5 anti-forensics techniques to trick investigators (+ examples & detection tips)

Adversaries use anti-forensics techniques to remain undetected during and after attacking targets. This makes it harder for incident response and threat-hunting teams to identify:
- Who attacked their infrastructure.
- The actions of the attacker.
- What the attacker’s objectives were.
- Which weak links allowed access to the network.
In this blog post, you’ll learn how to apply some common (and not-so-common) anti-forensics techniques to add to your repertoire of defensive and offensive skills.
Demonstrations and examples are included, so feel free to follow along!
1. Secure delete
When a file is created on a Windows operating system (OS) it’s recorded in the Master File Table (MFT): a critical artifact during incident response that contains a wealth of information related to all disk-based activities including file size, time and date stamps, permissions, and data content.
When a file is deleted, its content remains on the disk in unallocated space, which means the OS doesn’t know how to read the file content, but it’s still there. That happens because the file entry in the MFT file gets flagged as deleted in a record called File Record Segment. We can still see the file name, path, and associated timestamps from MFT, which makes it a valuable artifact.
Attackers, however, can completely wipe out the file’s contents and metadata from the disk to render it unrecoverable.
This happens because the unallocated space of the file is overwritten again and again until the previous original data is completely gone. Attackers usually overwrite with dummy data so nothing makes sense.
Let’s demonstrate this technique. First, we will create a text file and see the original MFT record, then securely delete it and see its record in the MFT file.
Here I created a text file named “HTB IS AWESOME.txt.”

Now let’s parse the MFT file to see the record of the original file.


We can see the filename, its path, its timestamps, etc. Next, let’s securely delete the file to see how it wipes it’s content.

Sdelete64.exe /p 5 “c:\users\CyberJunkie\Desktop\HTB Blog\HTB IS AWESOME.txt”
Here the /p flag specifies the number of times we want to overwrite the file data (five times in this case).

Now let’s parse and analyze the MFT file again.
Since we discussed before that the data and file name is overwritten with dummy data, we don’t know what to look for in MFT. This is why SDelete is a common anti-forensic technique—along with file contents, the file name, extension, and path are also manipulated.
Thankfully for us, we know the file MFT entry number because we analyzed the original MFT record above. We can search based on that.
The entry number was “580518.”

Here we see that the filename is wiped and the path too. So if we were analyzing an MFT file to find evidence of malicious files, and the attacker used this anti-forensic technique, we wouldn’t be able to find original malicious file names and paths.
This makes life for incident responders difficult, but thankfully there’s still room for us to detect this.
Recommended read: How to become a cybersecurity analyst in 2023.
Detection
Let’s analyze another Windows artifact called USN Journal. This file is our best bet for detecting the secure deletion anti-forensic technique.
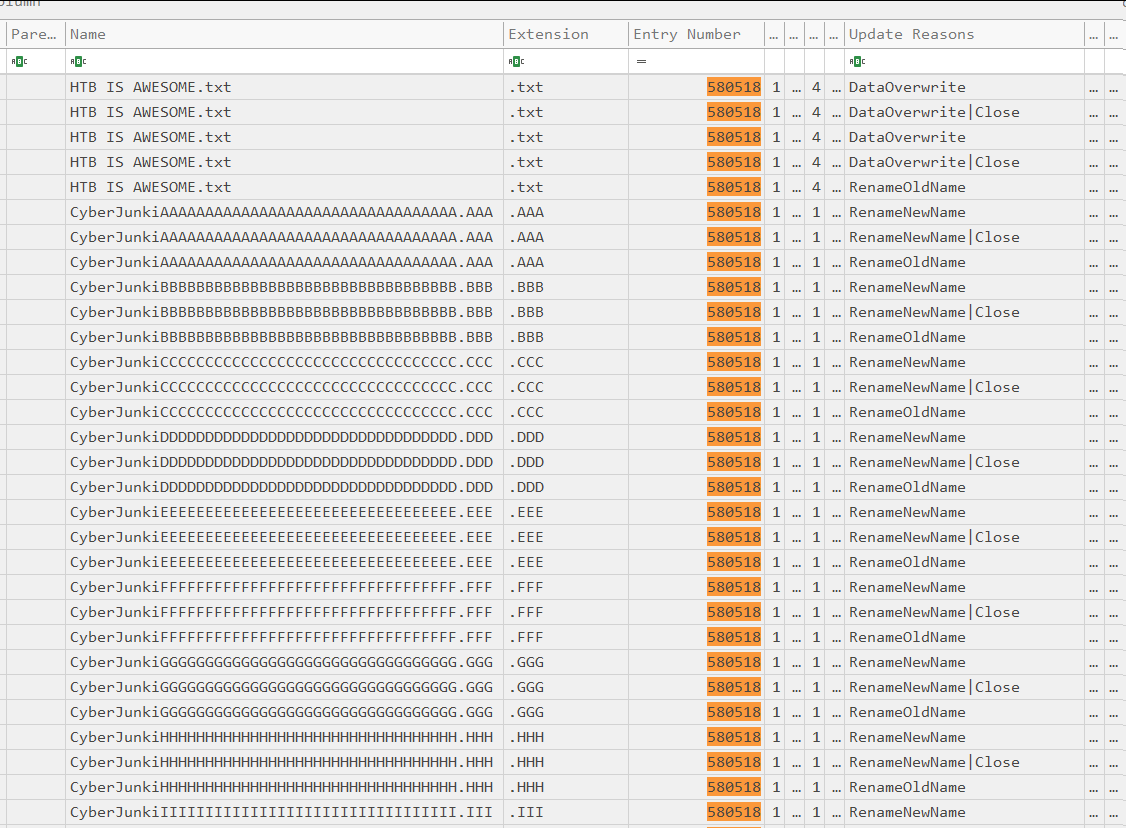
USN Journal gives us the original file name and keeps records of the changes to the file (like when the file is renamed). In the above picture, we can clearly see that:
- The file was renamed to “CyberJunkiAAAAAAAAAAAAAA.AAA” and then to “CyberJunkiBBBBBBBBBBBBB.BBB.”
- This is the same “HTB IS AWESOME.txt” file from the Entry Number Column.
If we don’t have access to USN Journal, another detection method is to use the MFT, as we can find evidence of the tool used by the attacker to cover their tracks.
In our example, we can easily find evidence of using the SDelete tool in MFT.
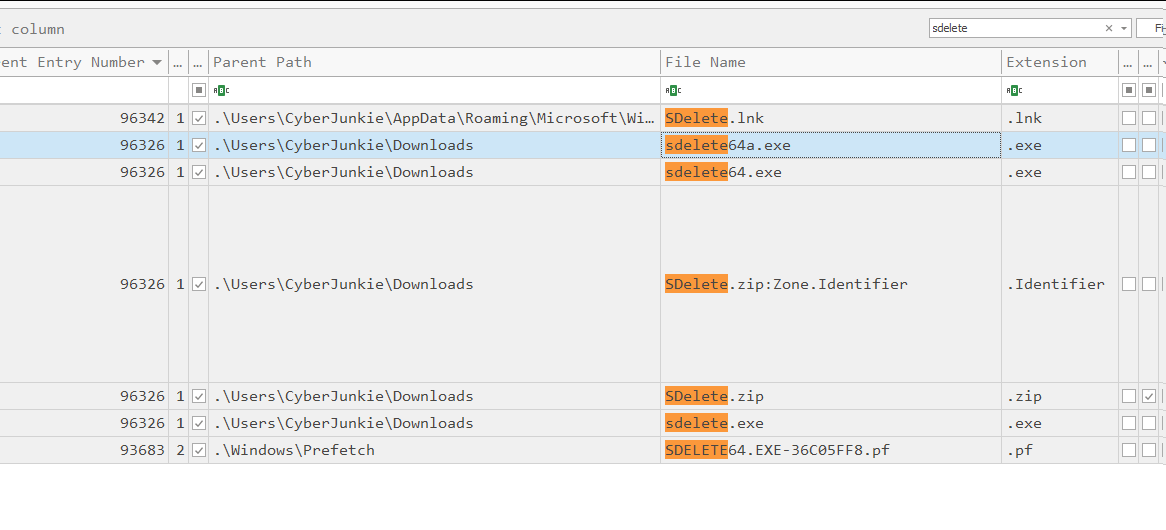
As investigators, we can then pair this with other Windows artifacts and start building evidence of tools used around the time of an incident.
2. Timestomping
Timestomping is a defense evasion technique threat actors use to hide malicious activity by modifying the timestamps. This tampers with evidence and can mislead forensic teams during incident analysis.
Example: An attacker runs a malicious file at 12:30 PM on 12th April 2023, but timestomps the file to 2:00 PM on 13th December 2020. So when investigated, the file timestamps (like created timestamps, last access timestamps, etc.,) will show the false 2020 date.
So how does timestomping work?
There are 2 types of attributes in the MFT file recording timestamps:
- $STANDARD_INFORMATION ( $SI): works at the user-level space using a set of API calls.
- $FILE_NAME ($FN): works at the kernel level and can only be modified by the kernel itself.
When attackers timestomp a file, the timestamps changed are reflected in the $STANDARD_INFORMATION attribute. Since the $FILE_NAME attribute is not modified, we can compare the timestamps of both these attributes in the MFT record for the file and find evidence of timestomping.
This is a general approach to timestomping and detecting it isn’t too difficult, as we just need to compare $SI and $FN attributes.
Let’s create a file and timestomp it using a tool called timestomper.

Here we can see the creation date timestamp, which is the time I created this file:

TimeStomper.exe -z 8-23-2018 09:06:09 -p C:\Users\CyberJunkie\Desktop\HTB_TIMESTOMPING\malicious.exe
This command sets all timestamps of the file to the specified timestamp, which is 23rd August 2018, 09:06 AM.
Now let’s visit the file in Windows Explorer to see the changed timestamp.

Here we can see that the time has changed and shows that the file was created in 2018.
The time here shows 2:06 PM, but we set it to 09:06 AM. This is because my system time is UTC+5 and Windows shows time in System Configured Time Zone although in the backend, Windows stores time in UTC, so when we analyze the MFT we will see the time in UTC which will be 09:06 AM.
Detection
Now let’s analyze the MFT and see how we can detect this technique.

Here we can see that created0x10 represents $SI and has the manipulated timestamps, but created0x30 represents $FN and persists in the original timestamps.
3. Clearing event logs
Event logs are records of activities (events) that occur on a Windows endpoint. They provide valuable information and visibility on what happened at a specific time.
When attackers clear event logs, it prevents those event logs from being sent to the Security information and event management (SIEM) tool, which in turn prevents any alerts from being raised—as alerts are triggered by logs, and since the logs themselves are deleted, there’s no way to raise security incident alerts.
While there’s no workaround for recovering deleted event logs, you can still detect when an attacker utilizes this anti-forensic technique.
Let’s assume the role of an adversary and perform an action on the endpoint that will generate some events in event logs.
In this example, I created a scheduled task which is often used by adversaries for persistence purposes:
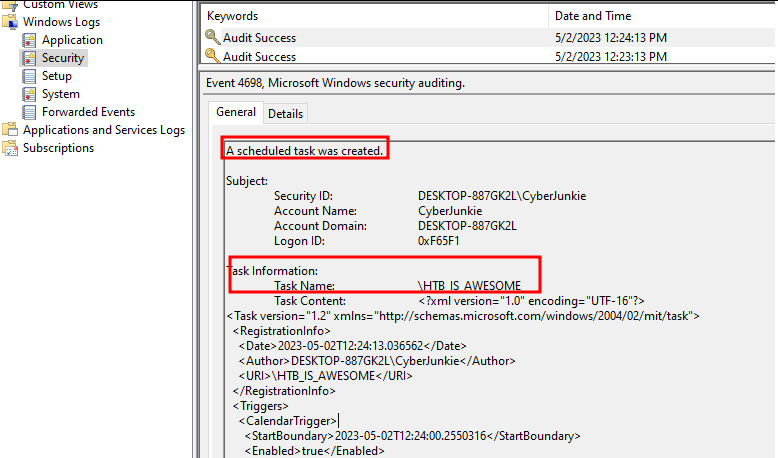

Creating this scheduled task generated an event in Windows security log. This is one of the most likely targets of attackers when clearing event logs as this log contains some juicy relevant information.
Now let’s clear the security log. We can do it from the event viewer, but since the command line is always cool, we’re going to be cool?.

wevtutil cl Security
Detection
When checking the Security Event logs, there is now only one event.

Whenever the Security Event log is cleared, an event is created recording the clear event. This ensures we still have a way to detect this technique and prevents attackers from completely hiding their tracks.
? Note: Whenever an alert is generated because of this event, it should be an investigative priority, because if triggered by an actual attacker, you’ll want to gather artifacts and logs before they destroy any more evidence and footprints.
Since there are many different types of event logs, some related to applications and Windows services, attackers can clear out any of them related to their use cases.
All cleared event logs are recorded in System Event logs, except the Security Event log which we discussed above as that is a common target of attackers and offers some extra separate logging.
Let’s assume that the attacker wants to clear Windows firewall logs to hide their actions when they added a firewall rule to allow C2 connections.
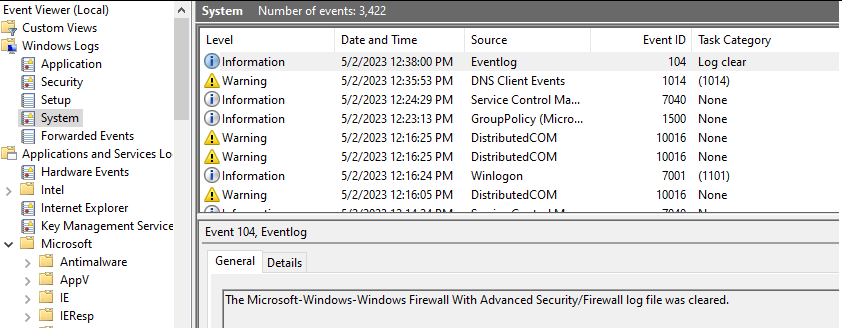
Here we can see the log-cleared event was generated under the System event log. We can also see details on which user cleared the log, and when they cleared it. This helps us build more context around the incident and perform root cause analysis.
Windows Security Event log ID 1102 and Windows System Event log ID 104 indicate the audit log(s) has attempted to be cleared, whether successful or not. This is an indicator of malicious activity as threat actors may often try and cover their tracks after performing illicit activities.
The presence of event ID 1102 or 104 are an indicator of that. My recommendation is that you set up a detection rule within SIEM, XDR, or EDR tooling utilized by your organization.
So in short, attackers can clear event logs and hide their actions (reconnaissance, persistence, lateral movement, data exfil), but still are forced to leave a huge indicator that they were present and performed malicious actions.
Security analysts can use the clear event log events to help build a timeline, and with the help of other artifacts from the endpoint, can perform root cause analysis.
4. Alternate data streams
Alternate data streams (ADS) in the Windows New Technology File System (NTFS) are a feature that allows additional data to be associated with a file or folder.
These streams are hidden from normal file operations and can be used to store metadata, such as author or security information, or even malicious code. ADS exists to provide a way to extend the functionality of the file system without breaking compatibility with existing applications.
This feature is widely used by legitimate applications and Windows to store metadata associated with files. However, this also means attackers can hide malicious files in plain sight in order to evade defense mechanisms and evade forensics procedures.
In this section, I’ll showcase a simple example in which I will hide a malicious executable with an innocent txt file.
Let’s first start by creating an innocent-looking txt file, and then we will have fun with it to hide our malicious exe file.
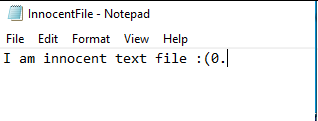
We can see that this is a text file. Let’s view this file in cmd too and then hide our malicious exe file in this.

Command to create an ADS: type HTB-ADS-STEALTH.exe > InnocentFile.txt:HTB-HIDDEN-ADS.exe
Here I first do a directory list for the file and we can see that this is just a txt file. Then I redirected our malicious exe file “HTB-ADS-STEALTH.exe” to our txt file and added in its alternate data stream as “HTB-HIDDEN-ADS.exe.”
Then I again do a directory listing for the file and we can still see that it’s just an innocent txt file.
?Note: You may notice that the txt file size is 28 bytes before hiding the exe and still remains 28 bytes even after hiding it. The original file size remains the same, but the available disk space has changed.
This can be more noticeable when attackers hide big files, like before data exfiltration or their offensive toolkits etc. From the upper level we cannot see the hidden data or won’t even know there’s anything hidden until we take a look at the raw file system.
Now we can still read the txt file, but we also can execute our hidden exe whenever we want. It’s like hiding in plain sight.

The hidden exe is executed from the second command.
Detection
We can see ADS in files through MFT or from the command line. For our current demonstration, we’ll view alternate streams of this txt file from the command line. During real-world analysis, however, this information can be found from the MFT.
Let’s run a PowerShell command which will display file streams for a specified file.
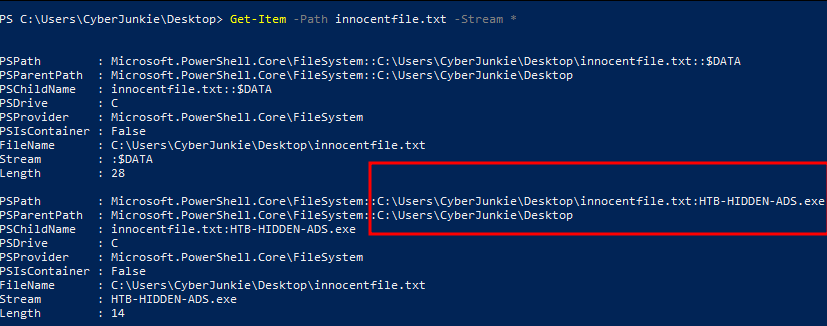
Get-Item -Path innocentfile.txt -Stream *
Here we can see that there’s a reference to an executable file, which is the one we created while hiding the original exe file.
Log tampering
Simply removing or deleting logs can hide an attacker’s footprints, but it’s a “noisy” way of doing so, as alerts will trigger analysts to dig deeper if logs are deleted.
But what if there was a way to remove and hide your footprints from logs without deleting and removing them? This is where log tampering comes in.
This anti-forensic technique sits so well with the digital environment that nothing seems ordinary at first glance. Adversaries can utilize built-in utilities in the OS to tamper with logs, which makes life harder for defenders and easier for adversaries.
Let’s take the wtmp log file as an example. This file keeps track of all system logins, shutdowns, and reboot activities. Utmpdump tool is present in Unix/Linux by default and is used to view utmp and wtmp files in their original raw format.
Let’s use it to see some past logins.
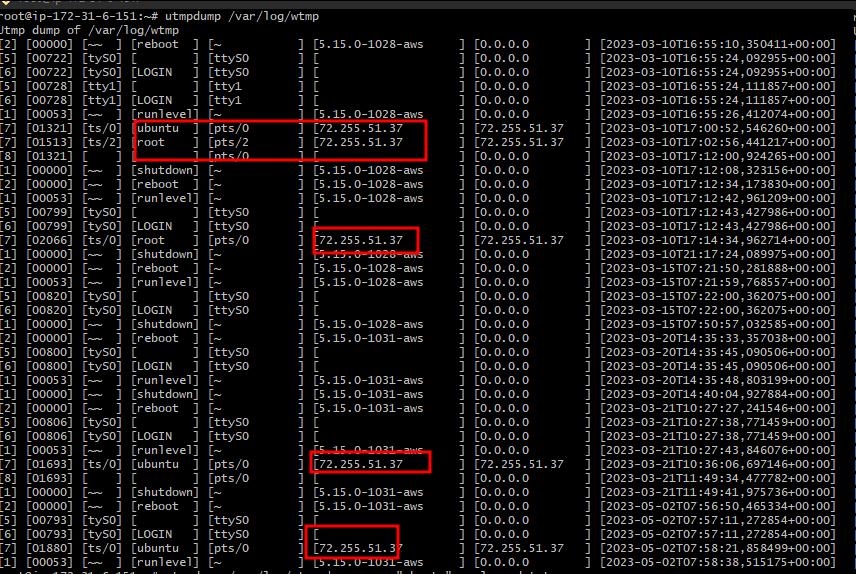
utmpdump /var/log/wtmp
We can see there are multiple login entries for user ubuntu and one instance of login for root user, all from the IP address “72.255.51.37”.
Let’s assume we are an attacker and this is our IP Address recorded for multiple times we logged in. We have fully compromised the server, but want to remain stealthy and hidden so we need to “scrub” our IP Address off the wtmp logs to conceal the indicator of compromise (IOC) from investigative eyes.
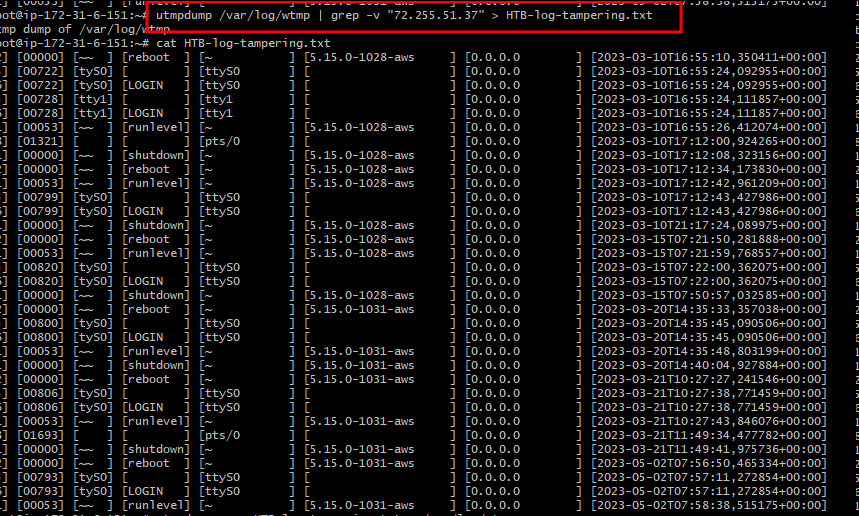
utmpdump /var/log/wtmp | grep -v “72.255.51.37” > HTB-log-tampering.txt
The above command is used to carve out all entries containing our attacker IP Address and redirect it to a text file called “HTB-log-tampering.txt”.
Now the content in this text file is the content that we want to be in the wtmp log file as it contains all entries except attacker footprints entries. Notice that there’s no reference to the attacker IP when we cat out the contents of the text file.
So an attacker can now redirect the text contents again in the wtmp log file, thus overwriting real wtmp entries and replacing them with carved entries.

Now the wtmp log should contain all the real entries except entries with attacker IP. Let’s read the wtmp file again.
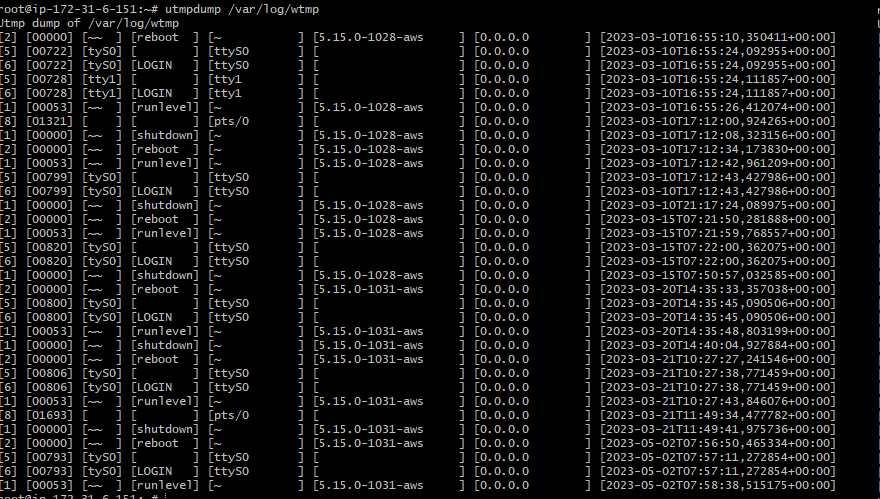
Detection
Let’s say you are an analyst analyzing wtmp logs. At first glance, there’s no indicator that anything is wrong. Everything looks great and normal. Enter timestamps!
There’s a reason why we forensics analysts love timestamps: because no matter what, time never lies (except during timestomping, hehe).
To detect if a log has been tampered with, note down the timestamp of the latest entry in the wtmp log file. Then find the timestamp of the wtmp log file itself. The latest entry timestamp should always match with log file timestamps.
If it doesn’t, then something clearly is not right and should be looked into. Let’s note down the timestamp of the latest entry in our wtmp log file.

Now see the timestamps of wtmp file itself.

We can see that there’s a difference of around 11-12 minutes between the last entry and the last access time of the file. Based on this, we can say that the attacker tampered with logs around 11-12 minutes after legitimate wtmp usage by the system.
Level up your defensive and offensive skills
And that’s a wrap! These anti-forensics techniques shed light on the cat-and-mouse game between attackers and defenders. Being aware of them helps defensive professionals think like—and therefore proactively defend against and hunt—attackers.
Want to practice executing these techniques in a realistic environment?
Sign up for HTB Labs and take advantage of our virtual lab environments to sharpen your offensive or defensive cybersecurity skills. If you want to practice specific techniques, there are also currently 13 active Forensic challenges and 21 Reversing challenges on the platform (with more to come soon!).
原文始发于CyberJunkie:5 anti-forensics techniques to trick investigators (+ examples & detection tips)
转载请注明:5 anti-forensics techniques to trick investigators (+ examples & detection tips) | CTF导航