Introduction 介绍
This blog post provides a walktrough on dynamically bypassing anti-debugging and anti-reversing defences in iOS applications. Furthermore, this blog post is using resources from OWASP MASTG and provides a comprehensive guide that discusses about mobile applications security testing and reverse engineering.
这篇博文提供了如何在 iOS 应用程序中动态绕过反调试和反反转防御的演练。此外,这篇博文使用了来自 OWASP MASTG 的资源,并提供了一个全面的指南,讨论了移动应用程序安全测试和逆向工程。
For the purpose of this blog post the ios-challenge-2 application is used to showcase the identification of the anti-debugging and anti-reversing techniques and also to present specific ways to bypass these security measures.
在本博文中,该 ios-challenge-2 应用程序用于展示反调试和反反转技术的识别,并介绍绕过这些安全措施的具体方法。
All the exercises in this blog post are accomplished using the radare2 tool in order to perform static analysis as well as the r2frida and r2ghidra plugins that used to perform dynamic analysis and runtime hooking on the target appication.
这篇博文中的所有练习都是使用该 radare2 工具完成的,以便执行静态分析,以及用于对目标应用程序执行动态分析和运行时挂钩 r2frida 的插件 r2ghidra 。
Further details about defense-in-depth measures such as code obfuscation, anti-debugging, anti-tampering, etc. can also be found at OWASP MASVS-RESILIENCE article.
有关代码混淆、防调试、防篡改等纵深防御措施的更多详细信息,请参阅 OWASP MASVS-RESILIENCE 文章。
Moreover, this blog post focuses on methods to bypass the following anti-debugging and anti-reversing techniques presented on the latest article Testing Resiliency Against Reverse Engineering provided by OWASP Mobile Application Security Testing Guide (MASTG)
此外,这篇博文重点介绍了绕过以下反调试和反逆技术的方法,这些技术 Testing Resiliency Against Reverse Engineering OWASP Mobile Application Security Testing Guide (MASTG) 在
-
- ptrace
- sysctl 系统
- getppid
- dynamic RE protections 动态 RE 保护
- Jailbreak detection 越狱检测
After installing the application on the iOS device, we run frida in order to identify the name of the installed application.
在iOS设备上安装应用程序后,我们运行 frida 以识别已安装应用程序的名称。

At this point we run the ios-challenge-2 application in order to have an overview of the application’s behaviour.
此时,我们运行 ios-challenge-2 应用程序以大致了解应用程序的行为。
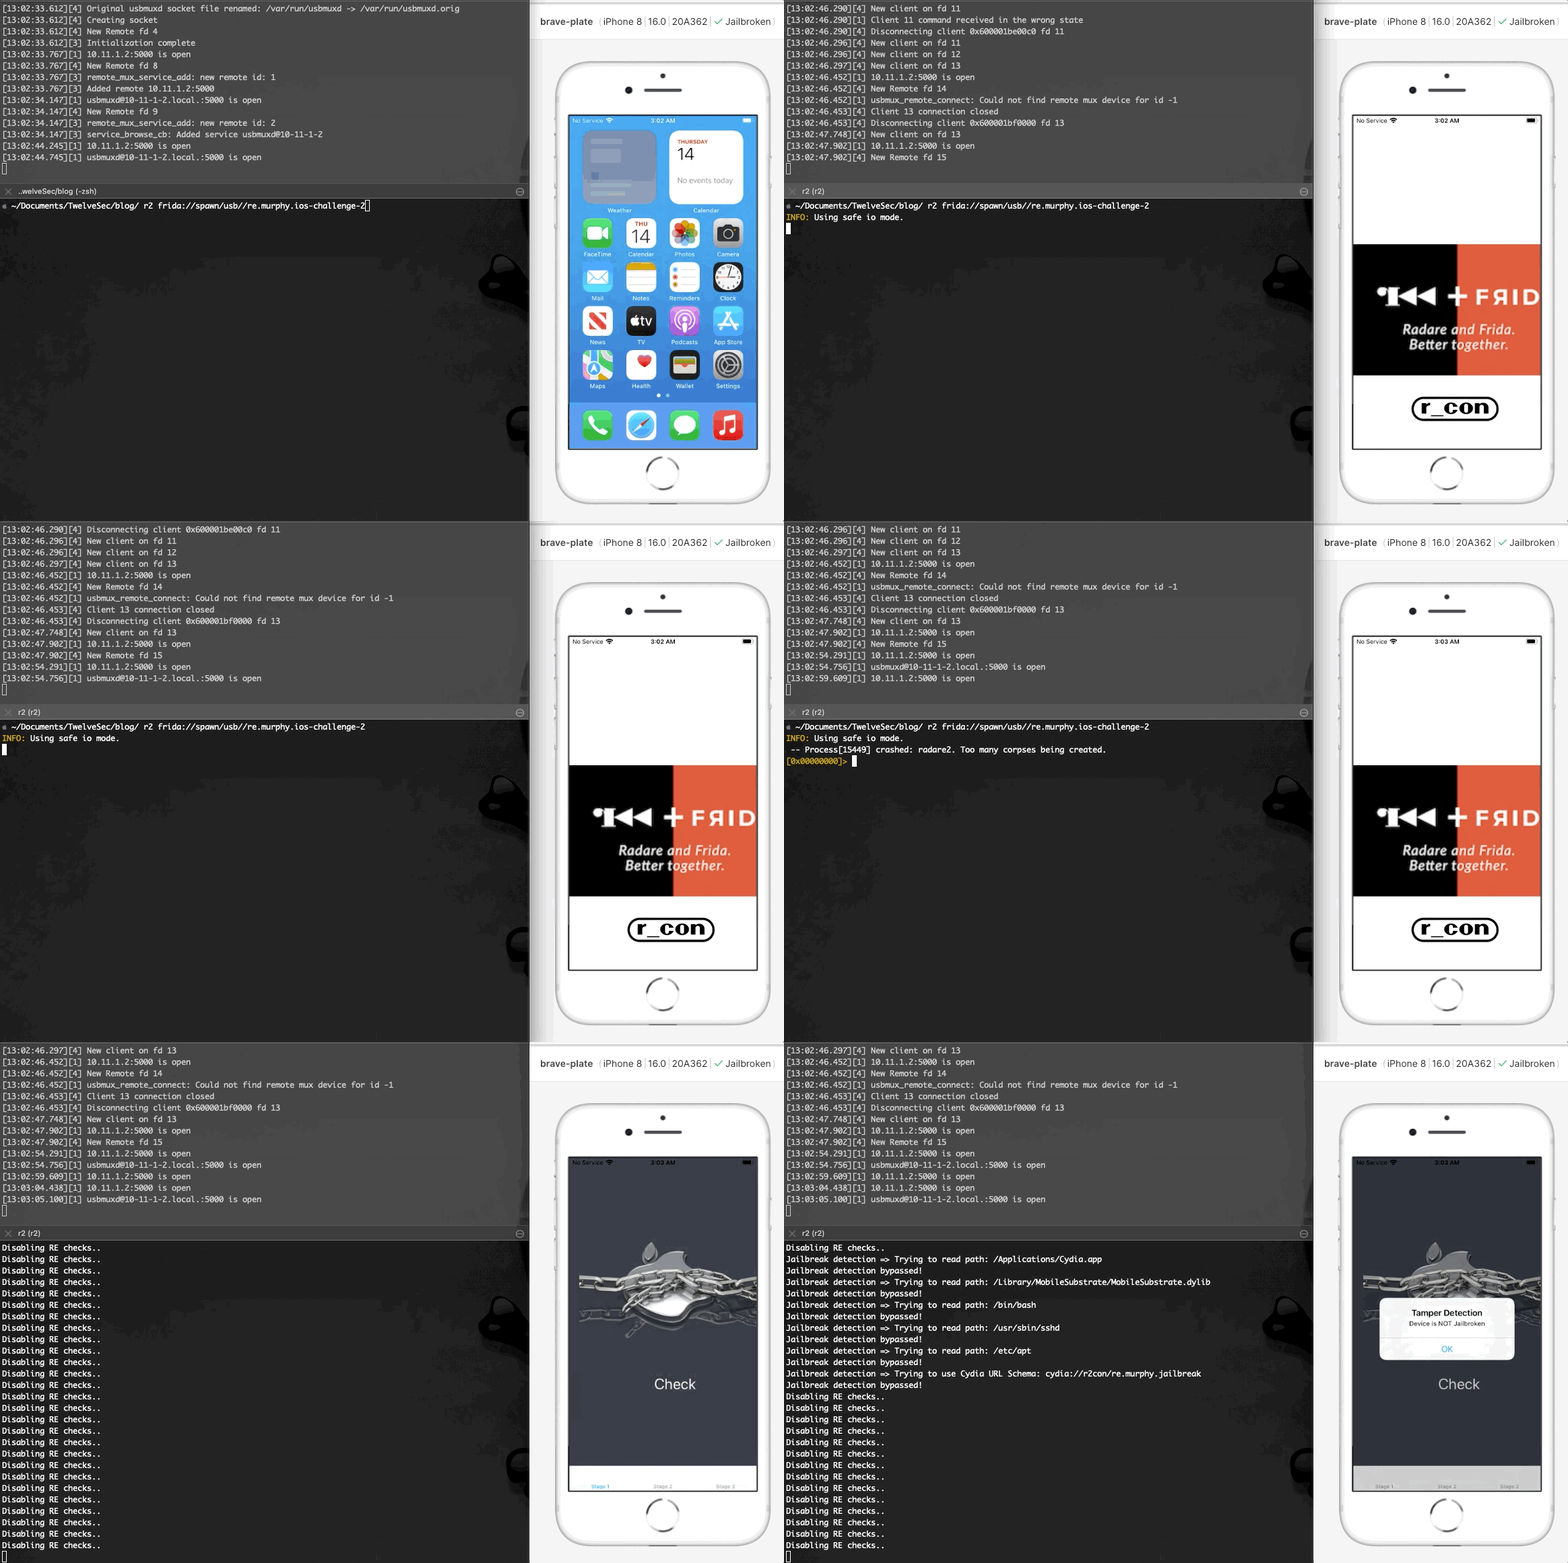
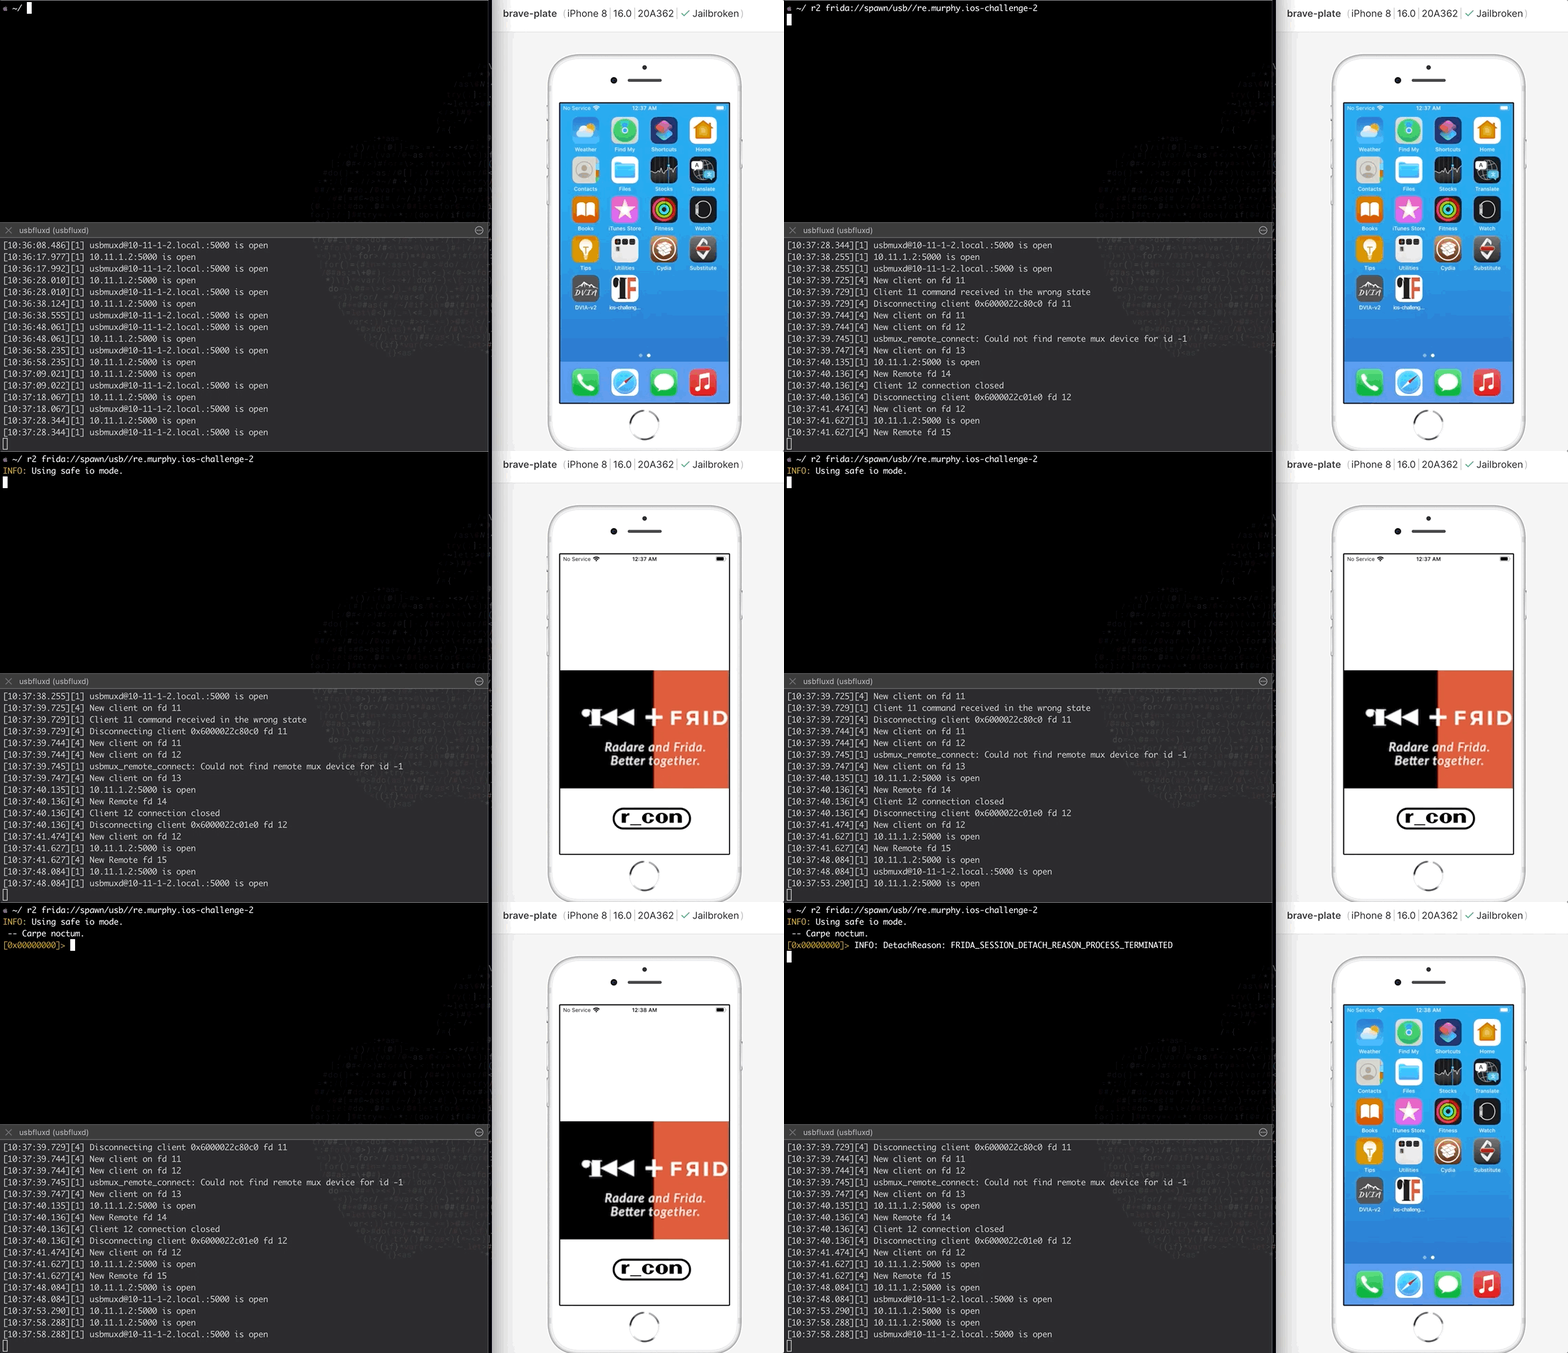
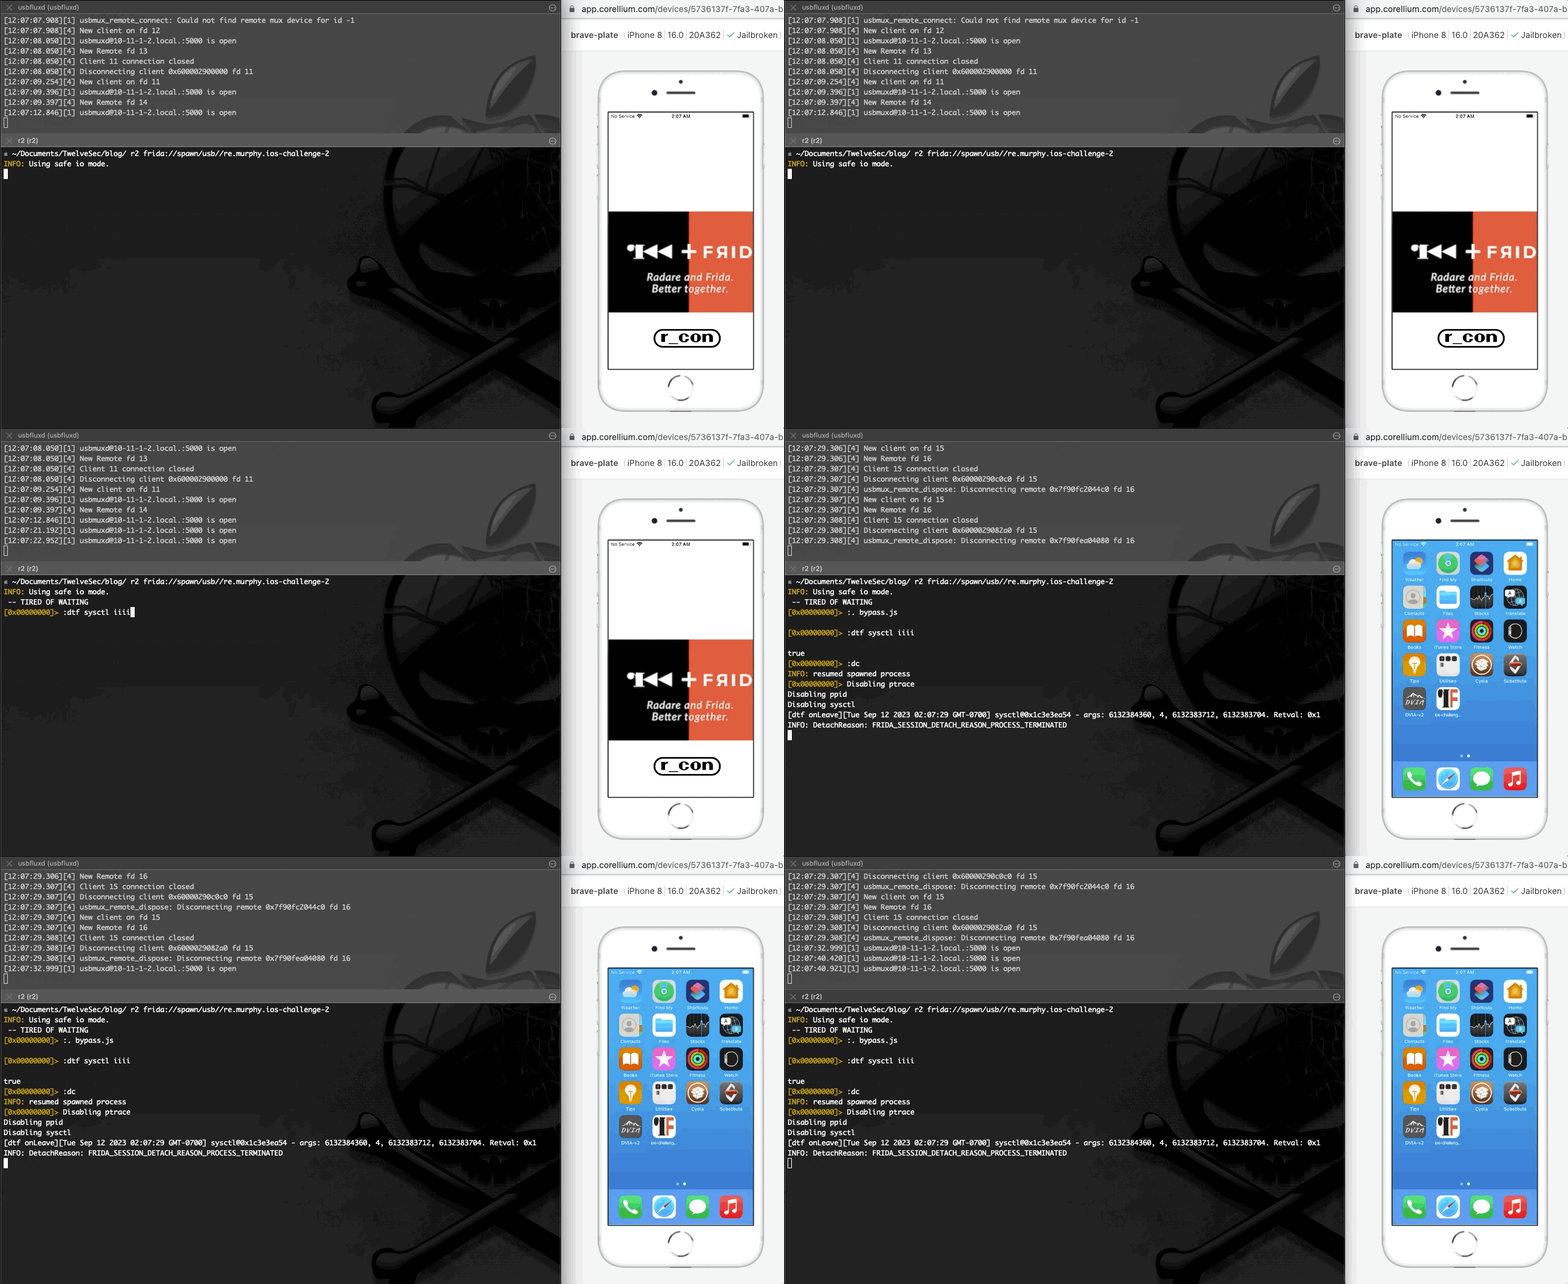
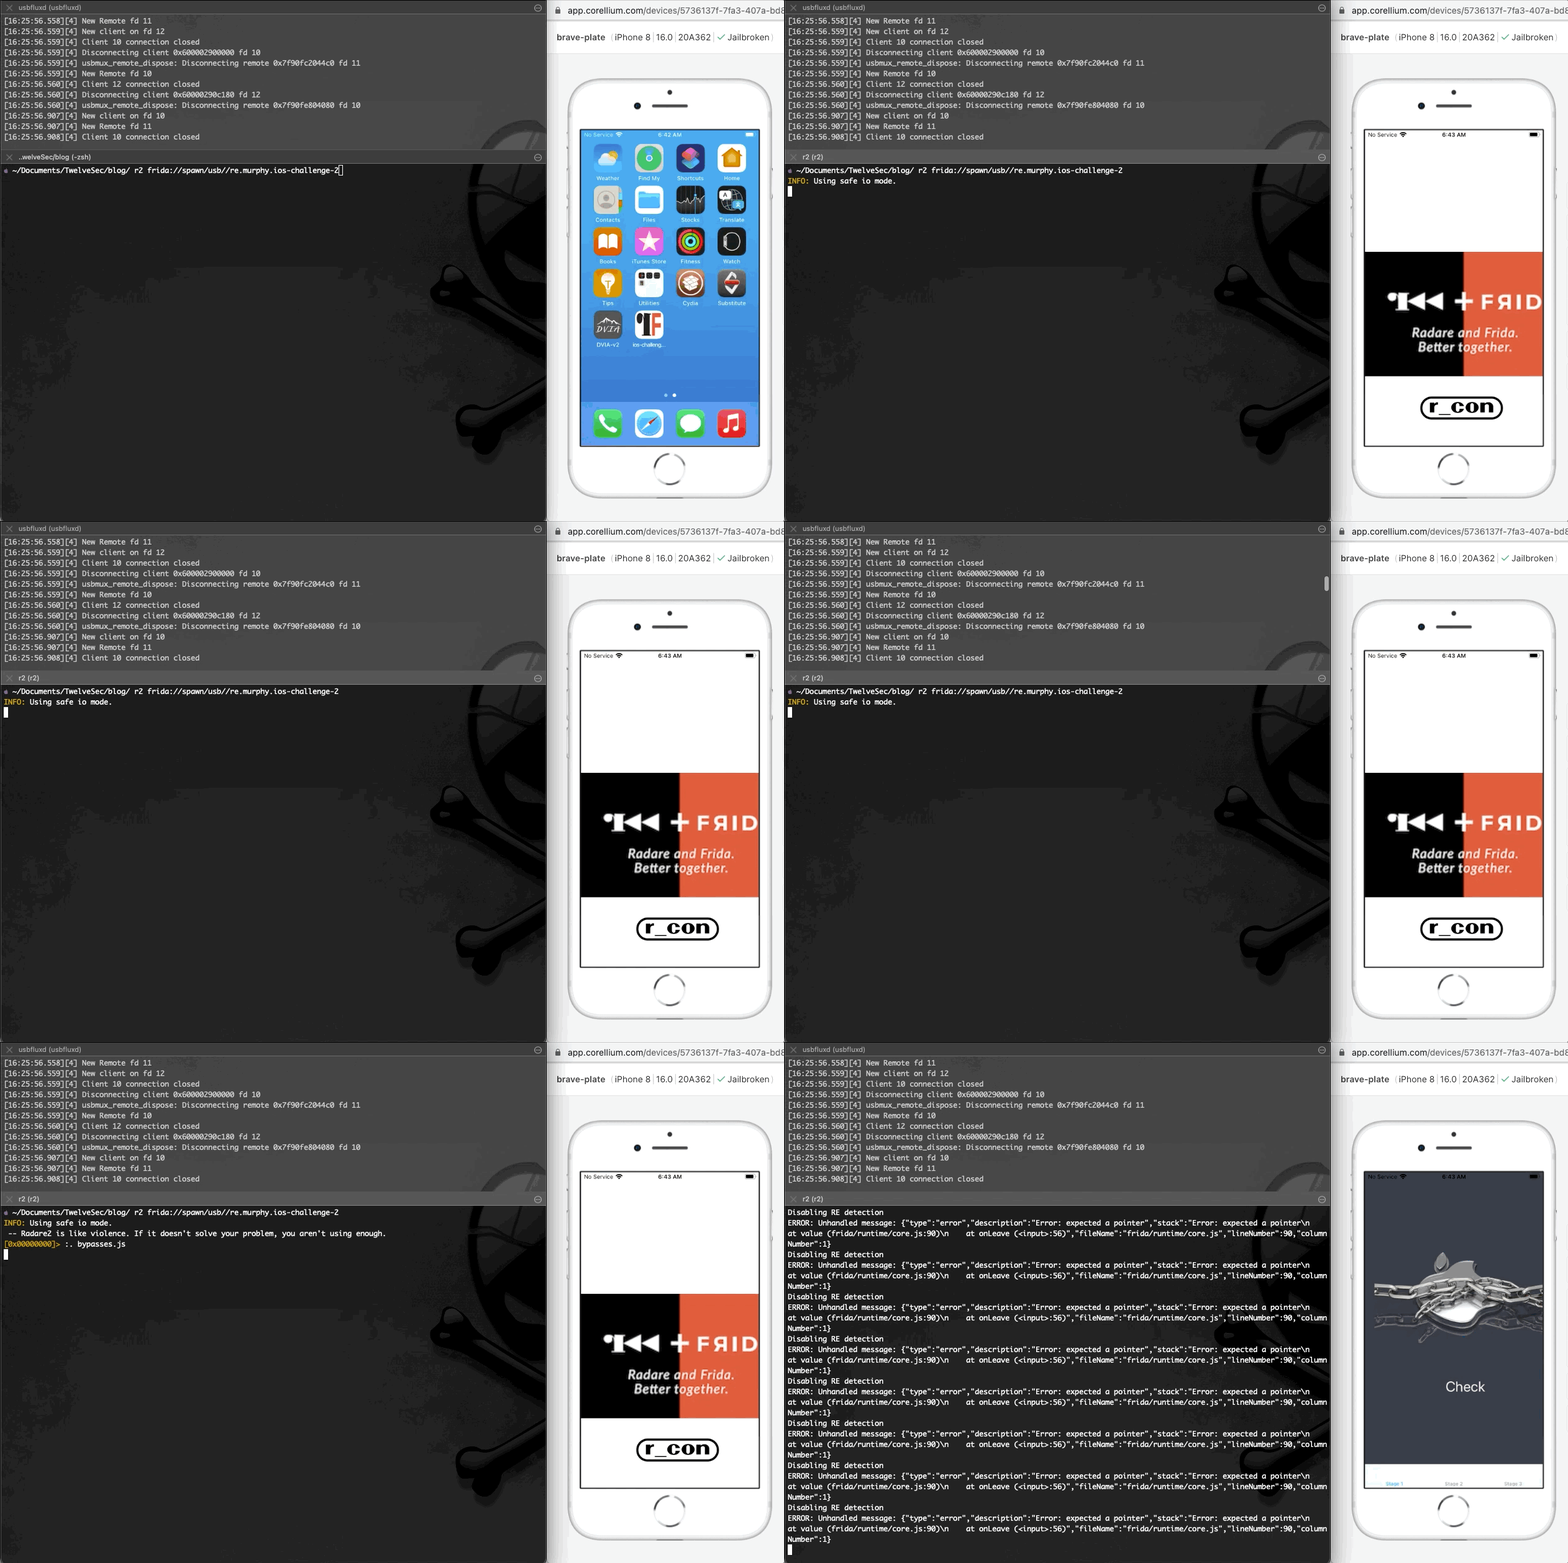
As seen at the image above, after installing and running the application it exits immediately. Using r2frida, the following command spawns the application, and after it exits, the detach reason eventually appears on the output. The detach reason indicates that the application performs anti-debugging checks that prevent it from running.
如上图所示,安装并运行应用程序后,它会立即退出。使用 r2frida ,以下命令生成应用程序,在应用程序退出后,分离原因最终会出现在输出中。分离原因表示应用程序执行反调试检查,阻止其运行。

Bypassing ptrace syscall anti-debugging defence
绕过 ptrace 系统调用反调试防御
This section discusses about the ptrace syscall that is used as a defence in order to prevent iOS mobile applications from entering into a debugging state. Furthermore, it showcsases a way to bypass such security measure.
本节讨论用作防御的 ptrace 系统调用,以防止 iOS 移动应用程序进入调试状态。此外,它还展示了一种绕过此类安全措施的方法。
The ptrace syscall can be found in several *nix operating systems. It is generally used for debugging breakpoints and tracing system calls. It is used from native debuggers to keep track. Also, this blog post covers only one feature of the ptrace syscall, the 'PT_DENY_ATTACH'.
ptrace 系统调用可以在几个 *nix 操作系统中找到。它通常用于调试断点和跟踪系统调用。它用于本机调试器进行跟踪。此外,这篇博文仅介绍了 ptrace 系统调用的一个功能,即 'PT_DENY_ATTACH' .
PT_DENY_ATTACH: This request is the other operation used by the traced process; it allows a process that is not currently being traced to deny future traces by its parent. All other arguments are ignored. If the process is currently being traced, it will exit with the exit status of ENOTSUP; otherwise, it sets a flag that denies future traces. An attempt by the parent to trace a process which has set this flag will result in a segmentation violation in the parent.
PT_DENY_ATTACH:此请求是跟踪进程使用的其他操作;它允许当前未被跟踪的进程拒绝其父进程将来的跟踪。所有其他参数都将被忽略。如果进程当前正在被跟踪,它将退出,退出状态为 ENOTSUP;否则,它会设置一个拒绝将来跟踪的标志。父级尝试跟踪设置了此标志的进程将导致父级中的分段冲突。
For further reading about ptrace check out this link
有关进一步阅读, ptrace 请查看此 link 内容
Now that we already runnning r2frida, lets spawn the application again but this time using the :dtf command which used to trace the address of the ptrace syscall.
现在我们已经运行 r2frida 了,让我们再次生成应用程序,但这次使用用于跟踪 ptrace 系统调用地址 :dtf 的命令。

As we see above, the application terminated again and from the args value (31) we are able to determine that the feature of the ptrace syscall is the 'PT_DENY_ATTACH'.
正如我们在上面看到的,应用程序再次终止,从 args 值 ( 31 ) 中,我们能够确定 ptrace 系统调用的功能是 'PT_DENY_ATTACH' .
According with OWASP-MASTG and iOS Anti-Reversing Defenses, the ptrace syscall is not part of the public iOS API. Non-public APIs are prohibited, and the App Store may reject apps that include them. Because of this, ptrace is not directly called in the code; it’s called when a ptrace function pointer is obtained via dlsym. The following code snippet represents the above logic.
根据 , OWASP-MASTG and iOS Anti-Reversing Defenses ptrace 系统调用不是公共 iOS API 的一部分。禁止使用非公开 API,App Store 可能会拒绝包含这些 API 的 App。因此,ptrace 不会在代码中直接调用;当通过 dlsym 获取 PTRACE 函数指针时,将调用它。以下代码片段表示上述逻辑。

Now that we know that the application immediately exits after running it with r2frida, we are in position to further check about anti-debugging / anti-reversing tecniques using static analysis. For this reason, we run the application using radare2 in order to perform static analysis to the revrersed code.
现在我们知道应用程序在运行后 r2frida 立即退出,我们可以使用静态分析进一步检查反调试/反逆技术。出于这个原因,我们运行应用程序是为了 radare2 对修订的代码执行静态分析。

As seen previously, the ptrace syscall is generally invoked via dlsym so we search for it as follows.
如前所述, ptrace 系统调用通常是通过 dlsym 以下方式调用的,因此我们按如下方式搜索它。

At this point we continue using radare2 in order to visualize the execution flow and to examine some assembly instructions in order to have insights of the validation checks in a lower level.
在这一点上,我们继续使用 radare2 以可视化执行流程并检查一些汇编指令,以便在较低级别中深入了解验证检查。

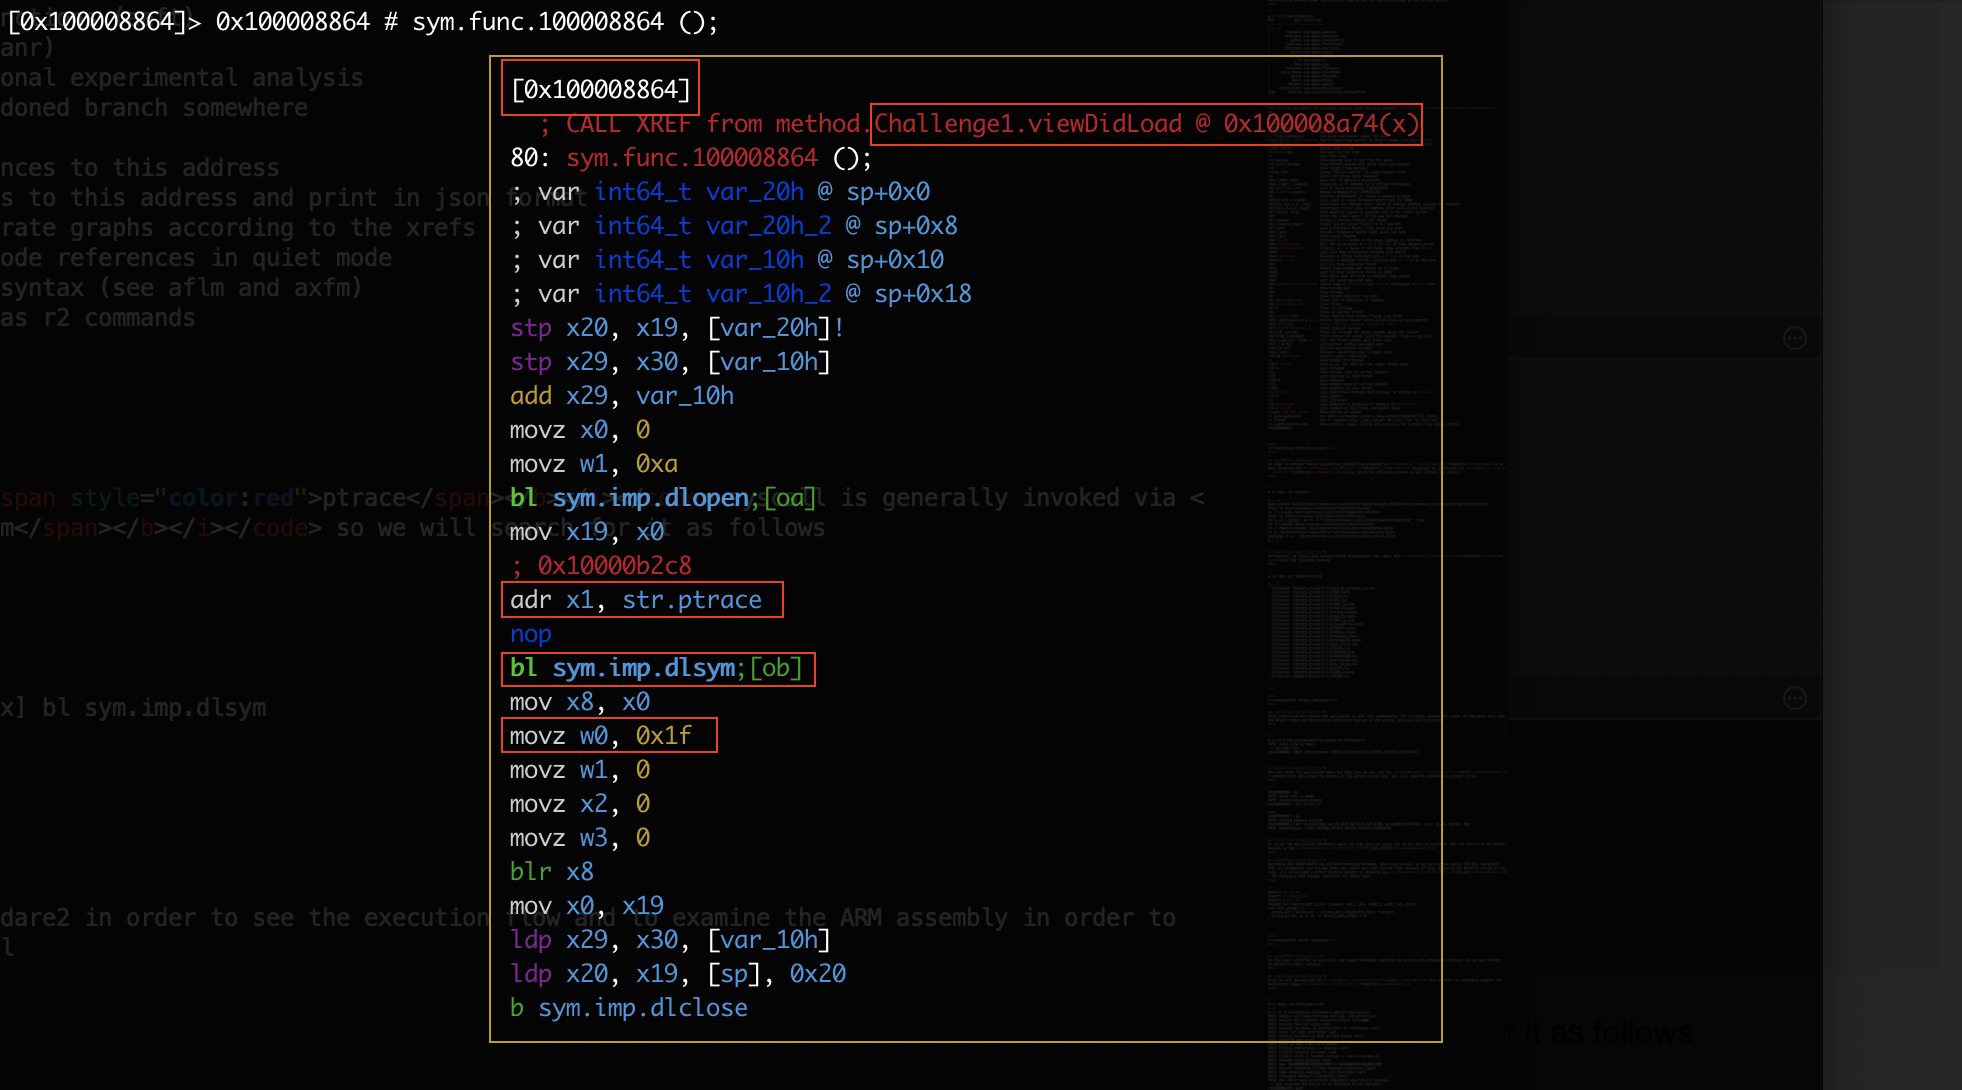
As we see at the screenshot below we have obtained a lot of information regarding the ptrace implementation. Specifically we see that the ptrace is called by Challenge1.viewDidLoad and also we are able to determine the feature of the ptrace from the 0xf1 hex value which is 31 in decimal indicating the 'PT_DENY_ATTACH' feature.
正如我们在下面的屏幕截图中看到的 ptrace ,我们已经获得了有关实现的大量信息。具体来说,我们看到 被 ptrace 调用 Challenge1.viewDidLoad ,并且我们还能够 ptrace 从 0xf1 十六进制值中确定特征,该十六进制值 31 以十进制表示该 'PT_DENY_ATTACH' 特征。
At this point we are able to examine the viewDidLoad method as we know it implements the ptrace syscall.
在这一点上,我们能够检查该 viewDidLoad 方法,因为我们知道它实现了 ptrace 系统调用。

We can see that the viewDidLoad method is located at 0x100008a4c address as seen above, so lets further check the validations on radare2
我们可以看到该 viewDidLoad 方法位于如上所示的 0x100008a4c 地址,因此让我们进一步检查以下 radare2 验证

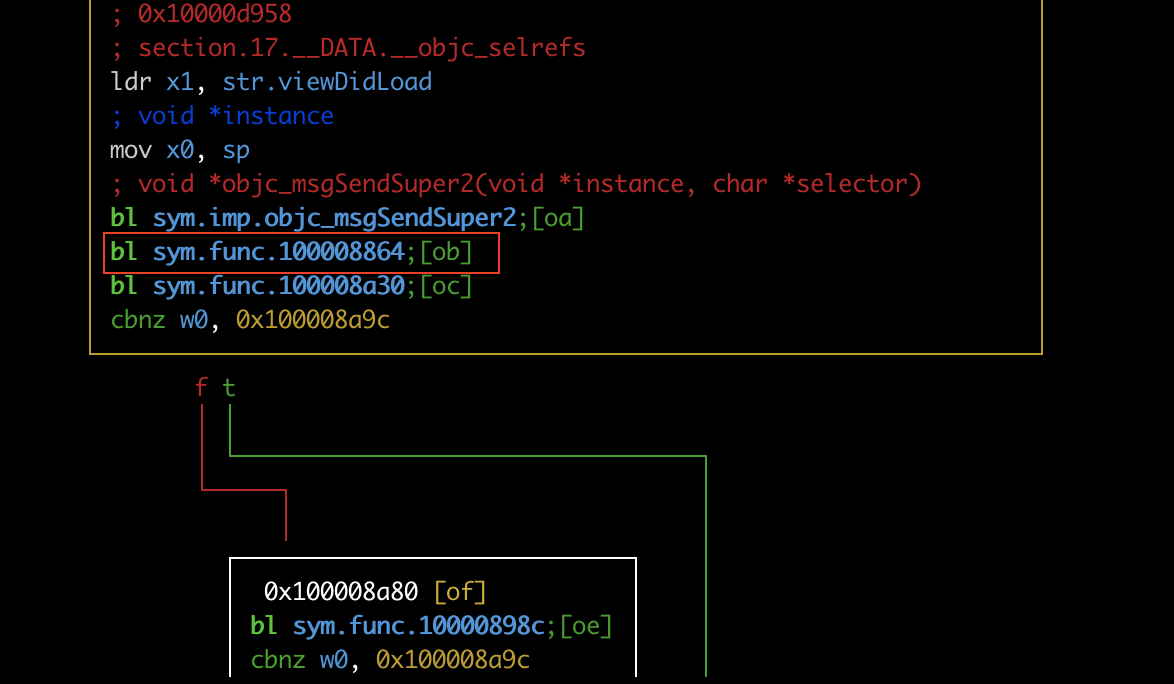
If we type ob which refers to sym.func.100008864 at radare2 we can then step inside the viewDidLoad low level assembly code block and from there we can use the r2ghidra plugin to decompile the code and have a higher level view of the viewDidLoad implementation.
如果我们键入 ob at sym.func.100008864 radare2 引用,那么我们可以进入 viewDidLoad 低级汇编代码块,从那里我们可以使用 r2ghidra 插件来反编译代码并获得更高级别的 viewDidLoad 实现视图。

From the decompiled code above, the first check is implemented using the ptrace ( sym.func.100008864 ) syscall. At this point we can bypass ptrace syscall using r2frida
As we saw earlier the argument passed to ptrace is 0xf1 in hex which indicates the ptrace feature. In order to disable ptrace syscall we can change this value to a non existing identifier, for example passing the value -1. The following code snippet can be used to dynamically manipulate the argument passed to ptrace

The following output indicates that the ptrace syscall has been disabled
以下输出指示 ptrace 系统调用已被禁用

Unfortunately if we run the application again it will exit immediately showing the same detach reason as before indicating that other defences might be enabled that should also be bypassed.
不幸的是,如果我们再次运行应用程序,它将立即退出,显示与之前相同的分离原因,表明可能启用了其他防御措施,这些防御措施也应该被绕过。
Bypassing getppid() anti-debugging defence
绕过 getppid() 反调试防御
This section discusses about the getppid() method that is commonly used as a defence technique in order to prevent iOS mobile applications from entering into a debugging state. In detail by checking the parent PID using getppid(), iOS applications can detect if they have been started by a debugger. In circumnstances where the iOS application has been started by a debugger, the getppid() returns a PID different than 1. If the PID=1 indicates that the application has been started from launchd process which is the first process running in user mode. Furthermore, this blog post will also showcsase a way to bypass such security measure. For further reading about getppid() refer to iOS Manual Pages
本节讨论 getppid() 通常用作防御技术的方法,以防止 iOS 移动应用程序进入调试状态。通过使用 getppid() 检查父 PID 的详细信息,iOS 应用程序可以检测它们是否已由调试器启动。在调试器启动 iOS 应用程序的情况下,返回 getppid() 的 PID 与 1 不同。如果 PID=1 表示应用程序已从 launchd 进程启动,这是在用户模式下运行的第一个进程。此外,这篇博文还将展示一种绕过此类安全措施的方法。有关进一步阅读, getppid() 请参阅 iOS Manual Pages
At this point we are in position to perform further analysis in order to check for getppid() and then try to bypass it. As seen in the previous section we have accomplished to bypass the ptrace defence and now we should be able to continue with the second defence which is getppid().
在这一点上,我们可以进行进一步的分析,以检查 getppid() 并尝试绕过它。如上一节所述,我们已经绕过 ptrace 了防御,现在我们应该能够继续进行第二种防御,即 getppid() .
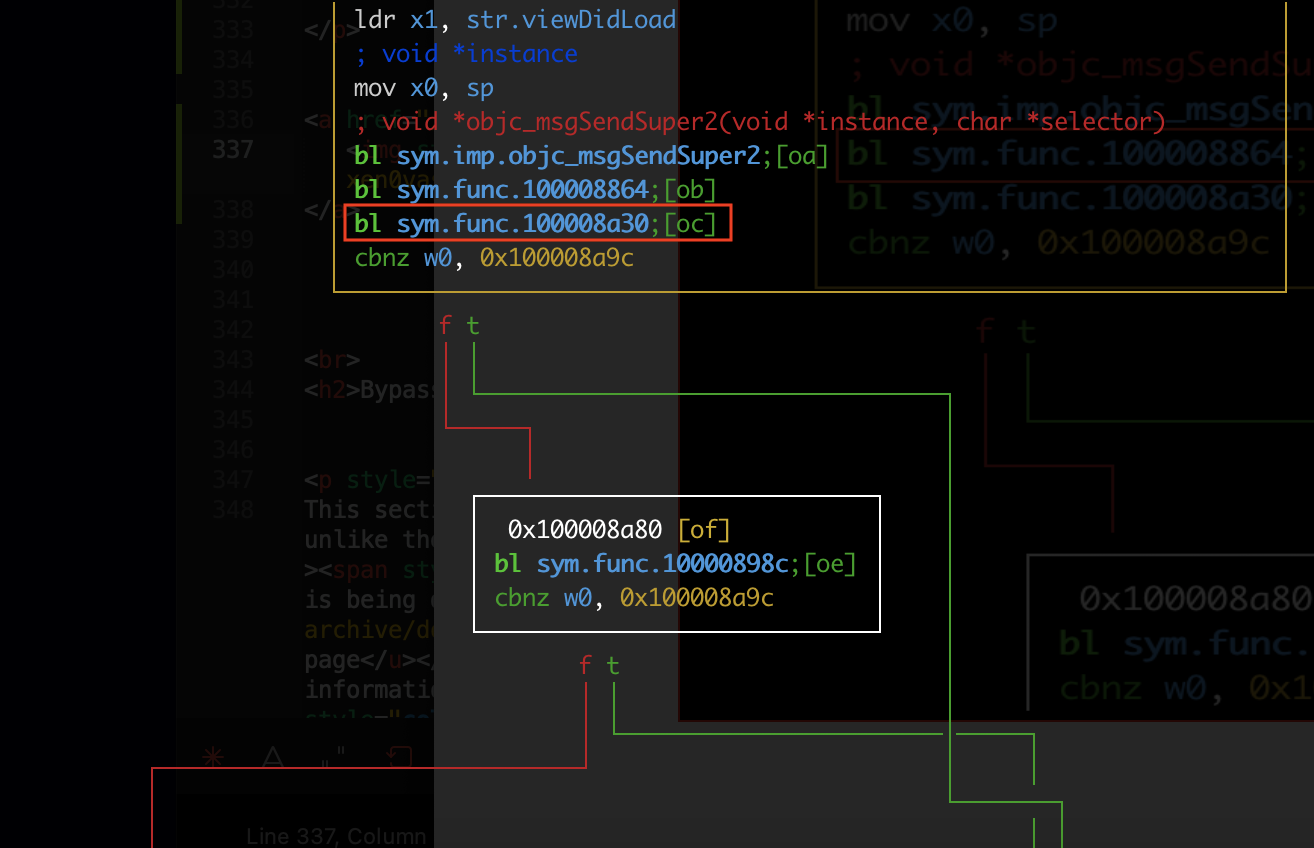
If we look closely at the program flow at radare2 we see that after the sym.func.100008864 which indicates the call of the ptrace function, the sym.func.100008a30 is also called that indicates the call of the getppid() method
如果我们仔细观察程序流, radare2 我们会看到在 sym.func.100008864 which 表示 ptrace 函数调用之后,也称为 sym.func.100008a30 is 表示 getppid() 方法的调用
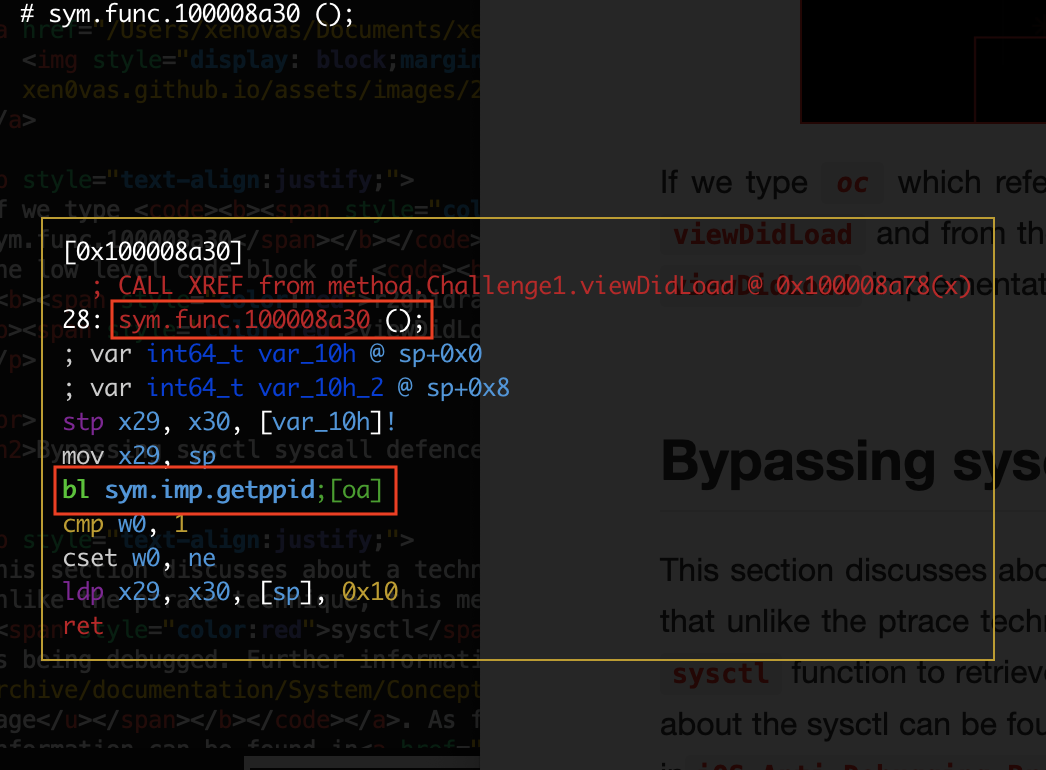
We can also see this in the following high level view of the decompiled code snippet using r2ghidra.


As seen from the decompiled function above it evaluates the expression iVar1 != 1. If the iVar1 is 1 it indicates that the the application has started from the launchd process. On the contrary, if the iVar1 is not 1 the function returns true which indicates the presence of a debugger.
In order to bypass getppid() defence we should intercept the getppid() module and focre the return value to be 0x01 which indicates that the application has been launched using the launchd process.
The following .js code snippet can be used in r2frida to dynamically manipulate the getppid() return value.

At this point we add the above snippet to a file named bypasses.js along with the previous snippet that bypasses the ptrace syscall technique as seen blow.

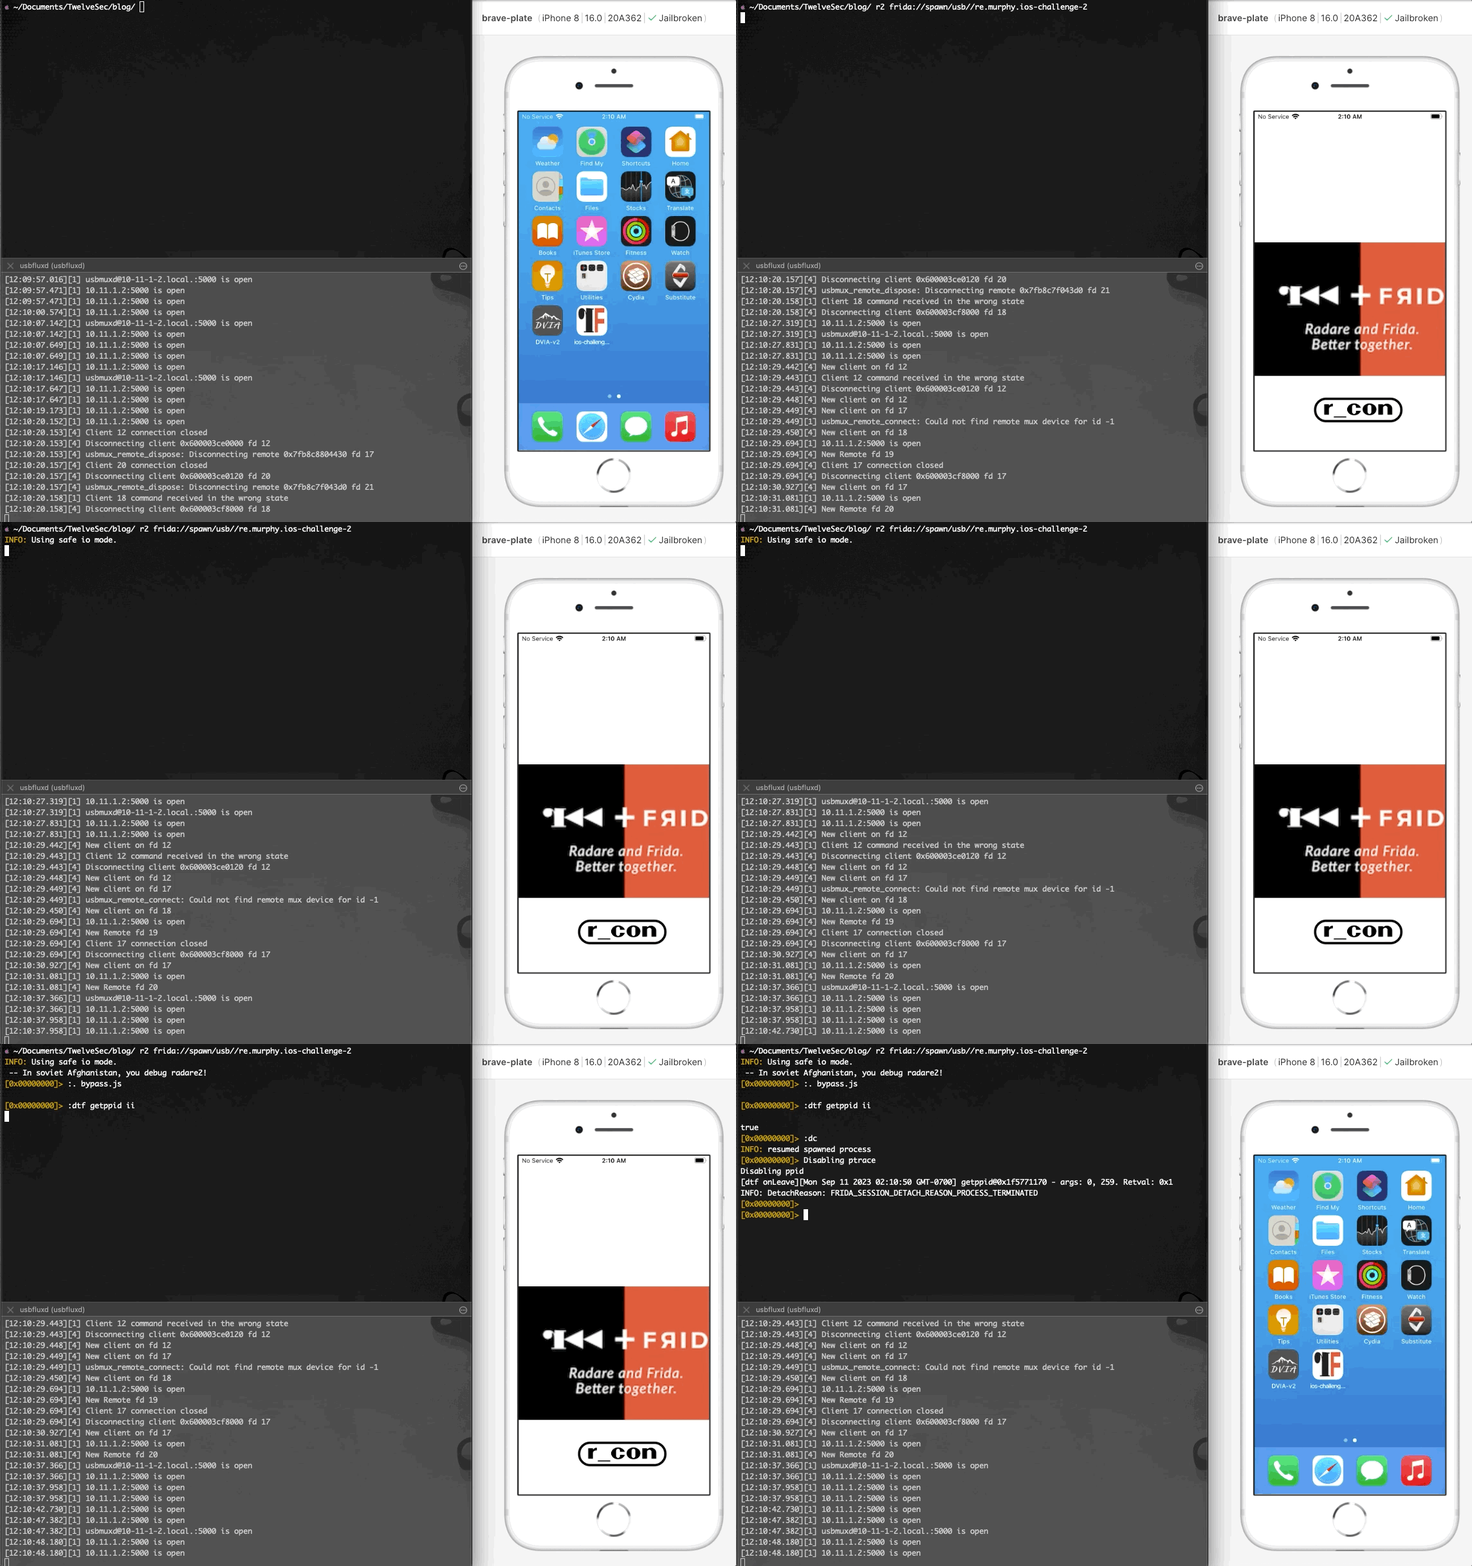
If we run the application again using r2frida we see that the application exits again but the :dtf command shows that the return value of the getppid() is 0x1 which indicates the successful bypass.

Nevertheless, the sudden application termination depicts that there are still defences that need to be bypassed.
Bypassing sysctl syscall anti-debugging defence
This section discusses about a technique that is commonly used to detect the presence of a debugger. It should be noted that unlike the ptrace technique, this method doesn’t prevent a debugger from attaching to a process. Instead, it uses the sysctl function to retrieve information about the process and determine whether it is being debugged. Further information about the sysctl can be found in the sysctl man page. As for the sysctl bypass technique, further information can be found in iOS Anti-Debugging Protections #2
At this point we are in position to perform further analysis in order to check for the sysctl syscall and then try to bypass it. As seen in the previous section we have accomplished to bypass the ptrace and the getppid() defences and now we should be able to continue with the third defence which is the sysctl syscall.
此时,我们可以执行进一步的分析,以检查 sysctl 系统调用,然后尝试绕过它。如上一节所示,我们已经绕过 ptrace 了 和 防御 getppid() ,现在我们应该能够继续进行第三种防御,即 sysctl 系统调用。
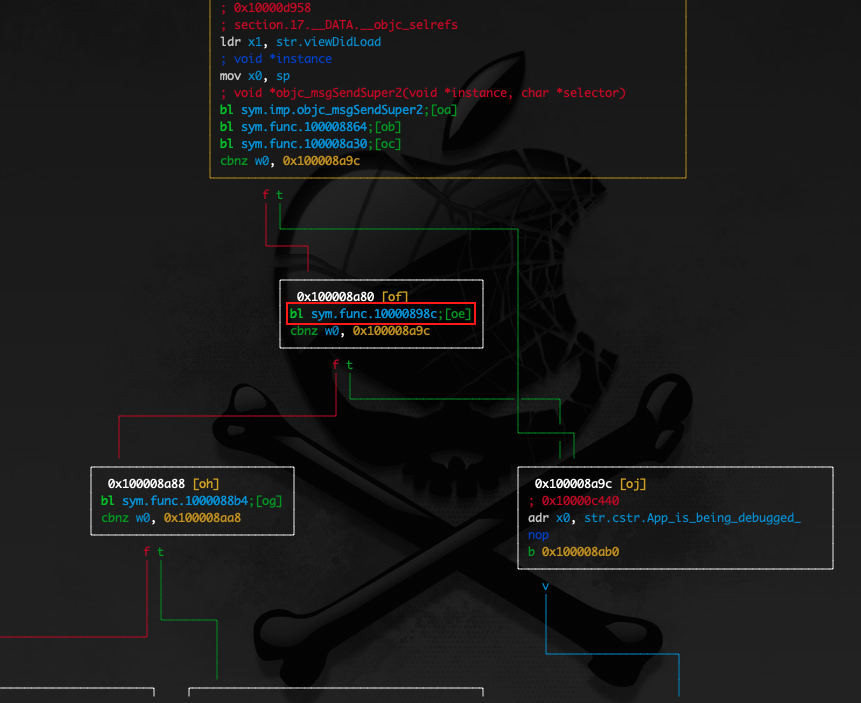
If we look closely at the program flow at radare2 we see that after the sym.func.100008864 which indicates the call of the ptrace syscall, the sym.func.100008a30 is also called that indicates the call of the getppid() method, and after these validations, we see that the sym.func.10000898c is called that indicates the call of the sysctl syscall
如果我们仔细观察程序流, radare2 我们会看到,在 sym.func.100008864 which 表示 ptrace 系统调用之后,也被 sym.func.100008a30 调用,表示 getppid() 方法的调用,在这些验证之后,我们看到 sym.func.10000898c 被调用,表示 sysctl 系统调用的
If we now step into the sym.func.10000898c we see the call of the sysctl syscall as seen at the decompiled code snippet below.
如果我们现在单步执行, sym.func.10000898c 我们会看到 sysctl 系统调用的调用,如下面的反编译代码片段所示。

According with Apple documentation archive, a code example is provided which checks the info.kp_proc.p_flag flag returned by the call to sysctl with the appropriate parameters. In case the sysctl syscall returns -1 it suppose to have detect that the application is being debugged, otherwise if any other value returned such as 0x0, the application is not being debugged.
In order to bypass the use of the sysctl syscall defence we should intercept the sysctl module and focre the return value to be 0x00 which indicates that the application has not been debugged.
The following .js code snippet can be used in r2frida to dynamically manipulate the return value of the sysctl syscall.

At this point we add the above snippet to the previous created file bypasses.js along with the previous snippets that bypass the ptrace syscall and the getppid techniques as seen blow.

we see again that the application terminates immediately even after these bypasses with the same detach reason as previously seen.

The immediate termination can also be seen at the following screenshot.
Bypassing dynamic RE protections
Mobile applications can be analyzed by dynamic instrumentation tools inspecting application’s behaviour at runtime. In terms of iOS application security there are tools such as Cydia Substrate, Cycript and Frida that used for such purpose. Other tools such as SSLKillSwitch2 and SSLKillSwitch might also be used in order to disable SSL/TLS certificate validation including certificate pinning.
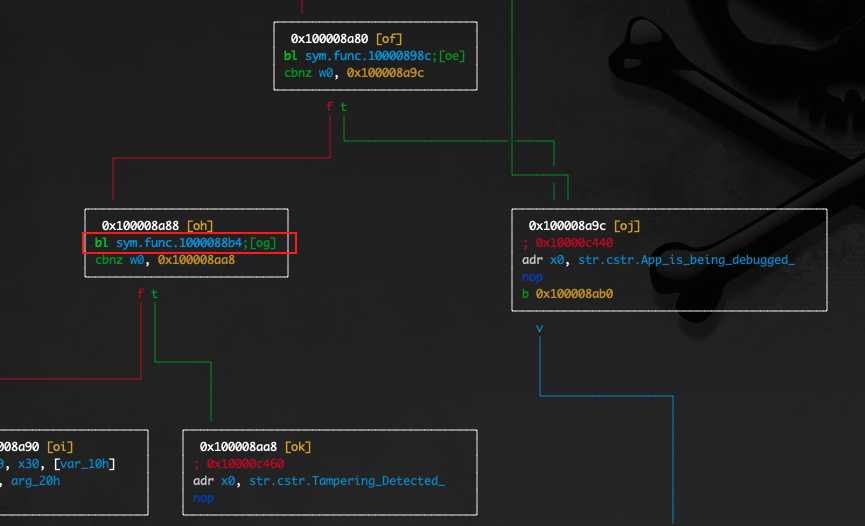
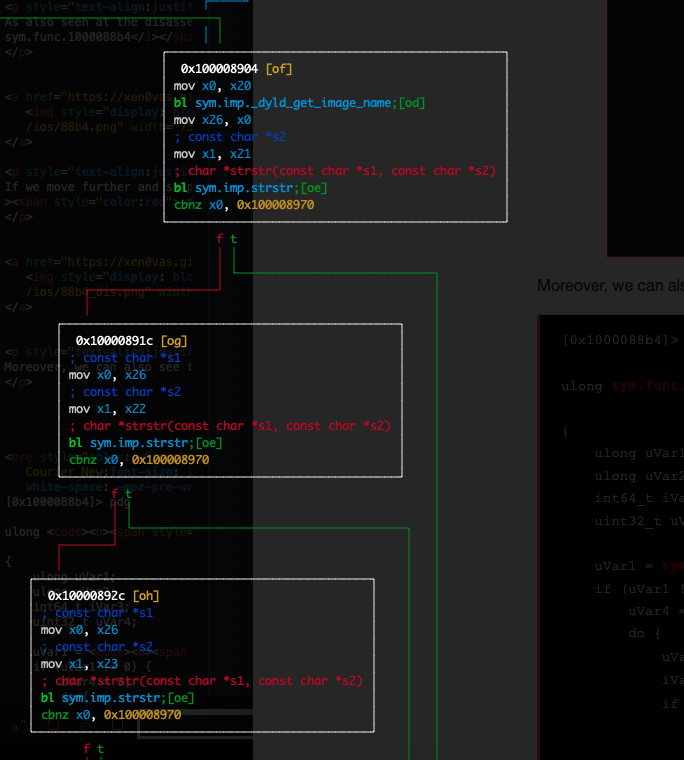
As also seen at the disassembled code below, there is a validation refering to the function sym.func.1000088b4
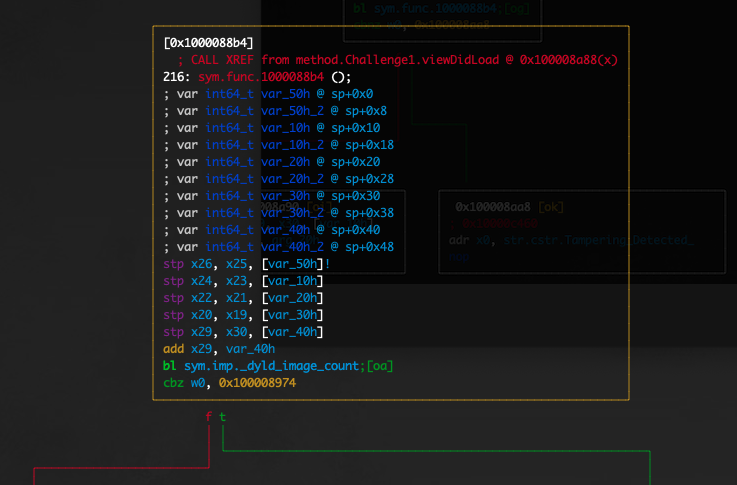
If we move further and step into the sym.func.1000088b4 we see a call to the _dyld_image_count() function which is used to get the number of loaded dylibs.
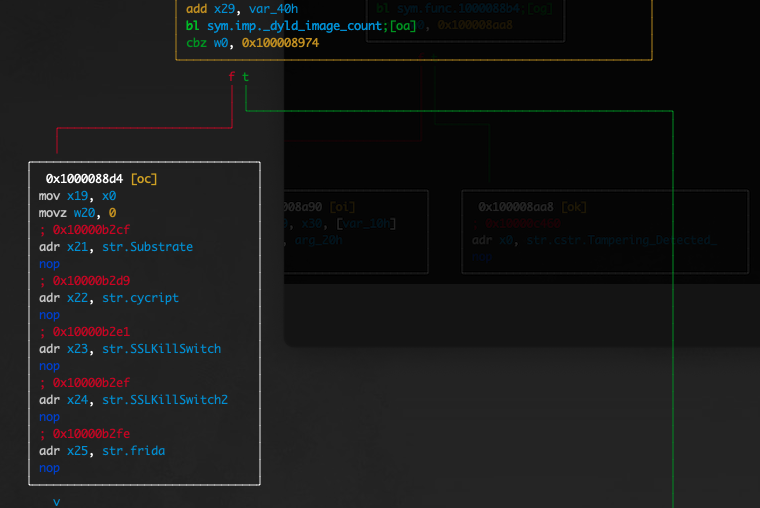
Moreover, we can also see that there are further checks regarding several instrumentation tools.
As seen from the decompiled code below, we have a clear view about the logic of the decompiled code where as also mentioned the _dyld_image_count() is first called to get the number of loaded dylibs. Then, for each index the _dyld_get_image_name()called to retrieve the name that will be verified. The verification is performed against several instrumentation tools and other tools that are used for TLS/SSL bypass as mentioned before. The application tries to detect the following list of tools
从下面的反编译代码中可以看出,我们对反编译代码的逻辑有一个清晰的了解,其中如前所述,首先调用 来 _dyld_image_count() 获取加载的 dylib 的数量。然后,对于每个索引, _dyld_get_image_name() 调用以检索将要验证的名称。如前所述,针对多个检测工具和用于 TLS/SSL 绕过的其他工具执行验证。应用程序尝试检测以下工具列表
- Substrate 酶作用物
- cycript
- SSLKillSwitch
- SSLKillSwitch2
- frida 弗里达

For further reading about the dylibs visit the iOS Manual Pages.
有关 dylibs 的进一步阅读, iOS Manual Pages 请访问 .
One way to bypass all the checks is to use a quick and dirty technique which intercepts the _dyld_get_image_name() function and manipulates the return value of the function, pointing to a non-existent string e.g. “null”.
绕过所有检查的一种方法是使用一种快速而肮脏的技术,该技术拦截 _dyld_get_image_name() 函数并操作函数的返回值,指向不存在的字符串,例如“null”。

At this point we add the code snippet above to the bypasses.js script as seen below.

If we run the bypasses.js script all the anti-debugging and anti-reversing techniques will be defeated. Although this is quick workarround to bypass RE checks, a drawback with this technique is that it causes errors as it actually breaks the functionality of the detected tool and eventually leads to exceptions.
A more elegant solution is to hook to the strstr() functions and manipulate the return value in order to disable all the checks. According with the iOS Manual Pages regarding the strstr(), the following code will be used.
一个更优雅的解决方案是挂接到 strstr() 函数并操作返回值以禁用所有检查。根据 iOS Manual Pages strstr() ,将使用以下代码。

As seen at the code above we initially use a const array with all the names of the intrumentation tools of our interest. Then after hooking to the strstr() function we give as input the names of the instrumentation tools one by one and then if the tool is detected the return value will be replaced to 0x00 thus the check will be disabled.
如上面的代码所示,我们最初使用一个 const 数组,其中包含我们感兴趣的所有 intrumentation 工具的名称。然后,在挂接到 strstr() 函数后,我们逐个给出检测工具的名称作为输入,然后如果检测到该工具,则返回值将被替换为 0x00 因此,检查将被禁用。
The modified bypasses.js script will be as follows.
修改后的 bypasses.js 脚本将如下所示。

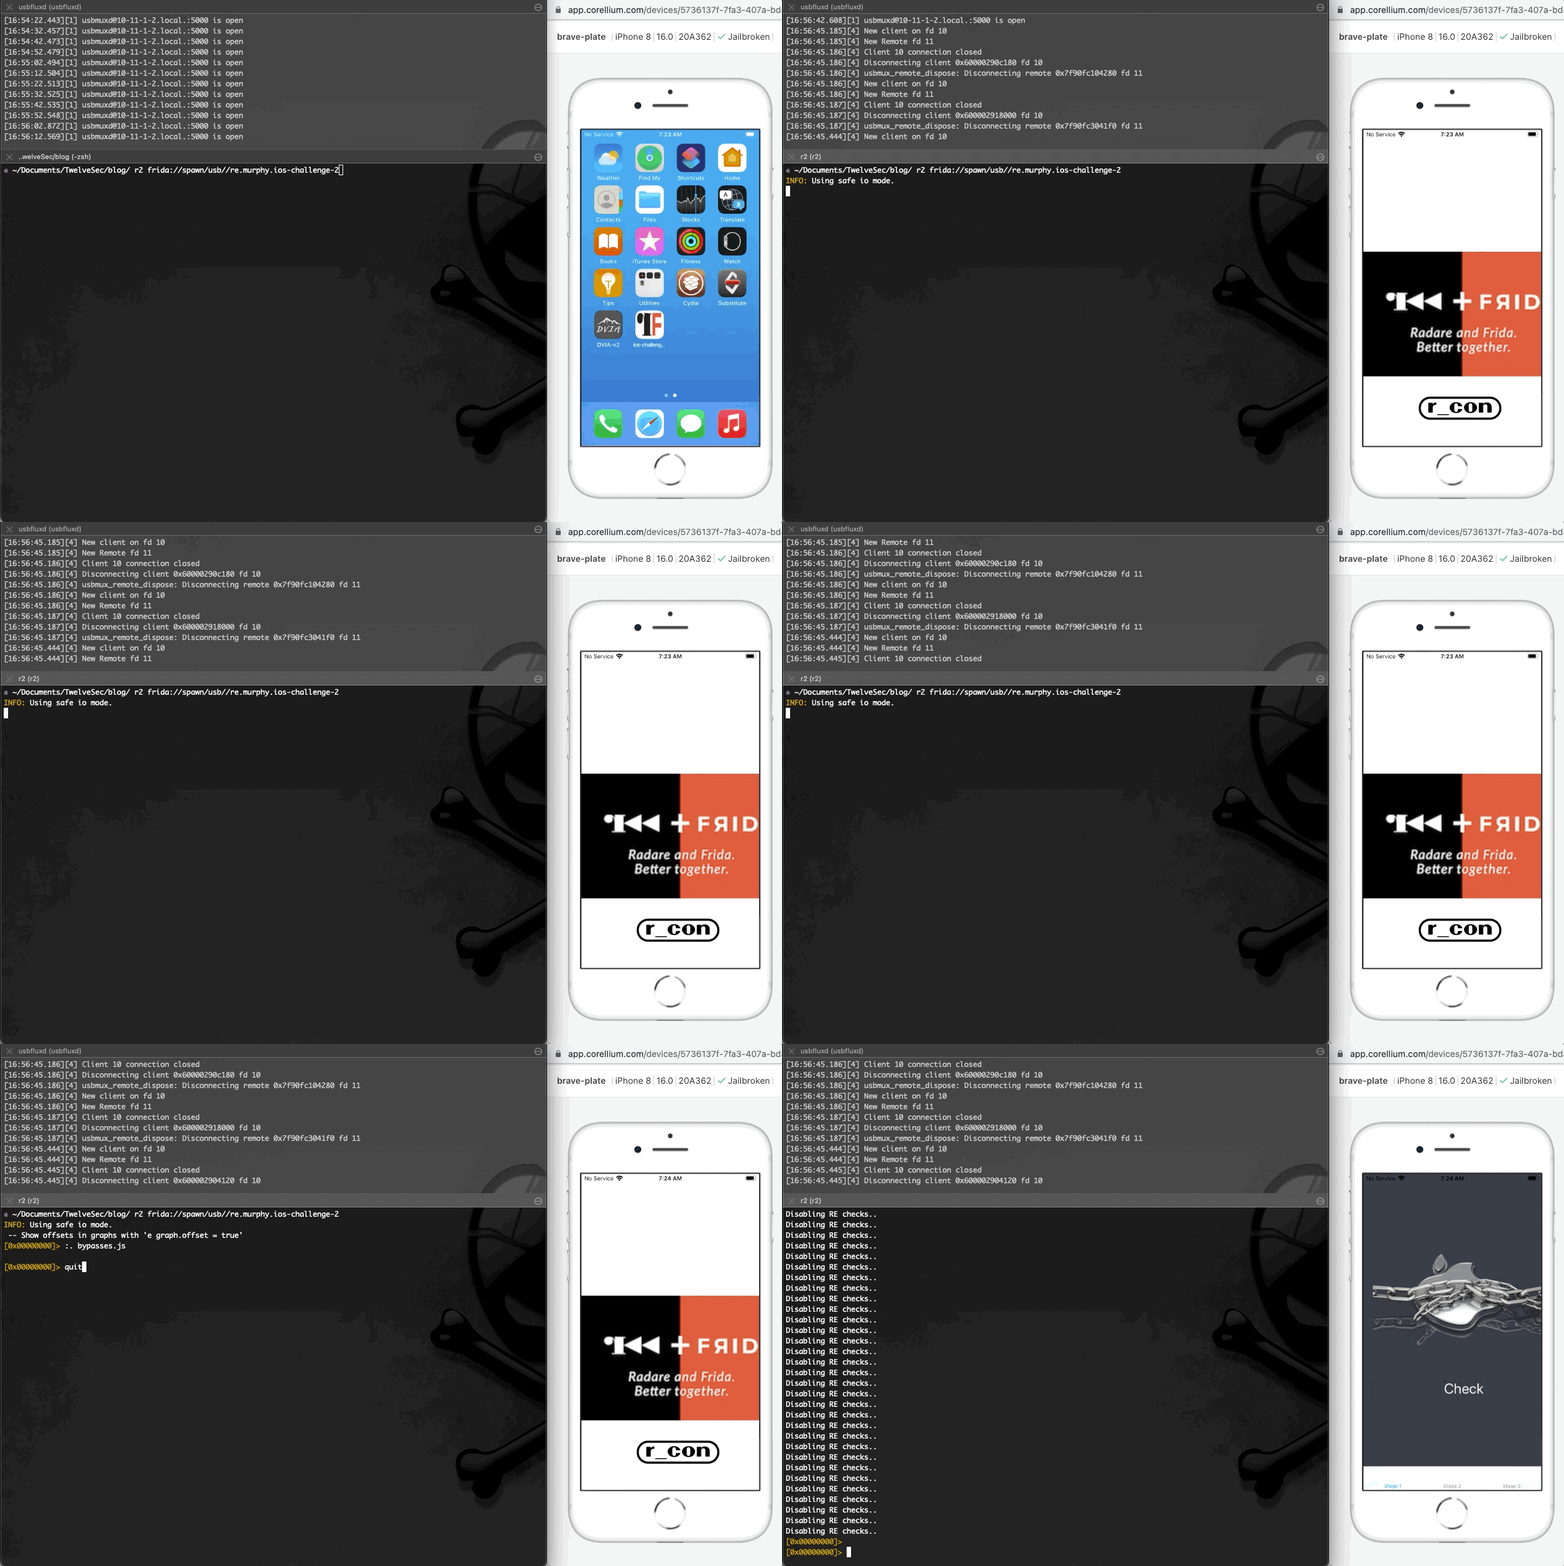
After running the above script with r2frida we see the following output
Bypassing Jailbreak detection
At this point we have disabled all the anti-debugging checks at the target application. There is one more validation that we have to bypass, and this is the jailbreak detection. Jailbreak detection is any technique implemented by developers to identify whether the application is running on a jailbroken device. It is crucial for applications to be able to detect if they are running in a Jailbroken device as the absent of this security mechanism could leave the application susceptible to security issues. Jailbreaking in iOS and Rooting in Android devices involves running a privilege escalation on the device. Also, the process of Jailbreaking gives the ability to alter or replace system applications, files, and settings, removing pre-installed applications, and running applications that require administrator-level permissions.
Moreover to ensure security of corporate data, it is recommended that jailbroken devices must not be used in organizations. Mobile Device Managment (MDM) solutions allow organizations to detect jailbroken devices in the network and also remove these devices once they are detected. After detection these devices cannot be enrolled into Moble Device Managment (MDM) and thus lose access to corporate data.
Checking at the Challenge1 class we identify two methods as seen at the snippet below

Using the above knowledge we are able to further examine the jailbreakTest1Tapped method to see the arguments it accepts

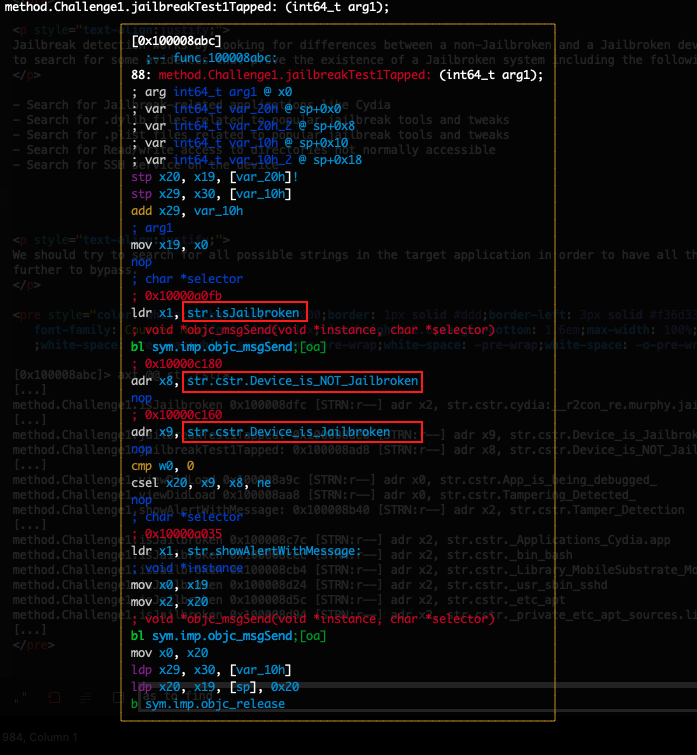
At the following screenshot we see the implementation of the jailbreakTest1Tapped method which gets the return value from isJailbroken method and raises the messages “Device is NOT Jailbroken” or “Device is Jailbroken” accordingly.
在下面的屏幕截图中,我们看到了 jailbreakTest1Tapped 该方法的实现,该方法从 isJailbroken 方法中获取返回值,并相应地引发消息“设备未越狱”或“设备已越狱”。
If we examine the code further we see the NSFileManager which is an interface to the contents of the file system and shares methods that can be called by multiple threads. As we see at the code, there are multiple checks that have to be exemined further. We should try to search for all possible strings in the target application in order to have all the paths and URLs that we try further to bypass. For further reading about the NSFileManager and its methods, refer to this link
如果我们进一步检查代码, NSFileManager 我们会看到 which 是文件系统内容的接口,并共享可以由多个线程调用的方法。正如我们在代码中看到的,有多个检查必须进一步执行。我们应该尝试在目标应用程序中搜索所有可能的字符串,以便获得我们尝试进一步绕过的所有路径和 URL。有关 NSFileManager 及其方法的进一步阅读,请参阅此 link

We shall also get a closer look to isJailbroken method to see the arguments it accepts.

Furthermore we do a more comprehensive search to find all possible implementations regarding the methods that might perform Jailbroken checks.
此外,我们进行了更全面的搜索,以找到有关可能执行越狱检查的方法的所有可能实现。

At a first glance, we see that at address 0x10000c140 at isJailbroken method, the URL cstr.cydia:__r2con_re.murphy.jailbreak used. Furtermore we need to search for more strings in order to find possible URLs and suspicious system paths.
乍一看,我们看到在 address 0x10000c140 at isJailbroken 方法中使用的 URL cstr.cydia:__r2con_re.murphy.jailbreak 。此外,我们需要搜索更多字符串,以找到可能的 URL 和可疑的系统路径。

Jailbreak detection works by looking for differences between a non-Jailbroken and a Jailbroken device. Some common techniques are to search for some evidences that prove the existence of a Jailbroken system including the following searches:
越狱检测的工作原理是查找非越狱设备和越狱设备之间的差异。一些常见的技术是搜索一些证明越狱系统存在的证据,包括以下搜索:
- Search for Jailbreak-related applications like Cydia
搜索与越狱相关的应用程序,如Cydia - Search for .dylib files related to popular jailbreak tools and tweaks
搜索与流行的越狱工具和调整相关的 .dylib 文件 - Search for .plist files related to popular jailbreak tools and tweaks
搜索与流行的越狱工具和调整相关的 .plist 文件 - Search for Read/write access to directories not normally accessible
搜索对通常无法访问的目录的读/写访问权限 - Search for SSH service on the device
在设备上搜索 SSH 服务
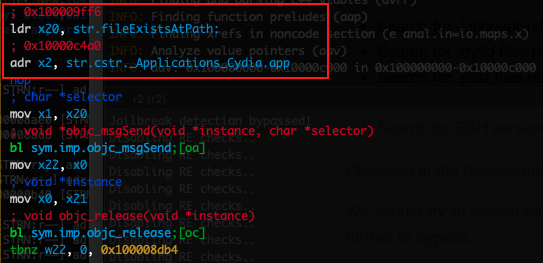
Checking at the disassembled code below we see a reference to fileExistsAtPath which we know that it is a method shared from the NSFileManager interface. We also see the instruction addr x2, str.cstr._Applications_Cydia.app which refers to the String "/Applications/Cydia.app".
检查下面的反汇编代码,我们看到一个引用 fileExistsAtPath ,我们知道它是从 NSFileManager 接口共享的方法。我们还看到引用 String "/Applications/Cydia.app" 的指令 addr x2, str.cstr._Applications_Cydia.app 。
Reversing this code portion until now, allows us to understand that application checks exist. Also this code portion lead us to understand that specific application checks exist regarding the Jailbreak detection. if the Cydia application is installed on the operating system is one method to indicate that the device is Jailbroken. We should also try to search for all possible strings in the target application in order to have all the paths and URLs that we further try to examine if they are used to identify if the deviced is Jailbroken.
到目前为止,将此代码部分反转,可以让我们了解应用程序检查的存在。此外,此代码部分使我们了解存在有关越狱检测的特定应用程序检查。如果 Cydia 应用程序安装在操作系统上,则是一种指示设备已越狱的方法。我们还应该尝试在目标应用程序中搜索所有可能的字符串,以便获得所有路径和 URL,我们进一步尝试检查它们是否用于识别设备是否越狱。

Isolating the lines regarding the method Challenge1.isJailbroken we see all the possible paths used to identify if the device is Jailbroken. The following paths have been identified
隔离有关该方法 Challenge1.isJailbroken 的行,我们可以看到用于识别设备是否越狱的所有可能路径。已确定以下路径
- “/Applications/Cydia.app”
“/应用程序/Cydia.app” - “/bin/bash”
- “/Library/MobileSubstrate/MobileSubstrate.dylib”
“/库/MobileSubstrate/MobileSubstrate.dylib” - “/usr/sbin/sshd”
- “/etc/apt”
- “/private/etc/apt/sources.list.d_electra.list”
Now we are able to write a frida script to hook to the NSFileManager.fileExistsAtPath in order to manipulate the return values when checking the above list of paths.
现在,我们可以编写一个 frida 脚本来挂钩到 , NSFileManager.fileExistsAtPath 以便在检查上述路径列表时操作返回值。

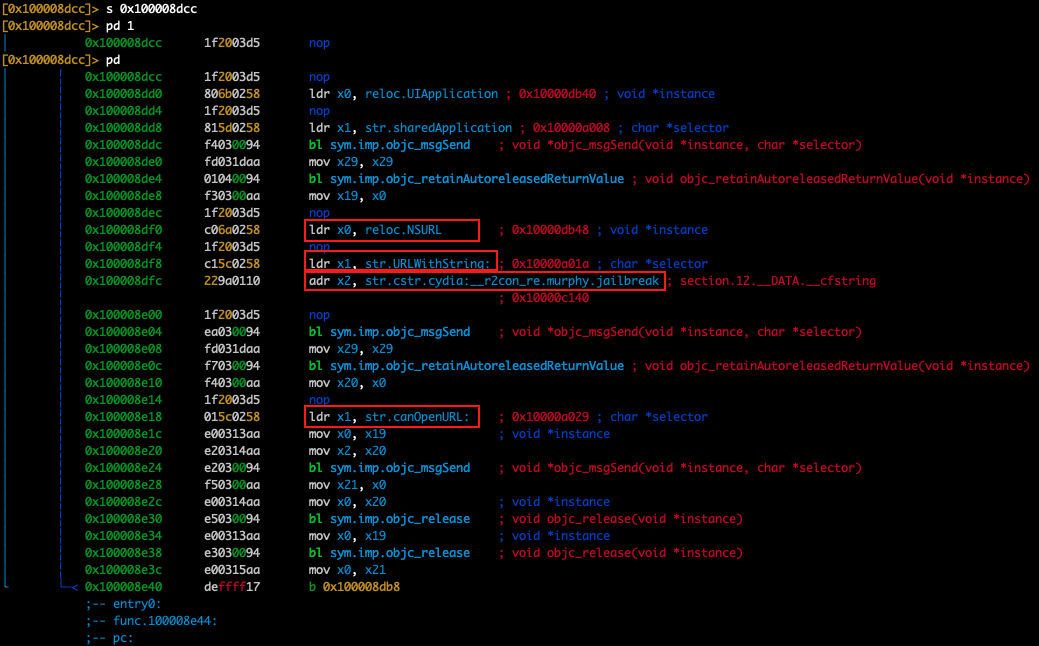
Apart from the previous paths mentioned before if we dig deeper we see that at 0x100008dcc the NSURL class is referenced which performs further checks using the URLWithString method that creates and returns an NSURL object initialized with a provided URL string. At this point we have identified the URL string cydia:__r2con_re.murphy.jailbreak which allows us to understand that the device is Jailbroken
除了前面提到的路径之外,如果我们深入挖掘,我们会看到 at 0x100008dcc 该 NSURL 类被引用,该 URLWithString 类使用创建并返回使用提供的 URL 字符串初始化的 NSURL 对象的方法执行进一步检查。此时,我们已经确定了URL字符串 cydia:__r2con_re.murphy.jailbreak ,这使我们能够了解设备已越狱
The following code snippet used to bypass this check.
以下代码片段用于绕过此检查。

Adding the previous scripts used to bypass Jailbreak detection to the bypasses.js script, we are able to bypass all the checks regarding the detected anti-debugging and anti-reversing techniques
将之前用于绕过越狱检测的脚本添加到脚本中 bypasses.js ,我们能够绕过有关检测到的反调试和反逆技术的所有检查

