
Earlier this year we made a RISC-V Emulator for Ox64 BL808 SBC. Every day we run it for testing the daily build of Apache NuttX RTOS, thanks to our customised TinyEMU RISC-V Emulator (not the small flightless bird)…
今年早些时候,我们为 Ox64 BL808 SBC 制作了 RISC-V 仿真器。我们每天都在运行它来测试 Apache NuttX RTOS 的日常构建,这要归功于我们定制的 TinyEMU RISC-V 模拟器(不是不会飞的小鸟)……
Now that NuttX supports Sophgo SG2000 SoC: Let’s create a similar emulator for Pine64 Oz64 SBC (pic above) and Milk-V Duo S…
现在 NuttX 支持 Sophgo SG2000 SoC:让我们为 Pine64 Oz64 SBC(上图)和 Milk-V Duo S 创建一个类似的模拟器……
-
We take TinyEMU Emulator for Ox64 BL808 SBC
我们采用适用于 Ox64 BL808 SBC 的 TinyEMU 仿真器 -
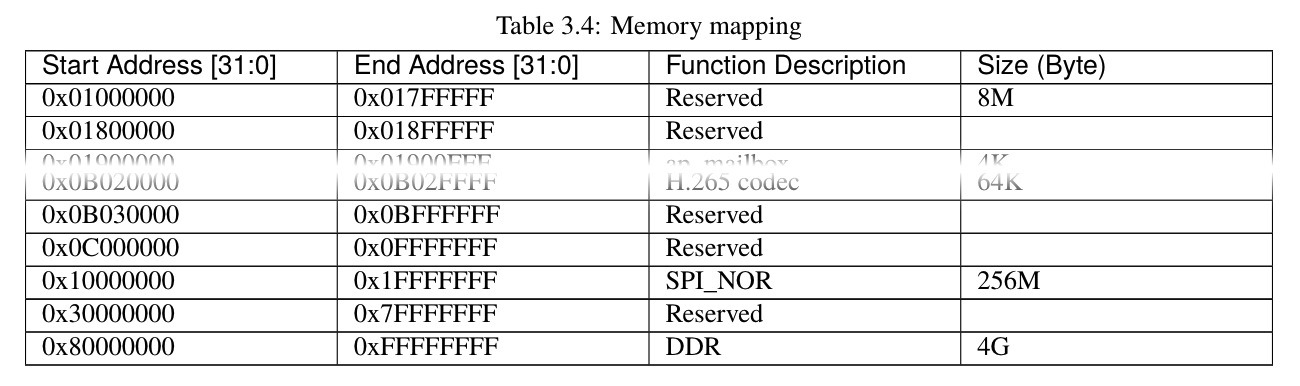
Update the RISC-V Memory Map to match Sophgo SG2000 SoC
更新 RISC-V 内存映射以匹配 Sophgo SG2000 SoC -
Fix the
auipcOverflow in TinyEMU Boot Code
修复TinyEMU开机代码溢出的问题auipc -
We emulate the 16550 UART Controller
我们仿真 16550 UART 控制器 -
By intercepting Reads and Writes to the UART I/O Registers
通过拦截对 UART I/O 寄存器的读取和写入 -
But TinyEMU supports only 32 Interrupts, we bump up to 64
但是 TinyEMU 只支持 32 个中断,我们增加到 64 个 -
Eventually we’ll emulate SG2000 Peripherals like GPIO
最终,我们将仿真 SG2000 外设,如 GPIO -
Right now it’s good enough for Daily Automated Testing of NuttX for SG2000
现在,它足以对 SG2000 的 NuttX 进行日常自动化测试
SG2000 Reference Manual (Page 17)
SG2000 参考手册(第 17 页)
§1 Update the Memory Map
§1 更新内存映射
We begin with the TinyEMU RISC-V Emulator for Ox64 BL808 SBC, and we tweak it for Sophgo SG2000 SoC.
我们从用于 Ox64 BL808 SBC 的 TinyEMU RISC-V 仿真器开始,然后针对 Sophgo SG2000 SoC 对其进行调整。
This is how we update the RISC-V Memory Map for SG2000: riscv_machine.c
以下是我们更新 SG2000 的 RISC-V 内存映射的方式:riscv_machine.c
// Base Addresss of System RAM, Core Local Interrupt Controller (unused)
// And Platform-Level Interrupt Controller
#define RAM_BASE_ADDR   0x80200000ul
#define CLINT_BASE_ADDR 0x74000000ul
#define PLIC_BASE_ADDR  0x70000000ul
(NuttX boots at 0x8020_0000)
(NuttX 靴子在 0x8020_0000 )
(Interrupt Controller is at 0x7000_0000)
(中断控制器位于 0x7000_0000 )
Then we build and run TinyEMU Emulator for SG2000…
然后我们构建并运行SG2000的TinyEMU仿真器…
## Build SG2000 Emulator for macOS
## For Linux: See https://github.com/lupyuen/nuttx-sg2000/blob/main/.github/workflows/sg2000-test.yml#L29-L45
cd $HOME
git clone https://github.com/lupyuen2/sg2000-emulator
cd sg2000-emulator
make \
  CFLAGS="-I$(brew --prefix)/opt/openssl/include -I$(brew --prefix)/opt/sdl2/include" \
  LDFLAGS="-L$(brew --prefix)/opt/openssl/lib -L$(brew --prefix)/opt/sdl2/lib" \
  CONFIG_MACOS=y

## Build NuttX for SG2000
cd $HOME/nuttx
tools/configure.sh milkv_duos:nsh
make
## Omitted: Create the NuttX Image
## See https://lupyuen.codeberg.page/articles/sg2000#appendix-build-nuttx-for-sg2000

## Boot TinyEMU with NuttX for SG2000
## To Exit TinyEMU: Ctrl-A x
wget https://raw.githubusercontent.com/lupyuen/nuttx-sg2000/main/nuttx.cfg
$HOME/sg2000-emulator/temu nuttx.cfg
(nuttx.cfg points to the NuttX Image)
(nuttx.cfg 指向 NuttX 图像)
Something baffling appears…
莫名其妙的东西出现了……

§2 auipc Overflow in Boot Code
§2 auipc 引导代码溢出
When we boot NuttX on TinyEMU, it crashes at a curious location (pic above)…
当我们在 TinyEMU 上启动 NuttX 时,它会在一个奇怪的位置崩溃(上图)……
$ sg2000-emulator/temu nuttx.cfg

TinyEMU Emulator for Sophgo SG2000 SoC
raise_exception2:
  cause=1
  tval= 0xffffffff_80200000
  pc=   0xffffffff_80200000

tinyemu:
  Illegal instruction, quitting
What just happened? 刚刚发生了什么?
Our Emulator tried to execute the code at MTVAL 0xffffffff_80200000. And crashed because it’s not a valid address!
我们的模拟器尝试在 MTVAL 0xffffffff_80200000 上执行代码。并崩溃,因为它不是一个有效的地址!
The Effy Address looks sus, it seems related to RAM Base Address: 0x80200000
Effy 地址看起来很可疑,它似乎与 RAM 基址有关:0x80200000
Our Emulator is booting the wrong address?
我们的模拟器启动错误的地址?
Apparently. We check the Original TinyEMU Boot Code: riscv_machine.c
显然地。我们检查原始的TinyEMU启动代码:riscv_machine.c
// Init the TinyEMU Boot Code
void copy_bios(...) {
  ...
  // `q` points to the Boot Code
  q = (uint32_t *)(ram_ptr + 0x1000);

  // Load `RAM_BASE_ADDR` into Register T0:
  // `auipc t0, RAM_BASE_ADDR`
  // `RAM_BASE_ADDR` is 0x80200000
  q[0] = 0x297 + RAM_BASE_ADDR - 0x1000;

  // Later: Jump to Register T0
To load the RAM Base Address into Register T0: TinyEMU tries to assemble this RISC-V Instruction (into our Boot Code)…
要将RAM基址加载到寄存器T0中:TinyEMU尝试将此RISC-V指令(组装到我们的引导代码中)…
auipc t0, 0x80200000
Maybe auipc has a problem?
也许auipc有问题?
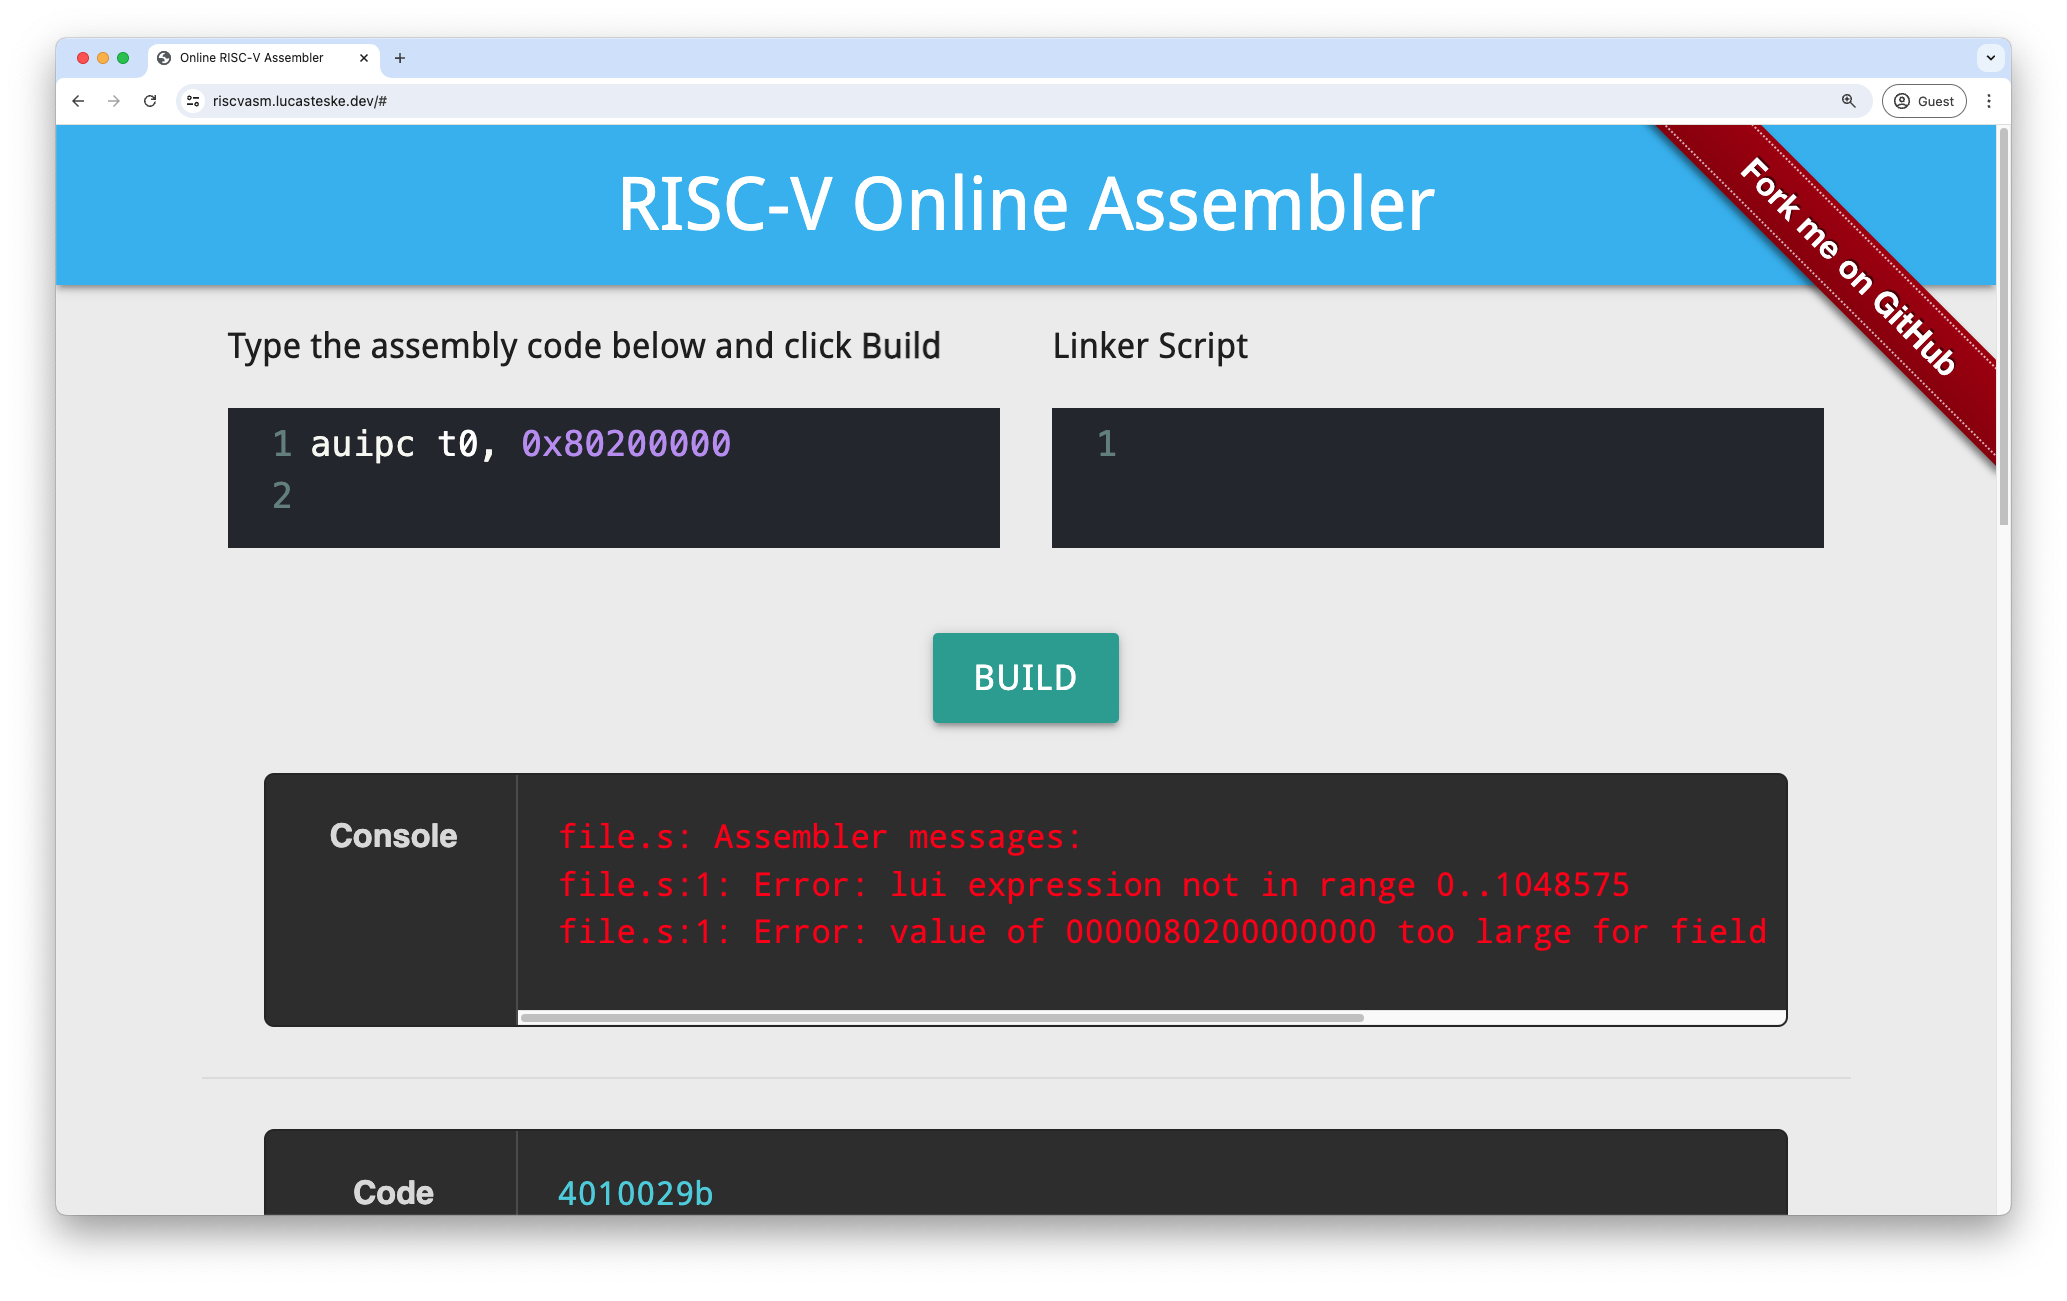
We verify with the RISC-V Online Assembler.
我们使用 RISC-V 在线汇编程序进行验证。
When we assemble the auipc instruction above, the Online Assembler fails with an error (pic below)…
当我们组装上面的 auipc 指令时,在线汇编程序失败并出现错误(如下图所示)……
Error: lui expression not in range 0..1048575
Error: value of 0000080200000000 too large
  for field of 4 bytes at 0000000000000000
Aha 0x8020_0000 is too big to assemble as an auipc Address!
啊哈0x8020_0000太大了,无法组装成地址 auipc !
But 0x8020_0000 is a perfectly valid address?
但是0x8020_0000是完全有效的地址呢?
Remember that RISC-V is a RISC Platform after all. Some operations won’t fit into 4 bytes of Machine Code.
请记住,RISC-V毕竟是一个RISC平台。某些操作不适合 4 字节的机器代码。
We upsize to 8 bytes of Machine Code…
我们将机器代码的大小增加到 8 字节…
§3 Change auipc to li in Boot Code
§3 auipc li 更改为启动代码
How else can we load 0x8020_0000 into Register T0?
我们还能如何将0x8020_0000加载到寄存器 T0 中?
Instead of aupic (which has size limits), we load our RAM Base Address with the li Instruction…
而不是 aupic (有大小限制),我们用 li 指令加载我们的 RAM 基址……
li t0, 0x80200000
When we feed the above into RISC-V Online Assembler, we see the resulting (8-byte) Machine Code…
当我们将上述内容输入RISC-V在线汇编程序时,我们会看到生成的(8字节)机器代码…
4010029b  addiw  t0, zero, 1025
01529293  slli   t0, t0,   0x15
That’s because li is a Pseudo-Instruction that expands into two RISC-V Instructions…
那是因为 li 是一个伪指令,它扩展为两个 RISC-V 指令……
-
addiw: Add zero to1025and store into T0
addiw:将1025零添加到 T0 并存储到 T0 中 -
slli: Shift-Left T0 by0x15bits
slli:左移 T0 位0x15 -
Producing:
1025<<0x15=0x8020_0000
生产:1025<<0x15=0x8020_0000
Thus we copy the above Machine Code into our TinyEMU Boot Code: riscv_machine.c
因此,我们将上述机器代码复制到我们的 TinyEMU 启动代码中:riscv_machine.c
// Init the TinyEMU Boot Code
void copy_bios(...) {
  ...
  // Load `RAM_BASE_ADDR` into Register T0:
  // `li  t0, 0x80200000`
  // Which is assembled as...
  q[pc++] = 0x4010029b;  // addiw t0, zero, 1025
  q[pc++] = 0x01529293;  // slli  t0, t0,   0x15

  // TODO: Remove the hardcoding of 0x80200000
Our Emulator now boots NuttX correctly at 0x8020_0000!
我们的模拟器现在可以在 0x8020_0000 正确启动 NuttX!
So TinyEMU will jump directly to 0x8020_0000?
那么TinyEMU会直接跳到0x8020_0000吗?
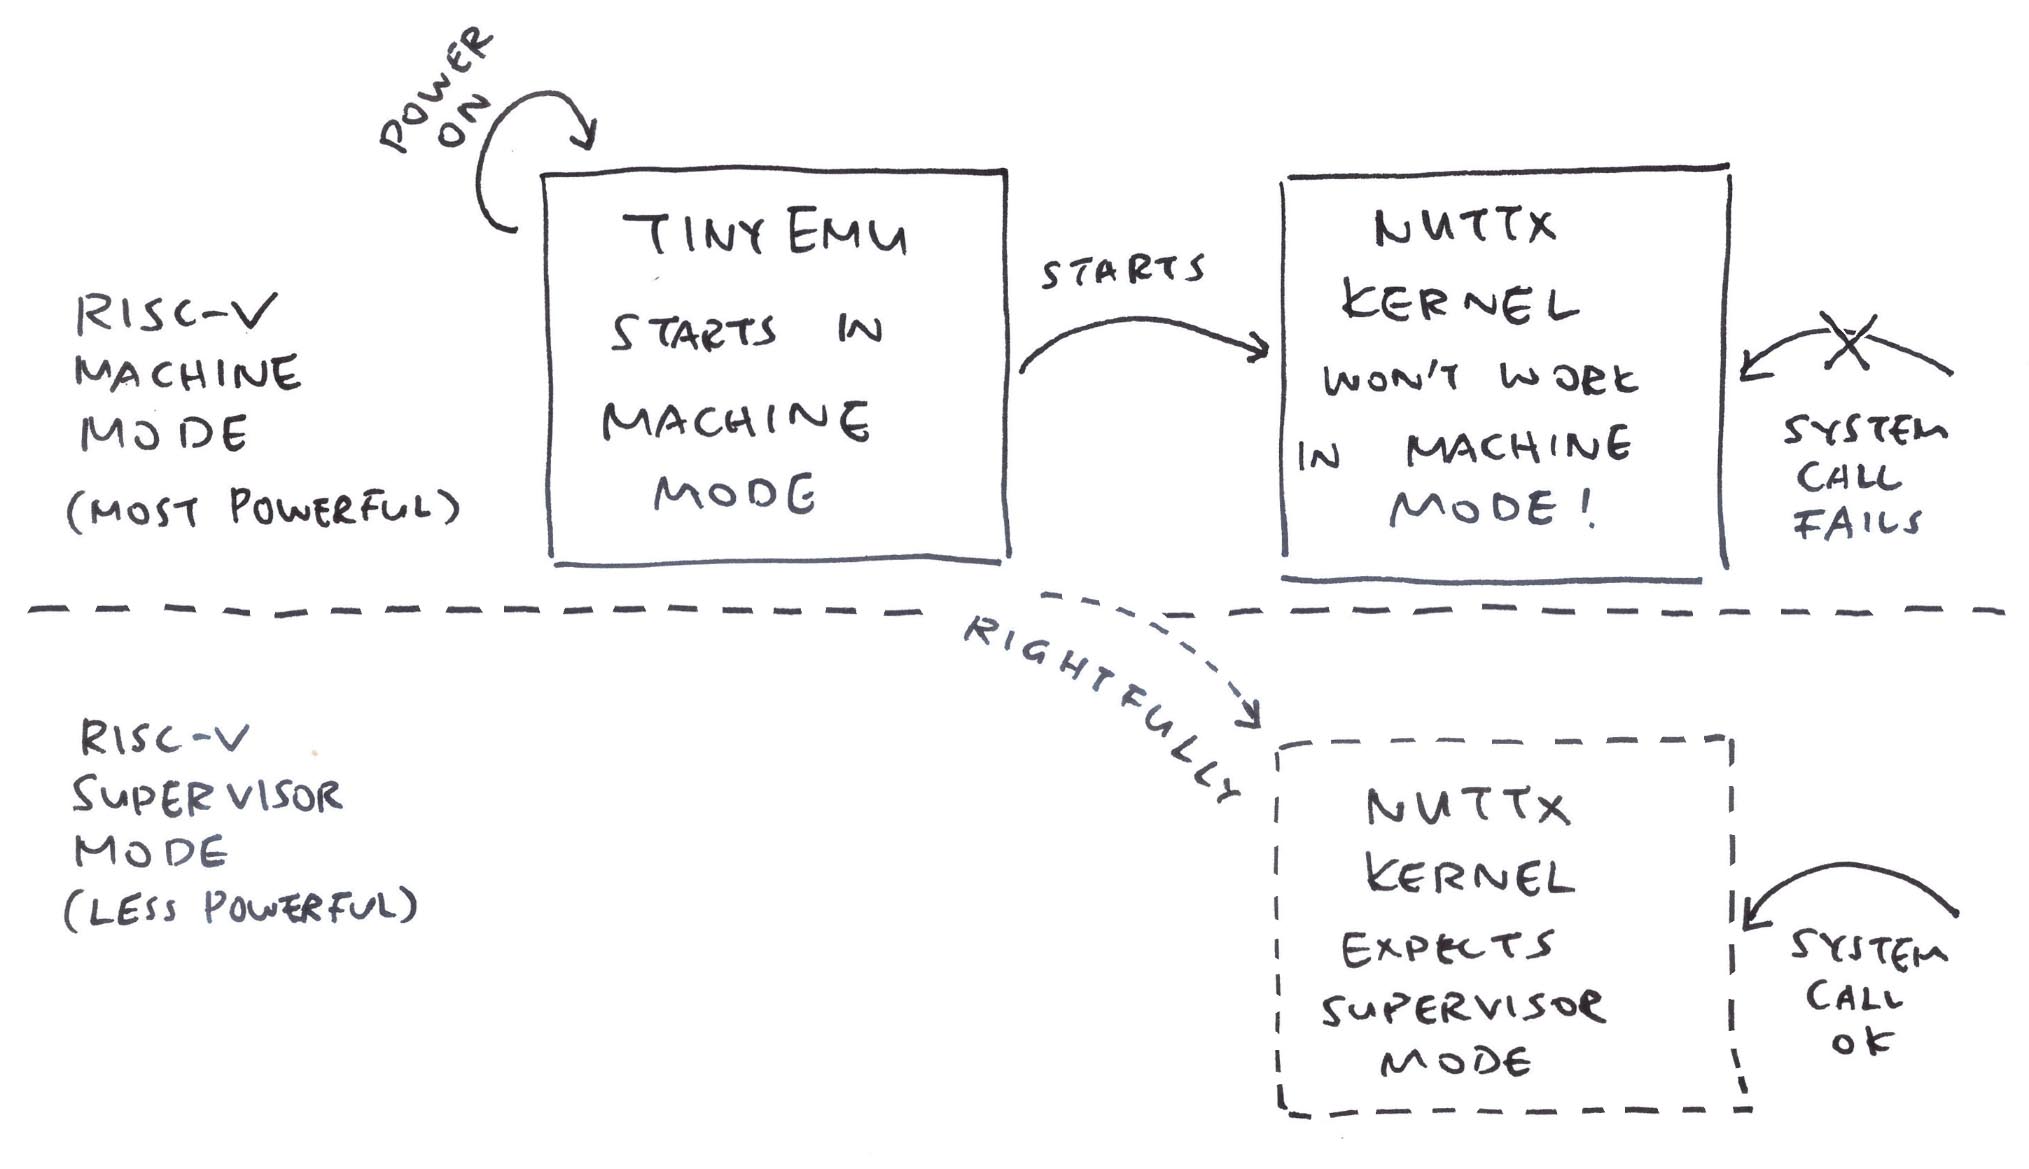
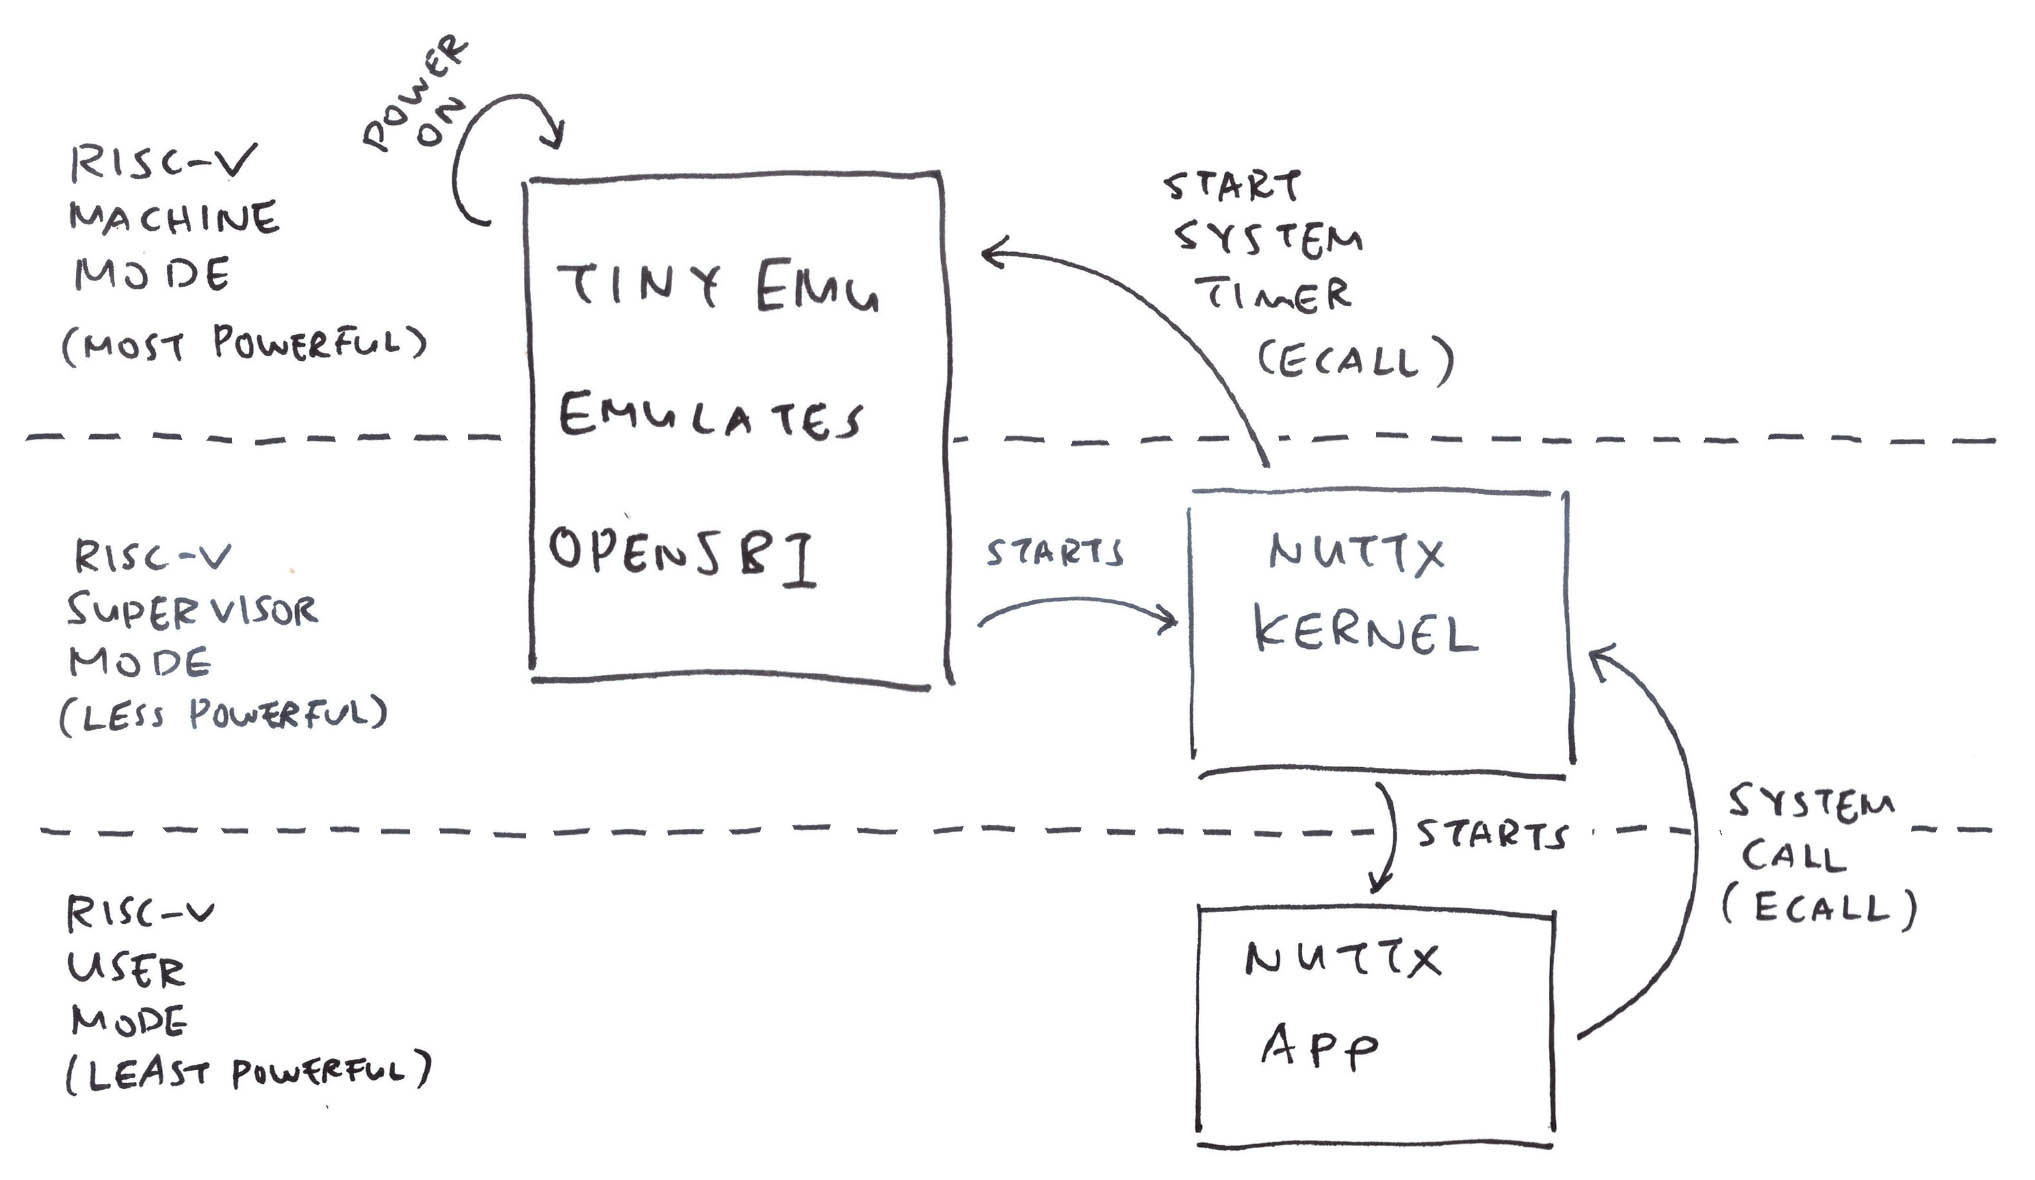
Not quite. TinyEMU boots in RISC-V Machine Mode, but NuttX expects to boot in RISC-V Supervisor Mode! (Pic above)
差一点。TinyEMU在RISC-V机器模式下启动,但NuttX希望在RISC-V管理引擎模式下启动!(上图)
That’s why we customised the TinyEMU Boot Code, so that it jumps from Machine Mode to Supervisor Mode via the MRET Instruction. (Pic below)
因此,我们定制了TinyEMU启动代码,以便它通过安瑞(MRET)指令从机器模式跳转到管理模式。(下图)
(Which will start NuttX at 0x8020_0000)
(这将在0x8020_0000启动 NuttX)
§4 Emulate the 16550 UART Controller
§4 模拟 16550 UART 控制器
Nothing appears when we boot NuttX?
当我们启动 NuttX 时,什么都没有出现?
$ sg2000-emulator/temu nuttx.cfg

TinyEMU Emulator for Sophgo SG2000 SoC
[...crickets...]
That’s because we haven’t emulated the 16550 UART Controller in TinyEMU!
那是因为我们还没有在 TinyEMU 中模拟 16550 UART 控制器!
To figure out what’s needed, we refer to the 16550 UART Driver in NuttX: uart_16550.c
为了弄清楚需要什么,我们参考了 NuttX 中的 16550 UART 驱动程序:uart_16550.c
// To send one byte to UART Output...
void u16550_send(struct uart_dev_s *dev, int ch) {
  ...
  // We write the byte to the 16550 UART Register...
  u16550_serialout(
    priv,             // UART Device
    UART_THR_OFFSET,  // UART Register: Transmit Holding Register (THR)
    ch                // Byte to be sent
  );
}

// To check if the UART Transmit FIFO is ready...
bool u16550_txready(struct uart_dev_s *dev) {
  ...
  // We read the 16550 UART Register...
  return ((
    u16550_serialin(
      priv,            // UART Device
      UART_LSR_OFFSET  // UART Register: Line Status Register (LSR)
    ) & UART_LSR_THRE  // And check the THRE Bit (Transmit Holding Register Empty)
  ) != 0);
}
Which says that… 这说明…
-
UART_THR: Transmit Holding Register
UART_THR:传输保持寄存器Will receive the byte that NuttX is transmitting
将接收 NuttX 正在传输的字节 -
UART_LSR: Line Status Register
UART_LSR:线路状态寄存器Will be read by NuttX to check if the Transmit FIFO is Ready
将由 NuttX 读取以检查发送 FIFO 是否就绪 -
UART_LSR_THRE: Transmit Holding Register Empty
UART_LSR_THRE:发送保持寄存器为空This is the bit in UART_LSR that will indicate whether Transmit FIFO is Ready
这是UART_LSR中的位,用于指示发送FIFO是否就绪
Let’s fix this in TinyEMU…
让我们在 TinyEMU 中解决这个问题……
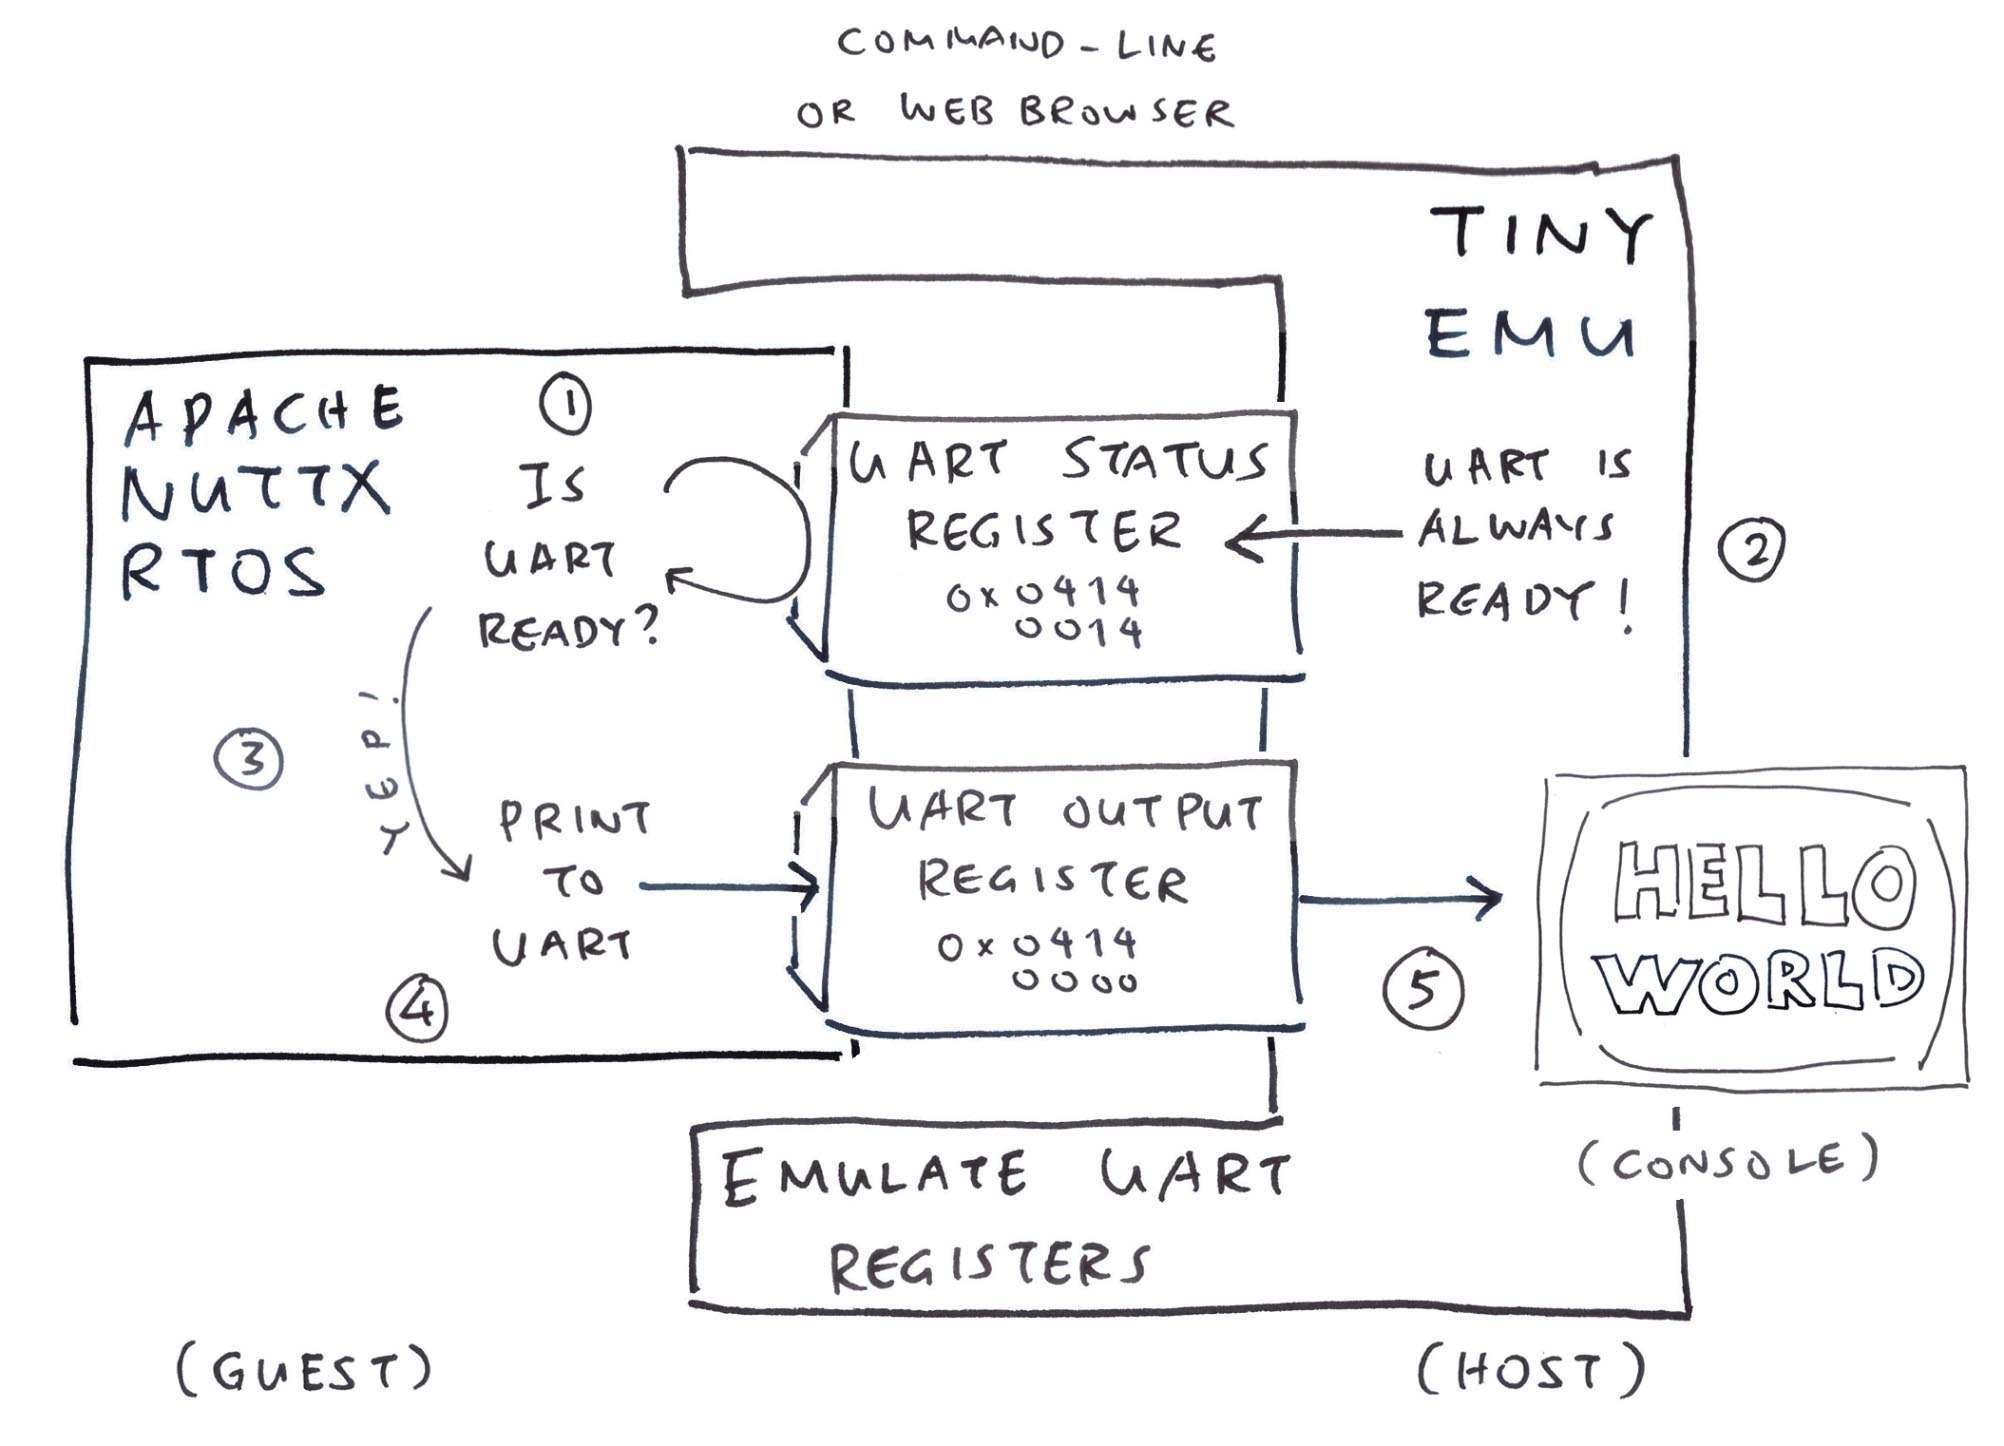
§5 Emulate the UART Output Registers
§5 仿真UART输出寄存器
How will we emulate the 16550 UART Registers in TinyEMU?
我们将如何在 TinyEMU 中模拟 16550 UART 寄存器?
When TinyEMU needs to Read or Write a Memory Address, it will call the functions below.
当TinyEMU需要读取或写入内存地址时,它将调用以下函数。
This is how we Intercept the Memory Writes to emulate the UART Output Register (Transmit Holding): riscv_cpu.c
这就是我们拦截存储器写入以模拟 UART 输出寄存器(发送保持)的方式:riscv_cpu.c
// TinyEMU calls this function to execute Memory Writes
int target_write_slow(...) {
  ...
  // If TinyEMU is writing to this address...
  switch(paddr) {

    // Address is UART Transmit Holding Register
    case UART0_BASE_ADDR + UART_THR_OFFSET:

      // Print the character that's written by NuttX
      char buf[1] = { val };
      print_console(NULL, buf, 1);
(UART Addresses are here)
(UART地址在这里)
And this is how we Intercept the Memory Reads to emulate the UART Status Register (Line Status): riscv_cpu.c
这就是我们拦截存储器读取以模拟 UART 状态寄存器(线路状态)的方式:riscv_cpu.c
// TinyEMU calls this function to execute Memory Reads
int target_read_slow(...) {
  ...
  // If TinyEMU is reading from this address...
  switch(paddr) {

    // Address is UART Line Status Register
    case UART0_BASE_ADDR + UART_LSR_OFFSET:

      // Always tell NuttX that
      // Transmit Holding Register is Empty
      ret = UART_LSR_THRE;

      // If UART Input is available:
      // Tell NuttX that Receive Data is Available
      if (read_input() != 0) {
        ret |= UART_LSR_DR;
      }
(UART Addresses are here)
(UART地址在这里)
(More about UART Input in a while)
(稍后会详细介绍 UART 输入)
What happens when we run this?
当我们运行它时会发生什么?
Now we see the NuttX Shell yay!
现在我们看到 NuttX Shell 耶!
$ sg2000-emulator/temu nuttx.cfg

TinyEMU Emulator for Sophgo SG2000 SoC
NuttShell (NSH) NuttX-12.5.1
nsh>
NuttX Shell won’t accept input, let’s fix it…
NuttX Shell 不接受输入,让我们修复它……
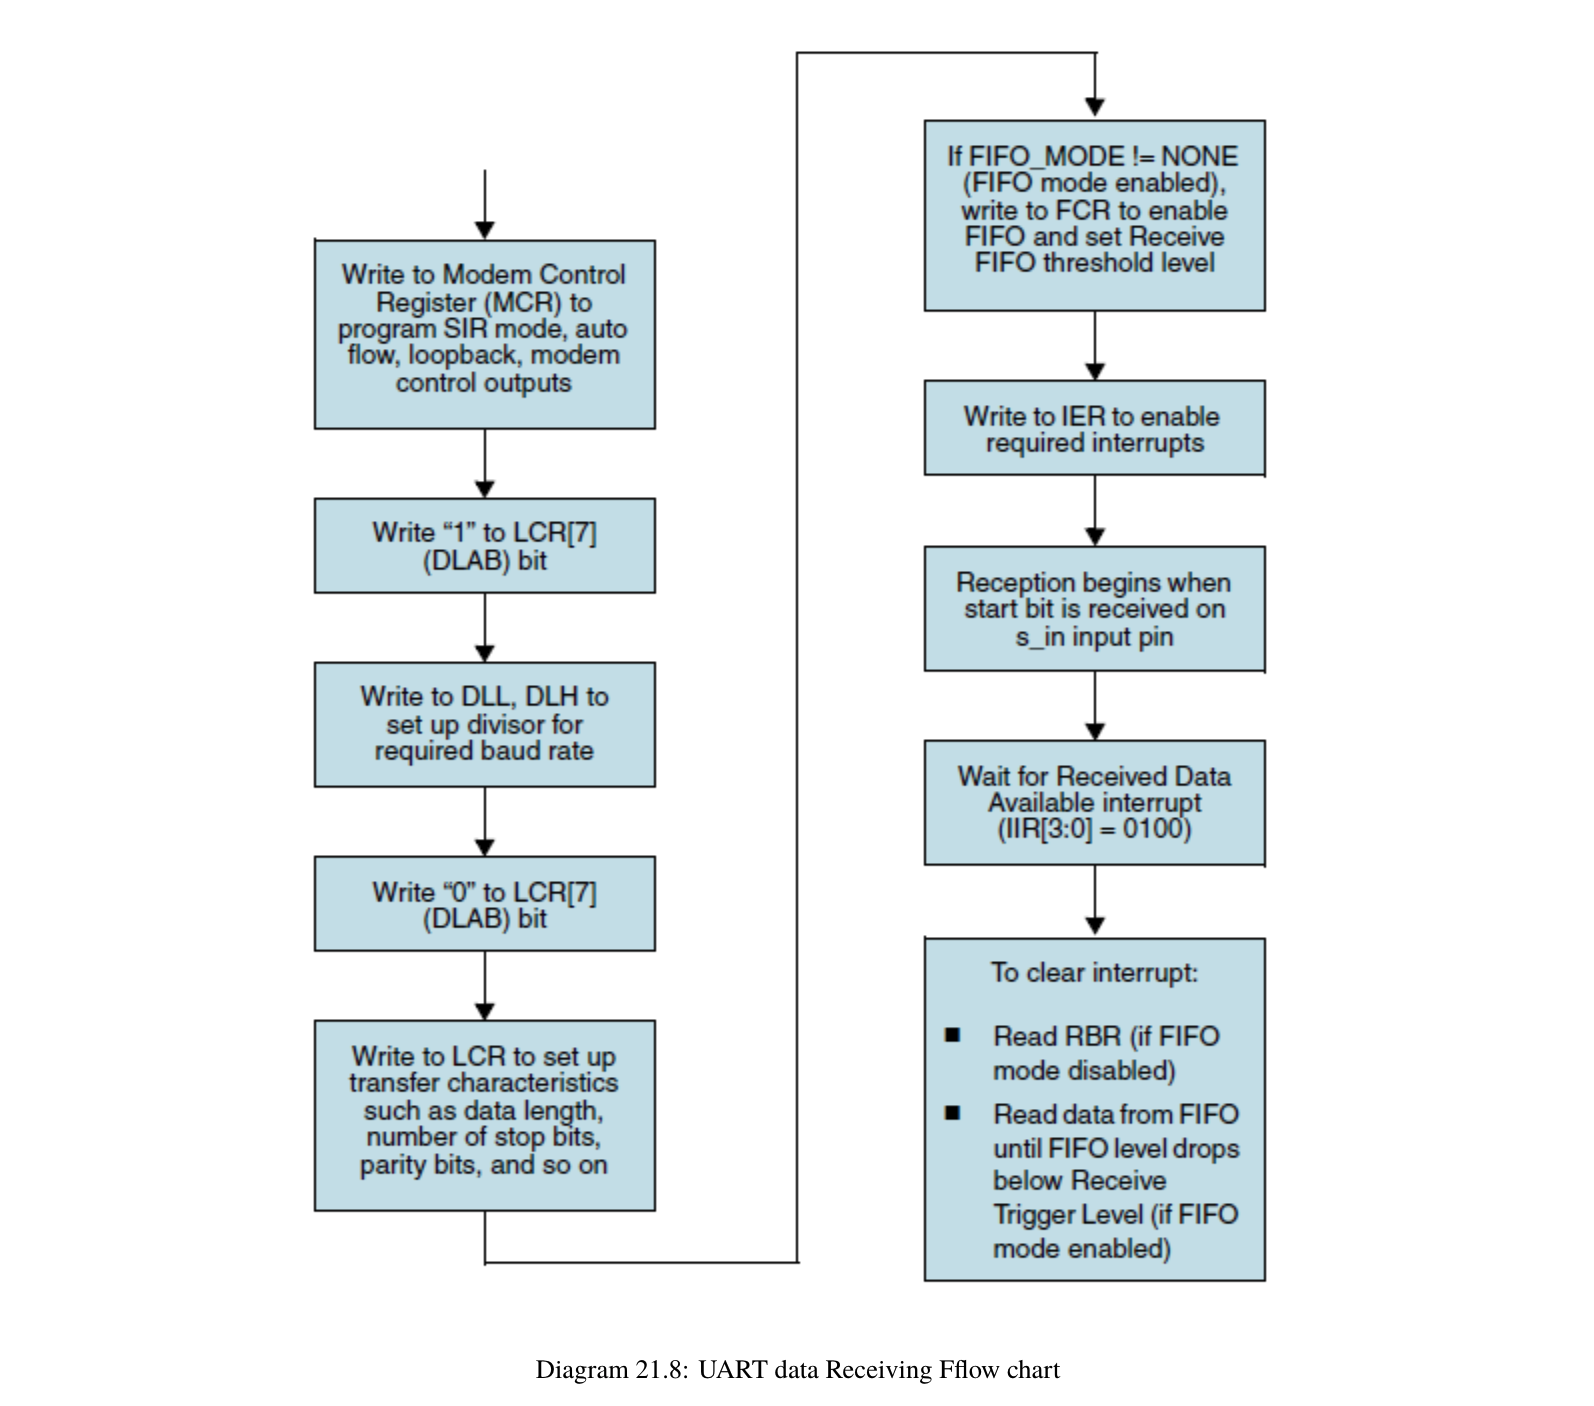
§6 Emulate the UART Input Registers
§6 仿真UART输入寄存器
What about UART Input? How to emulate the UART Registers?
UART输入呢?如何模拟UART寄存器?
Again we refer to the NuttX Driver for 16550 UART, to discover the inner workings of UART Input: uart_16550.c
我们再次参考 16550 UART 的 NuttX 驱动程序,以发现 UART 输入的内部工作原理:uart_16550.c
// NuttX Interrupt Handler for 16550 UART
int u16550_interrupt(int irq, FAR void *context, FAR void *arg) {
  ...
  // Loop until no characters to be transferred
  for (passes = 0; passes < 256; passes++) {

    // Get the current UART Status
    status = u16550_serialin(priv, UART_IIR_OFFSET);

    // If no Pending Interrupts, exit
    if ((status & UART_IIR_INTSTATUS) != 0) { break; }

    // Handle the UART Interrupt
    switch (status & UART_IIR_INTID_MASK) {

      // If UART Input is available,
      // receive the Input Data
      case UART_IIR_INTID_RDA:
        uart_recvchars(dev);
        break;
  ...
}

// Receive one character from UART.
// Called by the above Interrupt Handler.
int u16550_receive(struct uart_dev_s *dev, unsigned int *status) {
  ...
  // Return the Line Status and Receive Buffer
  *status = u16550_serialin(priv, UART_LSR_OFFSET);
  rbr     = u16550_serialin(priv, UART_RBR_OFFSET);
  return rbr;
}
Which says that (pic above)…
这说(上图)……
-
UART_IIR: Interrupt ID Register
UART_IIR:中断 ID 寄存器Should return INTID_RDA (data available)
应返回INTID_RDA(可用数据)Followed by IIR_INTSTATUS (no more data)
后跟 IIR_INTSTATUS(没有更多数据) -
UART_LSR: Line Status Register
UART_LSR:线路状态寄存器Should return LSR_DR (data available)
应返回LSR_DR(可用数据)Followed by 0 (no more data)
后跟 0(没有更多数据) -
UART_RBR: Receiver Buffer Register
UART_RBR:接收器缓冲寄存器Should return the UART Input Data
应返回 UART 输入数据
Thus we emulate the above UART Registers in TinyEMU: riscv_cpu.c
因此,我们在 TinyEMU 中模拟上述 UART 寄存器:riscv_cpu.c
// TinyEMU calls this function to execute Memory Reads
int target_read_slow(...) {
  ...
  // If TinyEMU is reading from this address...
  switch(paddr) {

    // Address is UART Interrupt ID Register
    case UART0_BASE_ADDR + UART_IIR_OFFSET:

      // If the Input Buffer is Empty:
      // Then Receive Data is NOT Available
      if (read_input() == 0) {
        ret = UART_IIR_INTSTATUS;
      } else {
        // Otherwise Receive Data is Available
        ret = UART_IIR_INTID_RDA;
      }
      break;

    // Address is UART Receive Buffer Register
    case UART0_BASE_ADDR + UART_RBR_OFFSET:

      // Return the Input Buffer
      ret = read_input();

      // Clear the Input Buffer and UART Interrupt
      set_input(0);
      virtio_ack_irq(NULL);
      break;
(virtio_ack_irq is here) (virtio_ack_irq在这里)
What about UART_LSR? (Line Status Register)
UART_LSR呢?(线路状态寄存器)
Check out our earlier implementation of target_read_slow.
查看我们之前的 target_read_slow 实现。
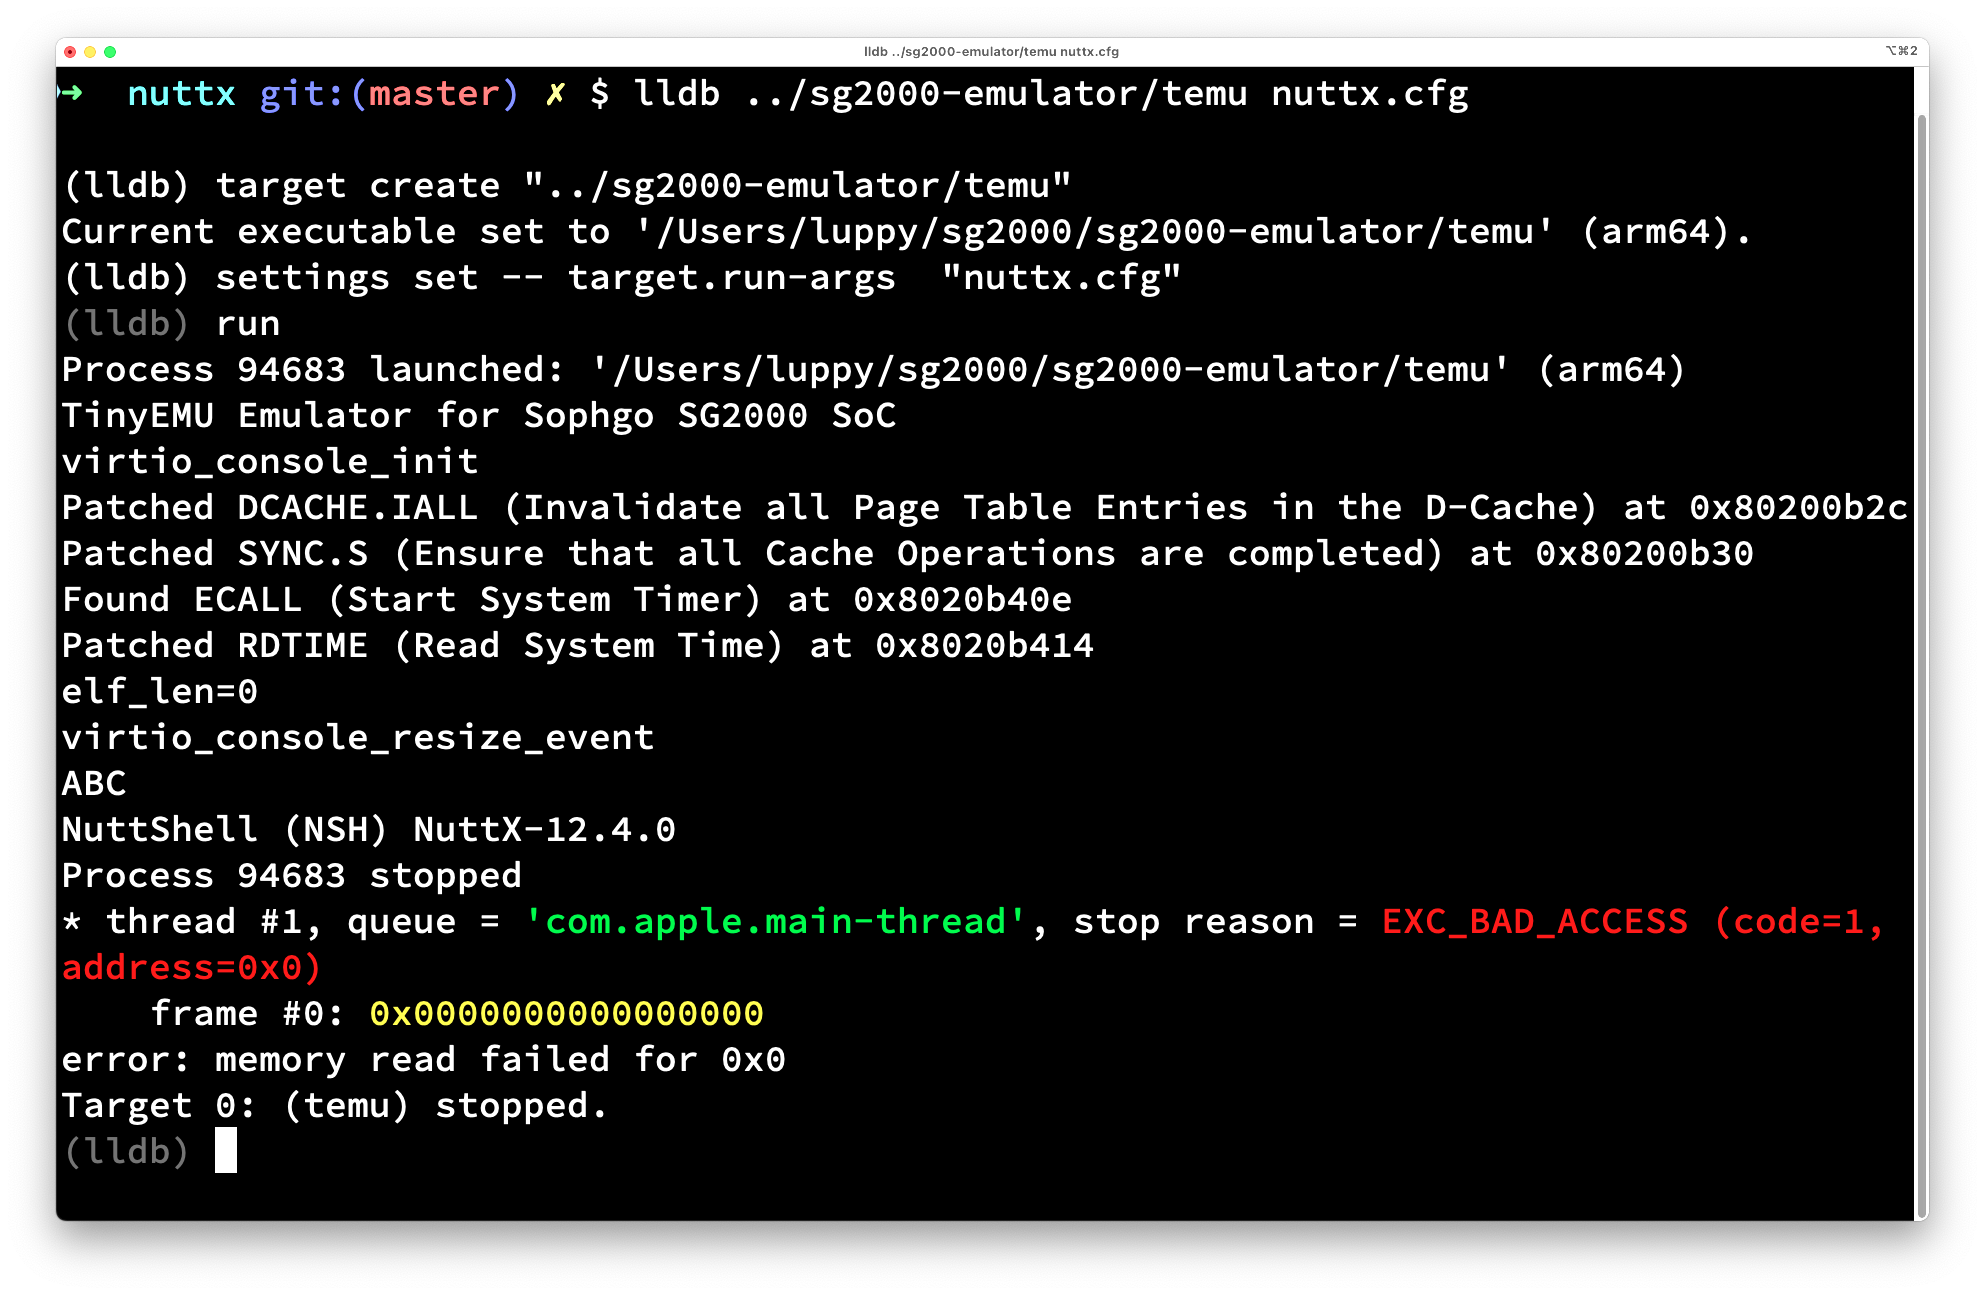
§7 UART Input triggers SegFault
§7 UART输入触发SegFault
So UART Input is all hunky dory?
所以 UART Input 都是笨拙的多莉?
Not quite. When we press a key: TinyEMU crashes with a Segmentation Fault (pic above)…
差一点。当我们按下一个键时:TinyEMU 因分段故障而崩溃(上图)…
$ sg2000-emulator/temu nuttx.cfg

NuttShell (NSH) NuttX-12.5.1
nsh>
[1] segmentation fault
Maybe we got the Wrong Interrupt Number?
也许我们得到了错误的中断号码?
We check our NuttX Config for UART Interrupt: nsh/defconfig
我们检查 UART 中断的 NuttX 配置:nsh/defconfig
## NuttX IRQ for UART0 is 69
CONFIG_16550_UART0_IRQ=69
Which says… 其中说…
-
RISC-V IRQ is 69 – 25 = 44
RISC-V IRQ 为 69 – 25 = 44 -
Which matches the SG2000 Reference Manual (Page 13)…
与SG2000参考手册(第13页)相匹配…“3.1 Interrupt Subsystem”
“3.1 中断子系统”“Int #44: UART0” “国际 #44:UART0”
-
And matches the VirtIO IRQ in TinyEMU: riscv_machine.c
并与 TinyEMU 中的 VirtIO IRQ 匹配:riscv_machine.c// UART0 IRQ becomes VirtIO IRQ for TinyEMU #define VIRTIO_IRQ 44
Something seriously sinister is wrecking our rojak…
一些严重险恶的东西正在破坏我们的 rojak……
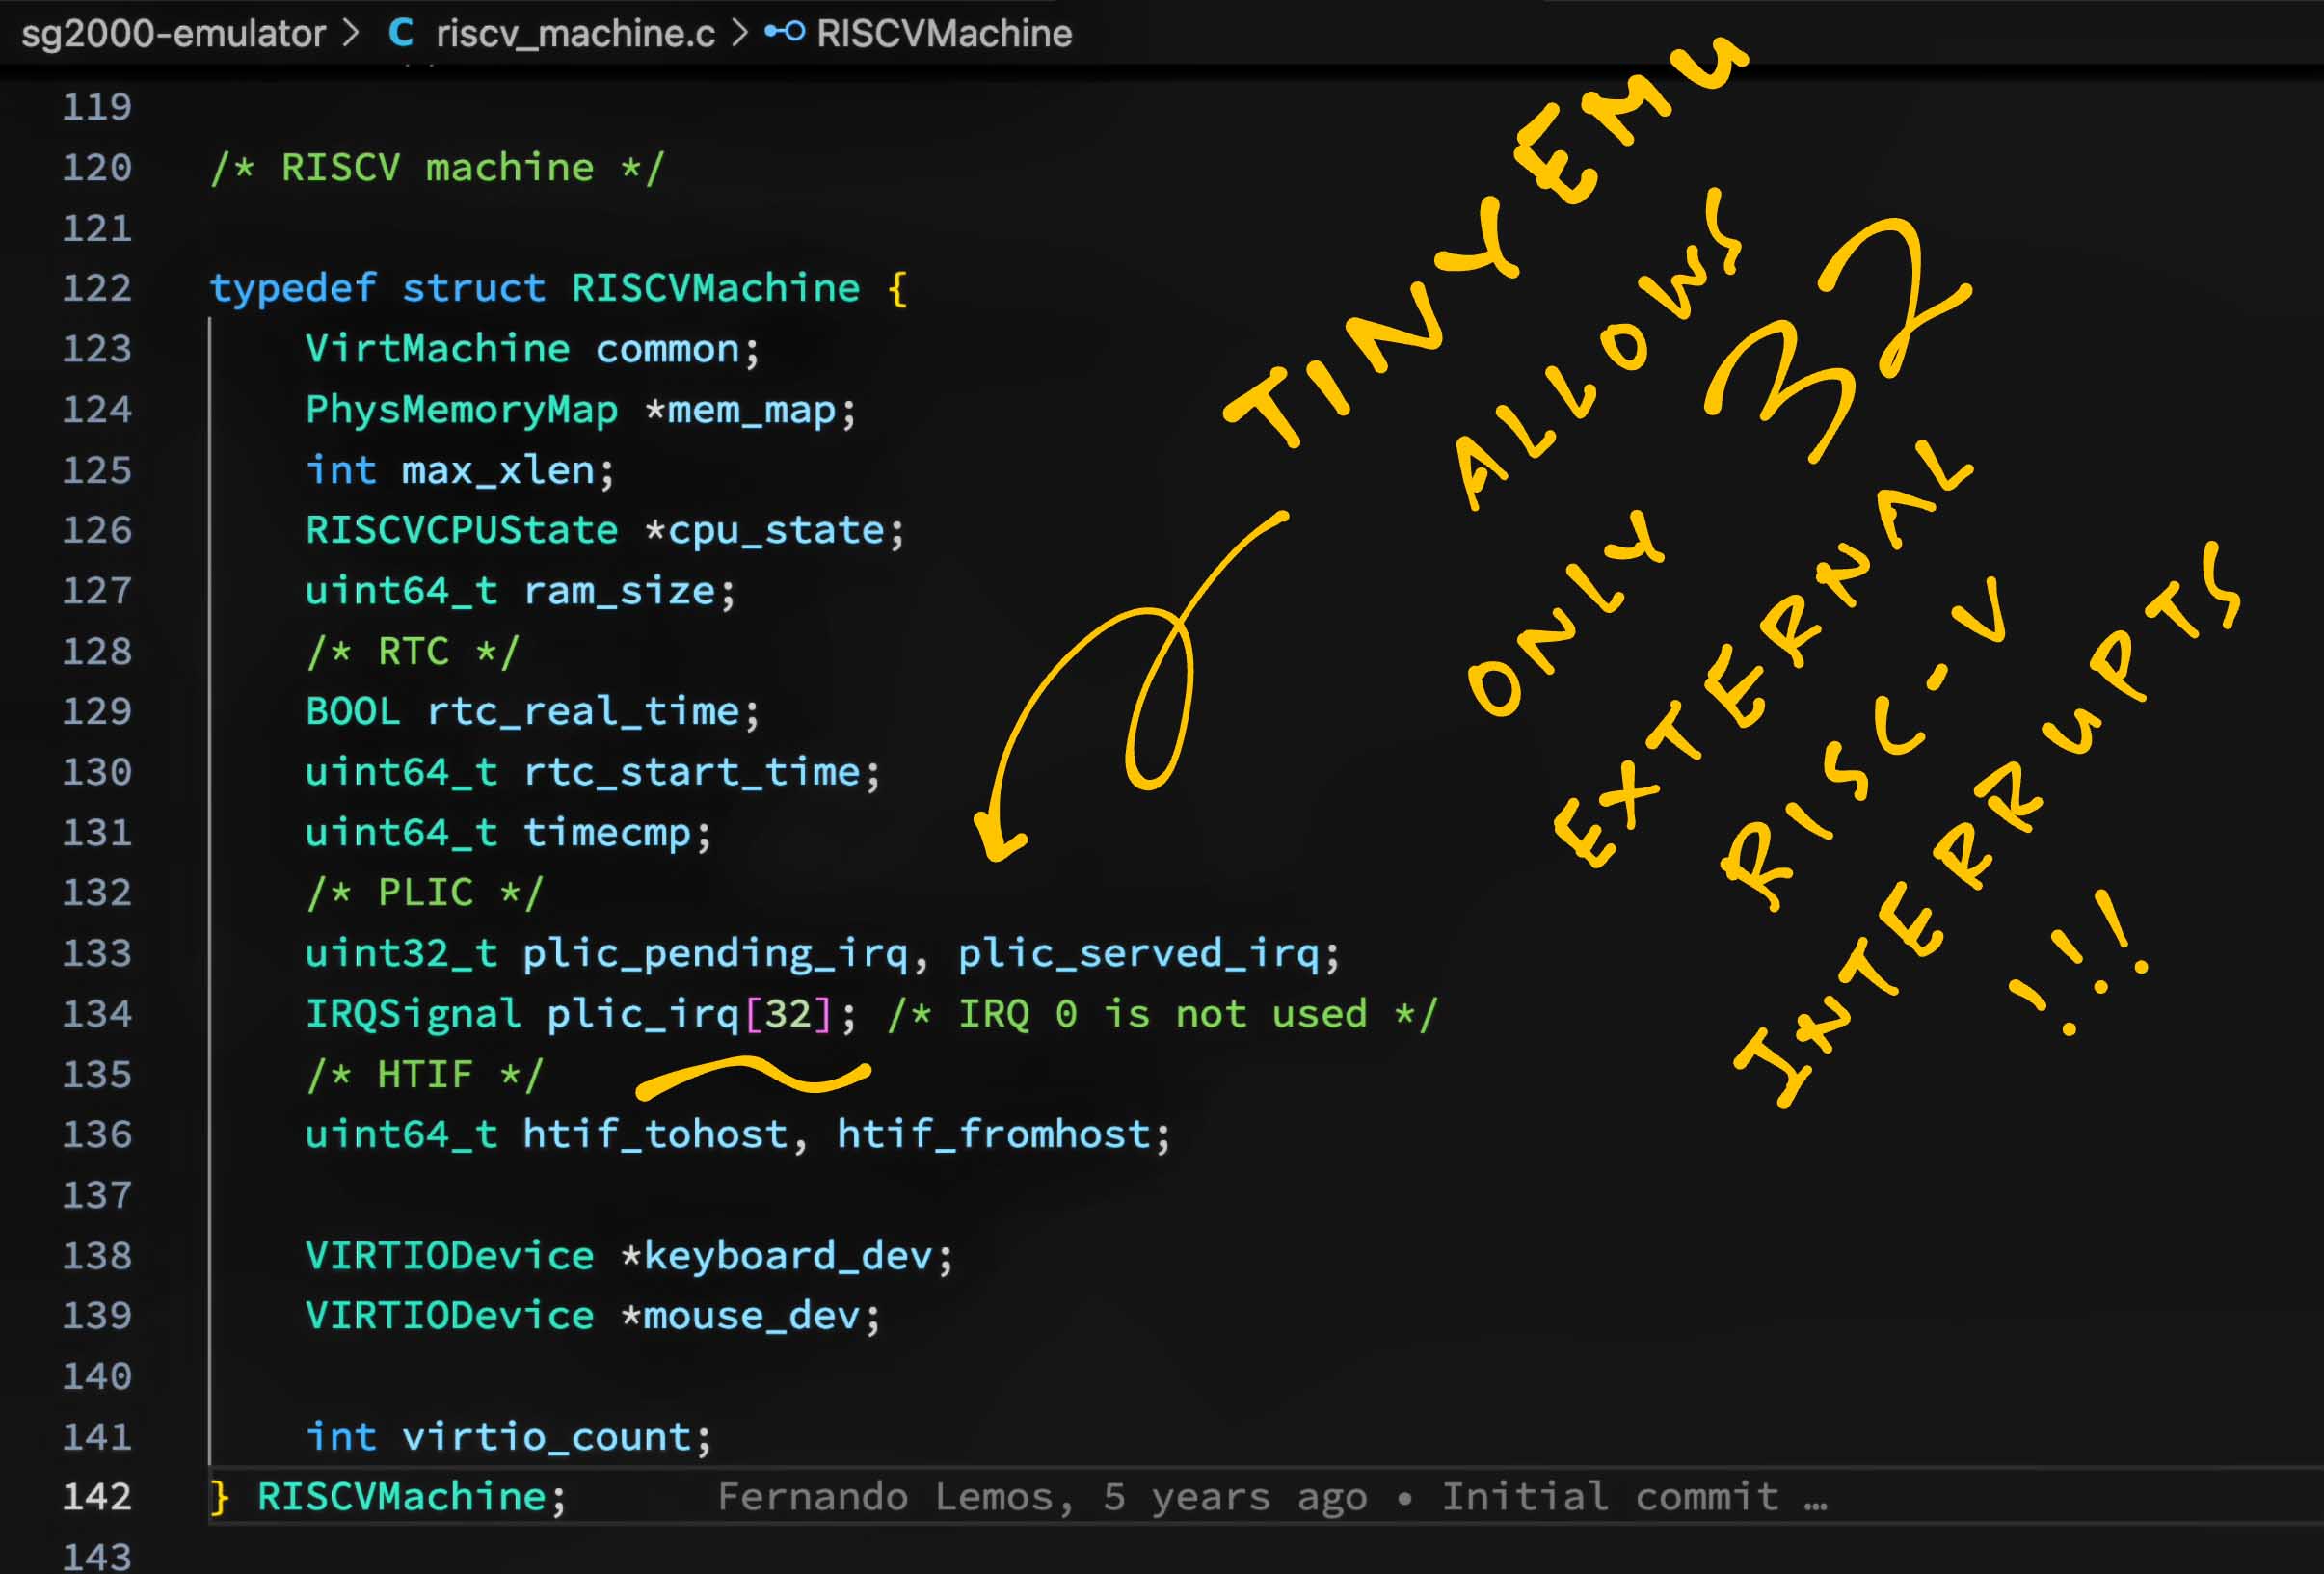
§8 Increase TinyEMU Interrupts to 64
§8 将 TinyEMU 中断次数增加到 64 次
After lots of headscratching: We discover that TinyEMU supports only 32 RISC-V External Interrupts. Which is too few for our UART Controller! (IRQ 44)
经过一番摸索:我们发现 TinyEMU 仅支持 32 个 RISC-V 外部中断。对于我们的UART控制器来说,这太少了!(IRQ 44)
Here’s the original definition in TinyEMU: riscv_machine.c
以下是 TinyEMU 中的原始定义:riscv_machine.c
// TinyEMU defines the RISC-V Virtual Machine
typedef struct RISCVMachine {
  ...
  // Platform-Level Interrupt Controller:
  // Only 32 External RISC-V Interrupts!
  uint32_t plic_pending_irq;  // 32 Pending Interrupts
  uint32_t plic_served_irq;   // 32 Served Interrupts
  IRQSignal plic_irq[32];     // 32 Interrupt Signals
  ...
} RISCVMachine;
Therefore we increase the number of TinyEMU Interrupts from 32 to 64…
因此,我们将 TinyEMU 中断的数量从 32 个增加到 64 个……
Finally NuttX Shell runs OK yay!
最后,NuttX Shell 运行正常,耶!
$ sg2000-emulator/temu nuttx.cfg

TinyEMU Emulator for Sophgo SG2000 SoC
virtio_console_init
Patched DCACHE.IALL (Invalidate all Page Table Entries in the D-Cache) at 0x80200a28
Patched SYNC.S (Ensure that all Cache Operations are completed) at 0x80200a2c
Found ECALL (Start System Timer) at 0x8020b2c6
Patched RDTIME (Read System Time) at 0x8020b2cc
elf_len=0
virtio_console_resize_event
ABC

NuttShell (NSH) NuttX-12.5.1
nsh> uname -a
NuttX 12.5.1 50fadb93f2 Jun 18 2024 09:20:31 risc-v milkv_duos
nsh>
(Complete Log is here) (完整日志在这里)
(OSTest works OK too) (OSTest 也可以正常工作)
(Why we Patch the Image)
(我们为什么要修补图像)
SG2000 Emulator seems slower than Ox64 BL808 Emulator?
SG2000 仿真器似乎比 Ox64 BL808 仿真器慢?
Yeah probably because SG2000 runs on MTIMER Frequency of 25 MHz.
是的,可能是因为 SG2000 在 25 MHz 的 MTIMER 频率上运行。
When we execute sleep 10, it completes in 25 seconds. We might need to adjust the TinyEMU System Timer.
当我们执行 sleep 10 时,它会在 25 秒内完成。我们可能需要调整 TinyEMU 系统计时器。
(CPU-bound Operations like getprime won’t have this timing delay)
(CPU 绑定操作不会 getprime 有此计时延迟)
§9 Emulate the SG2000 Peripherals
§9 模拟 SG2000 外设
Where’s the rest of our SG2000 Emulator?
SG2000仿真器的其余部分在哪里?
Yeah we need to emulate the SG2000 Peripherals: GPIO, I2C, SPI, …
是的,我们需要模拟 SG2000 外设:GPIO、I2C、SPI……
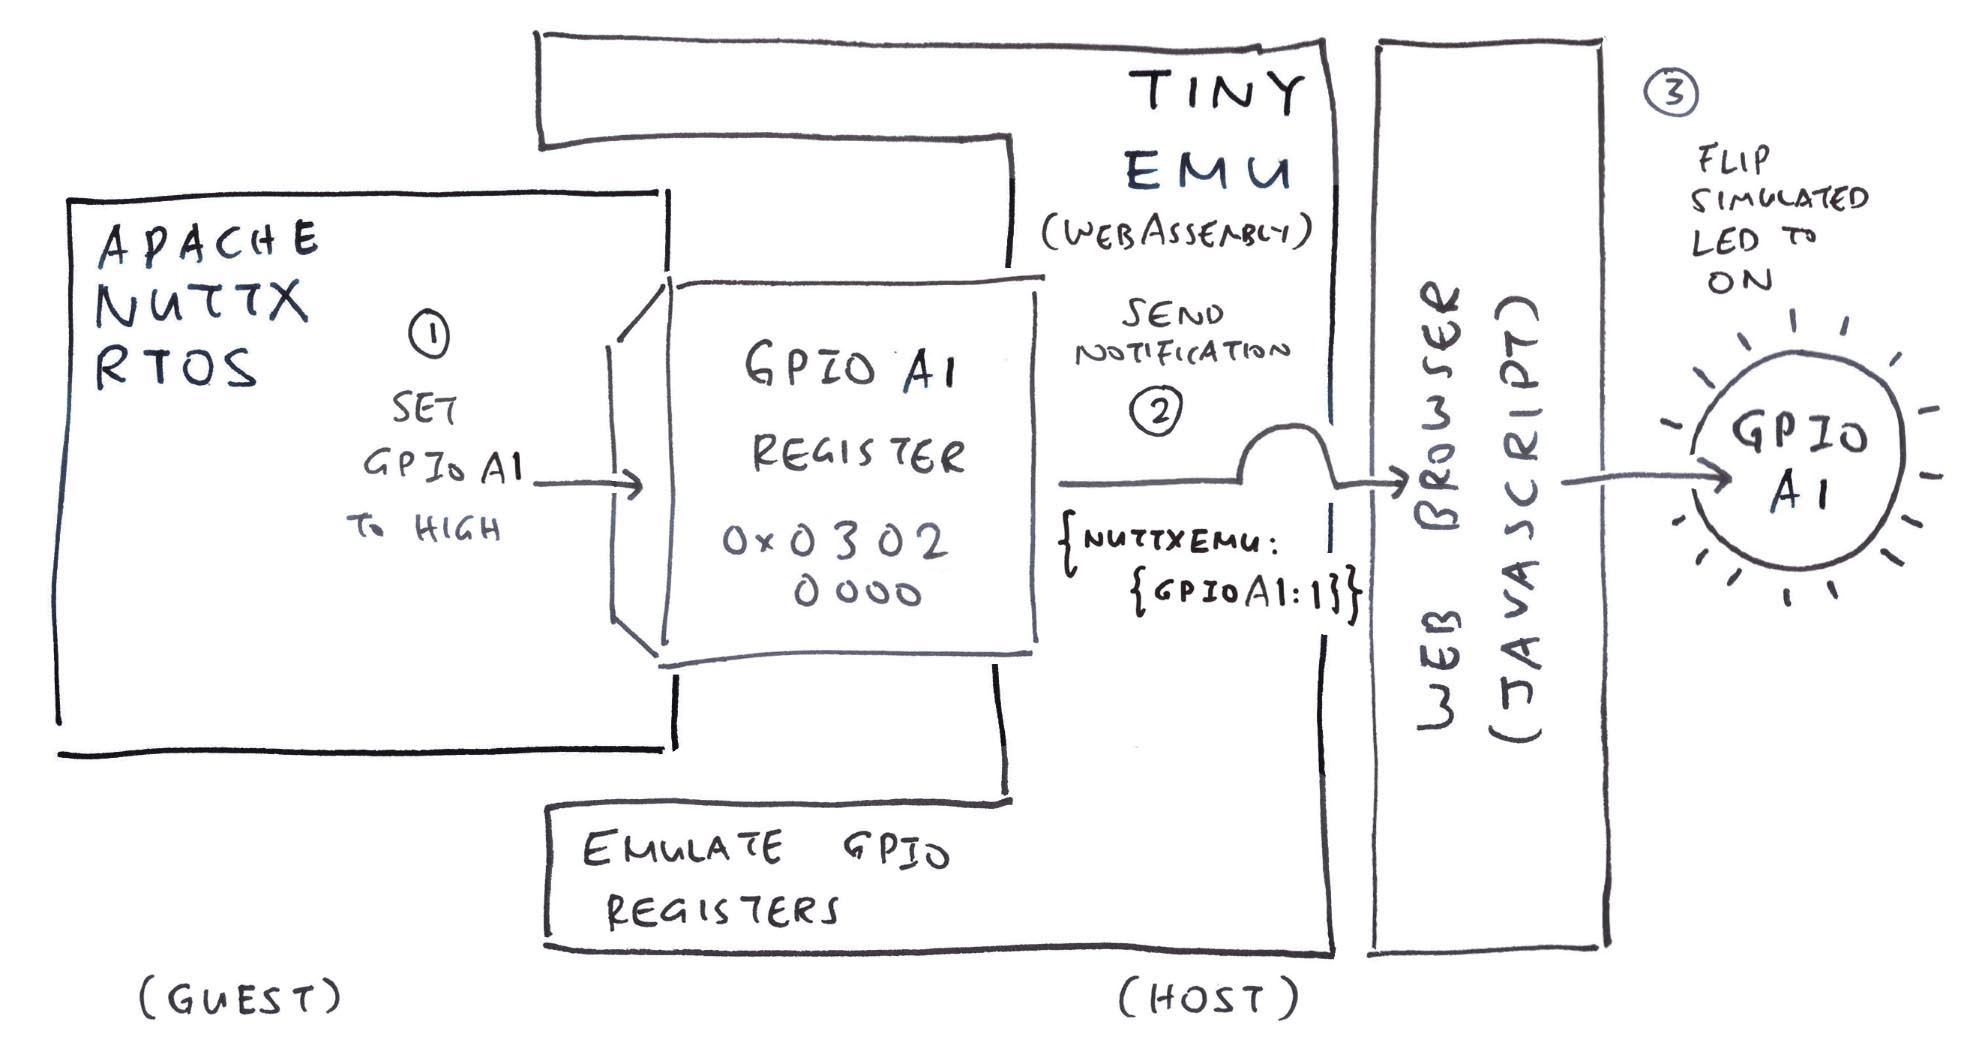
Based on the SG2000 Reference Manual (Page 721): We’ll probably emulate SG2000 GPIO Controller like this: riscv_cpu.c
根据 SG2000 参考手册(第 721 页):我们可能会像这样模拟 SG2000 GPIO 控制器: riscv_cpu.c
// TinyEMU calls this function to execute Memory Writes
int target_write_slow(...) {
  ...
  // If TinyEMU is writing to this address...
  switch(paddr) {

    // Address is GPIOA Base Address
    // with Offset 0 (GPIO_SWPORTA_DR)
    case 0x03020000:

      // Check if GPIOA1 is Off or On (Bit 1)
      // `val` is the value written by NuttX to 0x03020000
      const uint8_t gpio = 1;
      const uint32_t mask = (1 << gpio);
      const char b =
        ((val & mask) == 0)
        ? '0' : '1';

      // Send an Emulator Notification to the Console:
      // {"nuttxemu":{"gpioa1":1}}
      char notify[] = "{\"nuttxemu\":{\"gpioa1\":0}}\r\n";
      notify[strlen(notify) - 5] = b;
      print_console(NULL, notify, strlen(notify));
What’s this nuttxemu? 这是什么nuttxemu?
nuttxemu will be printed on the TinyEMU Console to notify the caller that GPIOA1 is set to On or Off.
nuttxemu 将打印在 TinyEMU 控制台上,以通知呼叫者 GPIOA1 设置为 On 或 Off。
When we run TinyEMU in a Web Browser (via WebAssembly), our Web Browser can intercept this notification and visualise a Simulated LED on GPIOA1. (Pic above)
当我们在 Web 浏览器中(通过 WebAssembly)运行 TinyEMU 时,我们的 Web 浏览器可以拦截此通知并在 GPIOA1 上可视化模拟 LED。(上图)
§10 Daily Automated Testing
§10 每日自动化测试
Why are we doing all this?
我们为什么要做这一切?
-
SG2000 Emulator will be helpful for testing NuttX Drivers and App, without a Real SBC
SG2000 仿真器将有助于测试 NuttX 驱动程序和应用程序,无需真正的 SBC -
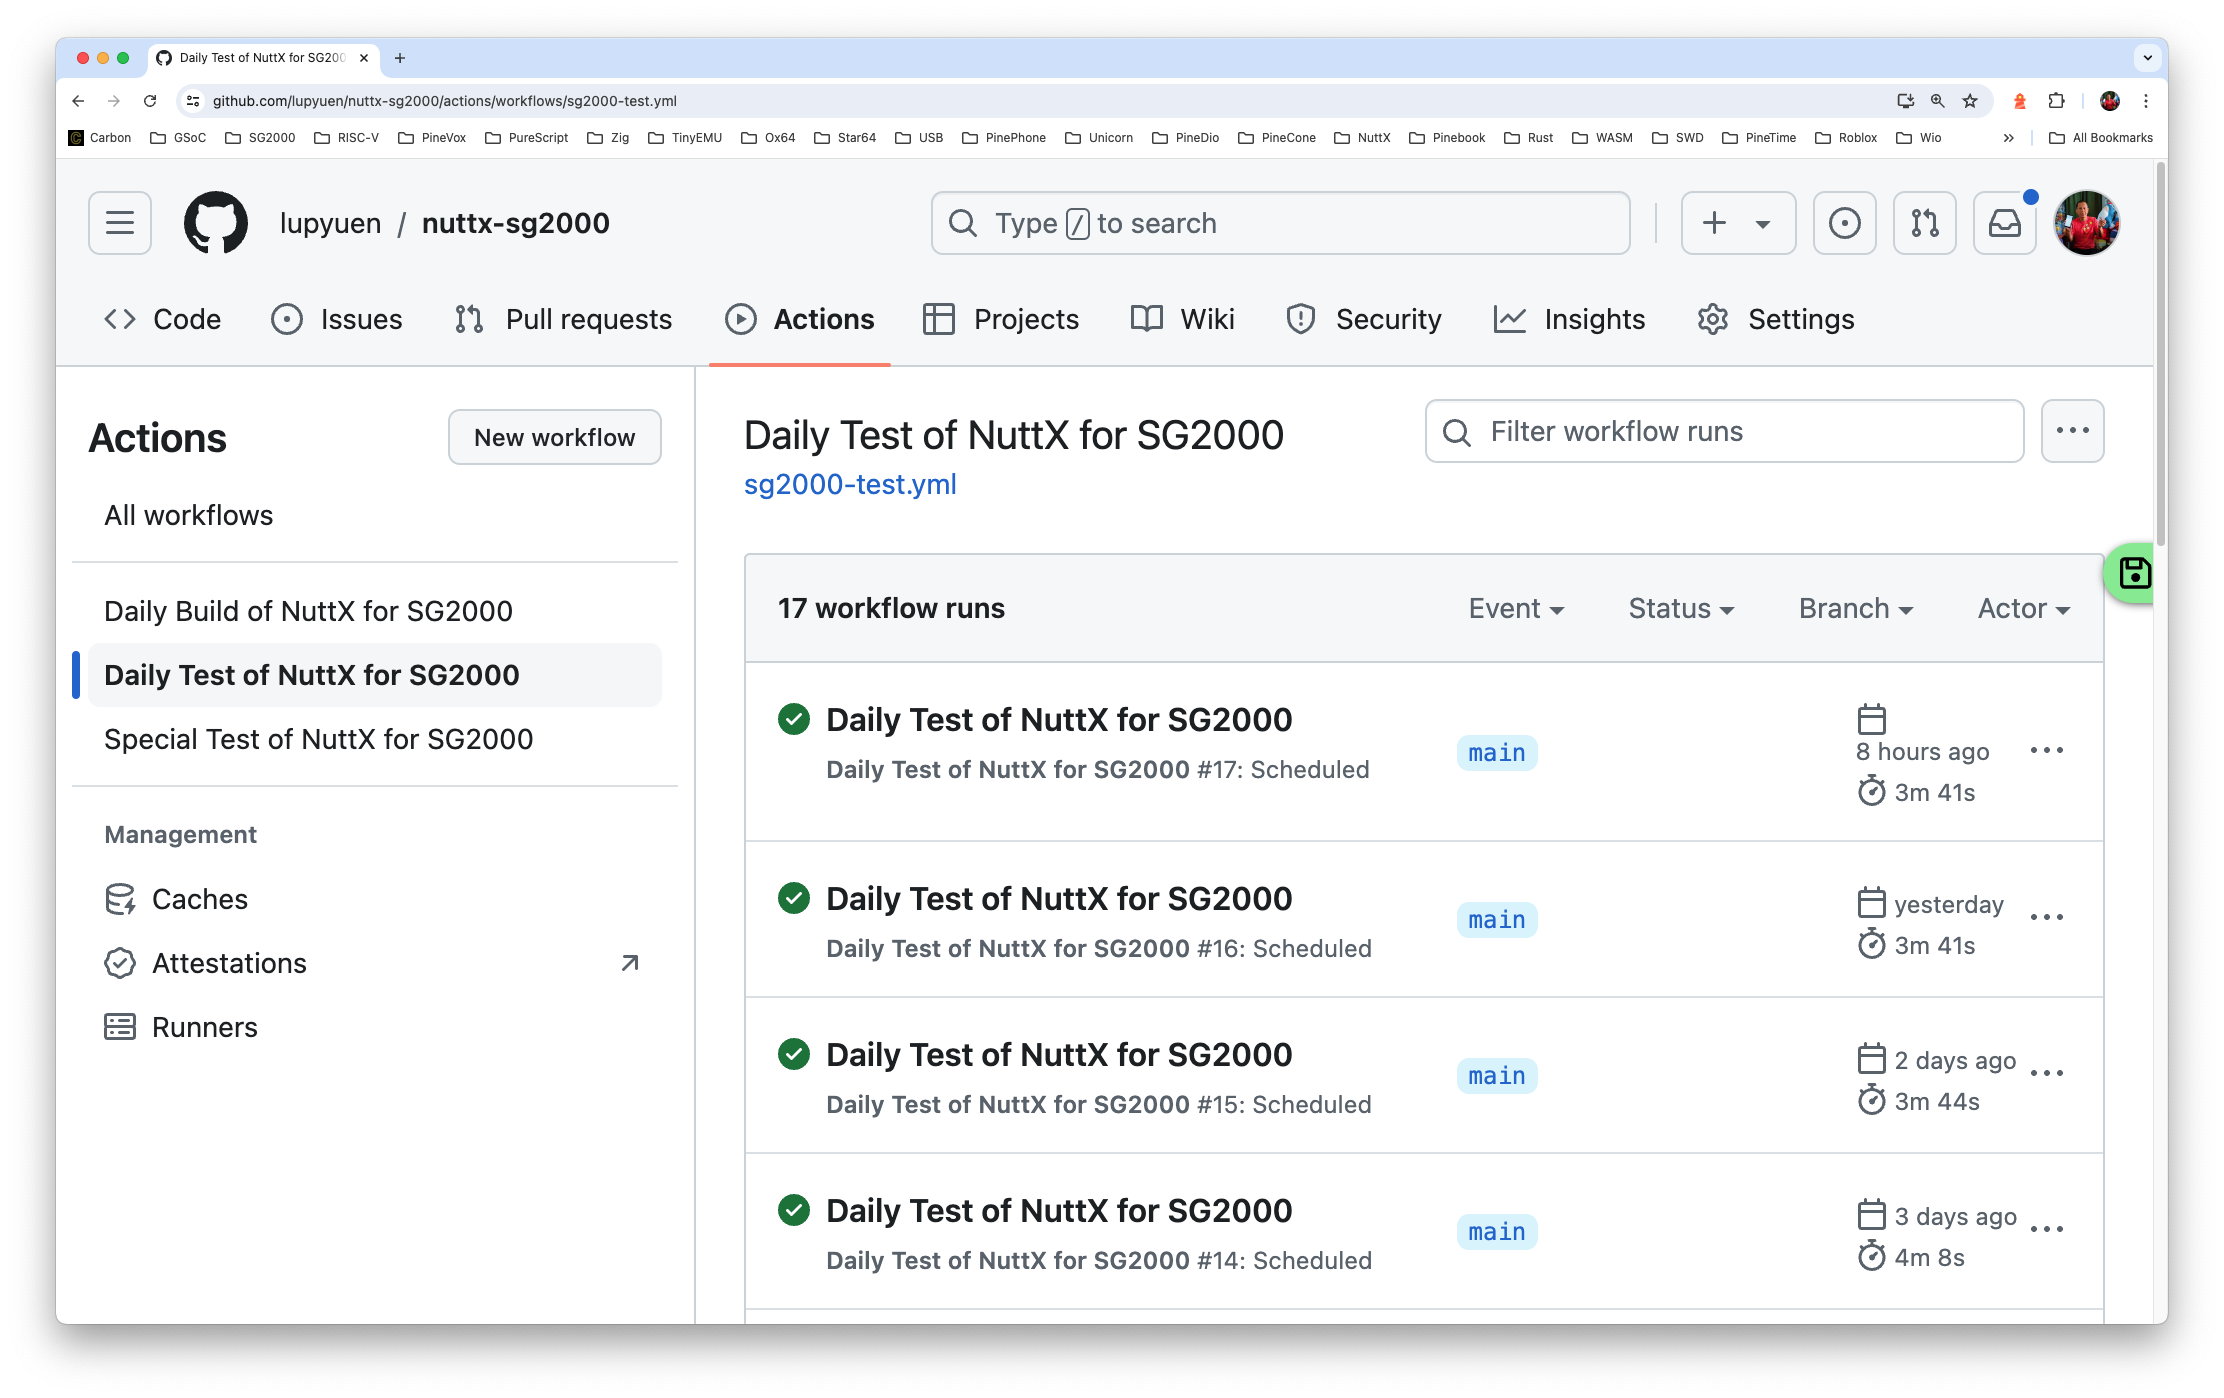
We’re running SG2000 Emulator for Daily Automated Testing at GitHub Actions (pic above): sg2000-test.yml
我们在 GitHub Actions 上运行用于日常自动化测试的 SG2000 模拟器(上图): sg2000-test.yml
## Build the SG2000 Emulator
git clone https://github.com/lupyuen2/sg2000-emulator
cd sg2000-emulator
make

## Download the NuttX Daily Build for SG2000
date=2024-07-04
repo=https://github.com/lupyuen/nuttx-sg2000
release=$repo/releases/download/nuttx-sg2000-$date
wget $release/Image
wget $release/nuttx.hash

## Download the NuttX Test Script
wget $repo/raw/main/nuttx.cfg
wget $repo/raw/main/nuttx.exp

## Run the NuttX Test Script
chmod +x nuttx.exp
./nuttx.exp
Which calls this Expect Script to execute OSTest (and verify that everything is hunky dory): nuttx.exp
它调用此 Expect 脚本来执行 OSTest(并验证一切都是笨拙的):nuttx.exp
#!/usr/bin/expect
## Expect Script for Testing NuttX with SG2000 Emulator

## Wait at most 300 seconds
set timeout 300

## For every 1 character sent, wait 0.01 milliseconds
set send_slow {1 0.01}

## Start the SG2000 Emulator
spawn ./temu nuttx.cfg

## Wait for the prompt and enter `uname -a`
expect "nsh> "
send -s "uname -a\r"

## Wait for the prompt and enter `ostest`
expect "nsh> "
send -s "ostest\r"

## Check the response...
expect {
  ## If we see this message, exit normally
  "ostest_main: Exiting with status 0" { exit 0 }

  ## If timeout, exit with an error
  timeout { exit 1 }
}
(See the Automated Test Log)
(请参阅自动测试日志)
What about QEMU Emulator?
QEMU 模拟器怎么样?
QEMU Emulator is way too complex to customise for SG2000. Instead we’re running QEMU Emulator for Daily Testing of NuttX QEMU.
QEMU 仿真器太复杂了,无法针对 SG2000 进行定制。取而代之的是,我们正在运行 QEMU 模拟器,用于 NuttX QEMU 的日常测试。
(Also based on GitHub Actions with Expect Scripting)
(也基于带有 Expect Scripting 的 GitHub Actions)
Isn’t it safer to run Daily Tests on a Real SG2000 SBC?
在真正的 SG2000 SBC 上运行每日测试不是更安全吗?
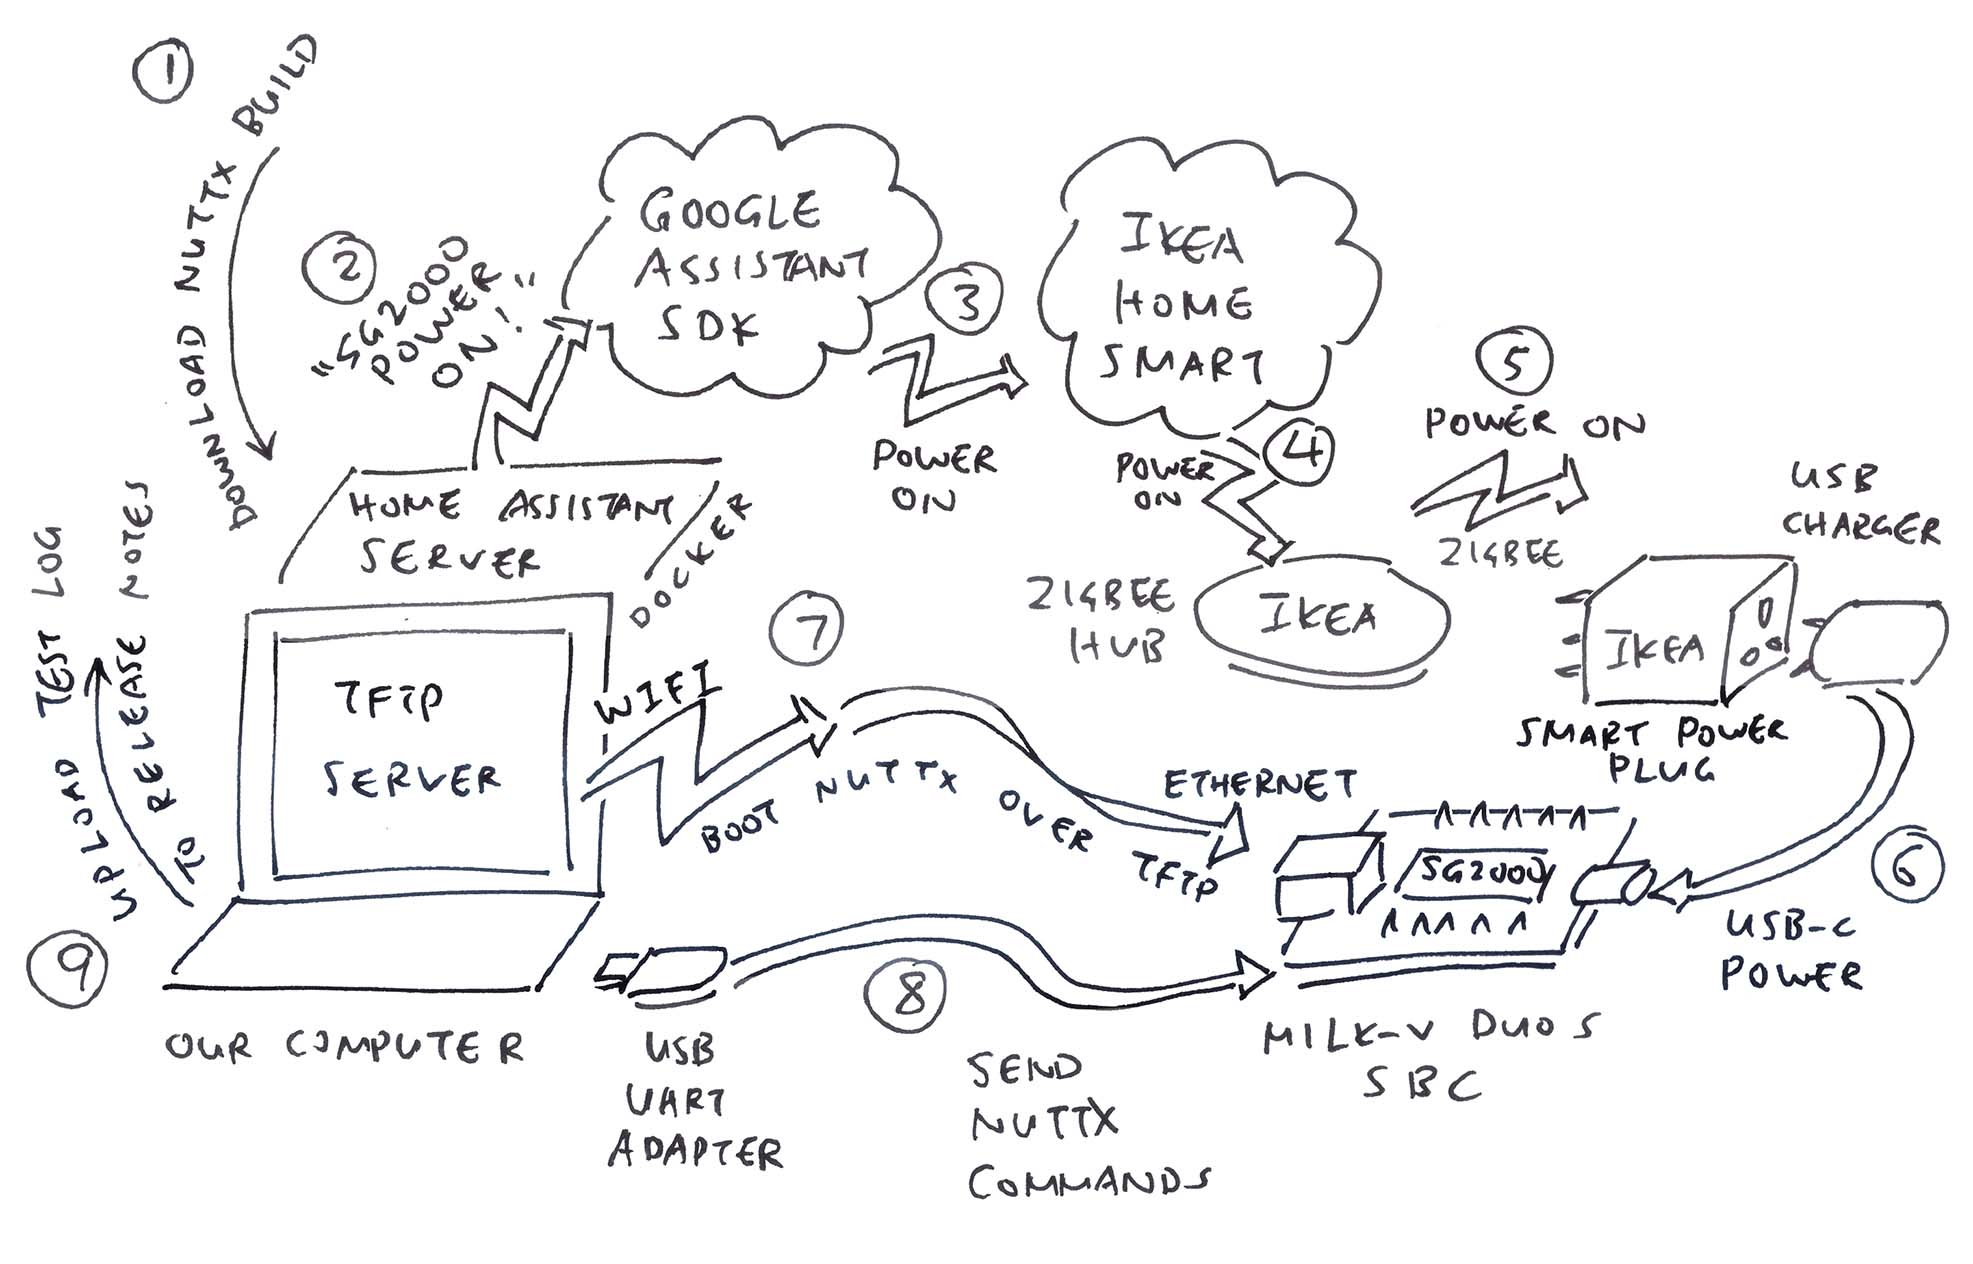
Oh yes we’re doing it too! (Pic below) Check out the article…
哦,是的,我们也在做!(下图)看看文章…
§11 What’s Next §11 下一步
Creating the SG2000 Emulator… Doesn’t look so hard?
正在创建 SG2000 仿真器…看起来没那么难?
Yeah I’m begging all RISC-V SoC Makers: Please provide a Software Emulator for your RISC-V SoC! 🙏
是的,我恳求所有 RISC-V SoC 制造商:请为您的 RISC-V SoC 提供软件仿真器!🙏
Just follow the steps in this article to create your RISC-V Emulator. Some SoC Peripherals might be missing, but a Barebones Emulator is still super helpful for porting, booting and testing any Operating System. 🙏 🙏 🙏
只需按照本文中的步骤创建您的 RISC-V 仿真器即可。某些 SoC 外设可能丢失,但准系统仿真器对于移植、启动和测试任何操作系统仍然非常有帮助。🙏 🙏 🙏
Many Thanks to my GitHub Sponsors (and the awesome NuttX Community) for supporting my work! This article wouldn’t have been possible without your support.
非常感谢我的 GitHub 赞助商(以及令人敬畏的 NuttX 社区)对我工作的支持!没有您的支持,本文是不可能完成的。
原文始发于lupyuen:RISC-V Emulator for Sophgo SG2000 SoC (Pine64 Oz64 / Milk-V Duo S)
转载请注明:RISC-V Emulator for Sophgo SG2000 SoC (Pine64 Oz64 / Milk-V Duo S) | CTF导航